Project FrankenBUFF Build Review
By Michael Benolkin
| Date of Review | October 2018 | Manufacturer | Multiple |
|---|---|---|---|
| Subject | Project FrankenBUFF | Scale | 1/72 |
| Kit Number | 72202 | Primary Media | Styrene |
| Pros | One way to an accurate B-52H | Cons | See text |
| Skill Level | Experienced | MSRP (USD) | I don't want to talk about it... |
Build Review
Project FrankenBUFF - Over the years, I've been collecting pieces/parts to convert the Monogram 1/72 B-52D Stratofortress kit into a modern B-52H. The AMT/ERTL/Italeri B-52H (when you can find one) has a few issues with the nose (and elsewhere) which have been addressed by the same aftermarket companies that also produce the conversions for the Monogram kit, but the AMT/ERTL kit is molded in a softer plastic that is sensitive to some glues and is soft enough to sag under its own weight over time. When Modelcollect announced the B-52G and B-52H kits, I pushed my conversion project to the back burner.
So imagine my disappointment when the Modelcollect B-52G finally arrived (which I had pre-ordered some six months ago) and it has serious accuracy problems. Since their G-model is way off the mark, I've abandoned the idea of waiting on their H-model release. Here I am with Monogram, AMT, and Modelcollect kits, and still no simple path to a decent B-52H, so now I am launching Project FrankenBUFF - bashing the best of these kits and conversions to render the recently updated H-model bomb truck.
To summarize the endgame, this model will represent one of the latest upgraded B-52H variants. The B-52G/H kits and aftermarket conversions leave off circa 1992. At that time, the aircraft still had their tailguns and gimbals installed, but as the aircraft went through upgrades at that time, the gun gimbal was removed, and the opening covered. As the JDAM family of smart weapons came online, the B-52Hs were modified again with new external bomb racks/pylons that supported the digital weapons bus which allowed each weapon to be programmed and released in-flight. One of the aftermarket companies has released these pylons and I'll put them to use. What is interesting is that with all of the photos showing B-52Hs over Iraq and Afghanistan carrying those external bomb loads, their bomb bays remained empty.
With the next round of updates to the B-52H that added the Sniper targeting pod and pylon between the starboard engine pylons, and added new communications including UHF SATCOM (the same mushroom antenna that distinguishes the A-10C), the bomb bay was left alone. A few years ago, the Conventional Rotary Launcher (CRL) for the B-52H was reworked to add the MIL-STD-1760 weapons bus to the system and allow bombs carried inside the bomb bay to be programmed and released in-flight. With these changes, the B-52H can either carry all of its bombs internally (again) to save drag/fuel or add additional weapons externally. The changes now allow the CRL to carry up to 24 GBU-38 (500lb) JDAMS or up to 20 GBU-31 (2000lb) JDAMS. These changes also allow for other advanced weapons and missiles to be carried on the aircraft into the future.
To recap, the Modelcollect kit appears to be based on a digitally scanned Monogram B-52D kit and test-fitting the two kits confirm the theory. When Modelcollect attempted to transform the D-model into a G, they made the nose and tail sections separate from the main fuselage. In that main section, they have a reasonably detailed bomb bay complete with the CRL. The main wheel wells are also promising. Most importantly, the conversion nose designed for the Monogram kit fits the Modelcollect fuselage nicely.
As with any good project, this build starts with the cockpit, but first I've got to get the nose free and clear of those casting blocks. Buff Master didn't leave any margin between the nose and the casting block, which means that some careful cutting needed to be done to get the thin fuselage parts free without damage. Instinctively, I wanted to use my disc sander the thin down those casting blocks to give better access to the edges of the nose, but that would have ended in disaster. Instead, I used a combination of razor saws over the course of several days to get the parts free. Cut a little, then walk away whilst uttering colorful metaphors.
The nose halves are finally free. There is a little more clean-up required, but I need to get the radome cut clear of its casting block and see how everything fits together with the flight deck installed before removing any more material.
I used my Sujiborido file to remove the rest of the casting block remnants, planed along the edges, and test-fit the nose halves together. One nose half was longer than the other and there seemed to be other issues of concern. I aligned the panel lines around the dorsal and ventral ejection seat hatches and used cyano with accelerant to glue the halves together. Using the Sujiburido file, I was able to square up the opening over the cockpit, the front of the nose, and bring the longer nose half closer to matching the other. That took some time to keep from shattering that resin shell.
Inserting the cockpit floor into the nose, that goes in nicely and fits just right, but there seemed to be something off with the front of the nose. Removing the casting block off of the radome and cleaning off the remnants, I saw another problem - there is a massive gap between the lower edge of the radome and the lower fuselage. I used the cyano again to glue the radome into position and filled a few minor gaps around the sides.
After staring at that gap under the nose, I pondered what sort of adult beverage this called for, but then I had a blinding flash of the obvious. I used cyano to glue one of those casting blocks off the front of one of the nose halves into place, then used my Dremel to shape the block. Since there was still a bit of a gap, I cut some styrene sheet and glued that into the gap, using the cyano to also fill in the remaining flaws. The next step will be to sand the plug to completely blend in with the rest of the nose and clean up any remaining gaps and seams.
This Buff Master nose was designed to mate to the Monogram fuselage, which required the old nose to be removed at a certain distance ahead of the wing root. Though the nose of the Modelcollect kit is molded separately, that joint isn't in the same position (that would have been too easy). Doing some comparisons of the assembled nose, Monogram fuselage half, and the Modelcollect fuselage half, the cut line will be along a panel line molded into the Modelcollect fuselage. I removed that section from both fuselage halves and test-fitted the nose again - so far, so good. Do not discard the fuselage bits that were removed, one or more bits will be required to be grafted onto the Buff Master nose for the forward wheel well edge.
The next question on my mind was how this nose really aligns with the Modelcollect fuselage, and dry-fitting them revealed a near-perfect joint.
So one question I get frequently is why I'm even bothering with the Modelcollect kit in this project. Here's why - look at the bomb bay and wheel well areas. They are full-depth and they are boxed in, and the kit even includes a rotary conventional weapons system for inside the bomb bay. The Monogram kit has a simple insert to simulate the full-depth bomb bay, complete with M117 bombs as part of that plate insert. The ESCI/ERTL kit doesn't offer a bomb bay. I want to do an updated bomb truck with the external pylons loaded as well as and revised rotary system also loaded.
Insert a ten-month time gap. After the preliminary fitting of the Buff Master nose to the converted fuselage, I discovered how crude the resin castings from Buff Master really are. Clearing the nose from the casting blocks was a challenge, but then there are parts that attach to the casting blocks from concave edges which was going to require far more effort to clean and contour to the nose. Mapping out the effort to make the Buff Master sets usable led to the whole project being set aside. That was ten months ago.
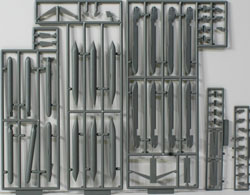
I recently received an email from a reader who asked if I was aware of a correction set from Modelcollect for the B-52G. For $15 (with free shipping), Modelcollect will send you a new nose and tail that was corrected for their B-52H release. I decided to give that option a look and signed up on their website. What came in the mail was a surprise! There is indeed a new nose and tail, and they are better than the originals, and they also included sprues with the updated landing flaps, tail gun, START fairings for the nuclear bomber B-52G wing roots, and a set of their cruise missiles. Apology accepted!
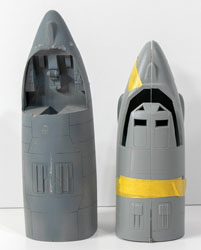
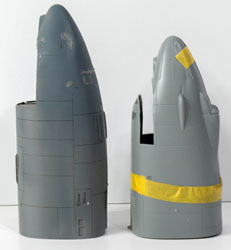
Here's a look at the noses side-by-side. The Buff Master nose is on the left, the revised Modelcollect nose on the right. The Buffmaster nose is longer only because it was designed to attach to the main fuselage at a different point than the Modelcollect nose. While the new nose is definitely an improvement over the original B-52G release, the EVS fairings under the nose are still a bit off, the radome is smoothly blended rather than having the angular joins of the real nose, the ejection seat hatches for the upper rear stations are big enough for the box lunches, but not the ejection seats, and the hatches for the lower rear seats are missing. Also missing are the various NACA air scoops on the nose. The antenna fairing atop the radome is also off, but for my project, this fairing is no longer installed on current-configuration B-52Hs.
At the 2019 IPMS/USA National Convention, at least one vendor had a huge stack of the Modelcollect B-52Gs priced at about 60% off of retail price. It is a shame that their first B-52 out of the series was a miss, but it looks like they're on a trajectory to get some nice B-52s by the time the B-52D/F and early B-52G are released, but unfortunately we're still back to square one on the late B-52G/H. I am hoping that someone in the aftermarket (not Buff Master) will do some proper updates for the Modelcollect kits, but until then, I am going to put this project back into hibernation.


