Minicraft 1/144 C-130A Hercules Build Review
By Fotios Rouch
| Date of Review | August 2012 | Manufacturer | Minicraft |
|---|---|---|---|
| Subject | C-130A Hercules | Scale | 1/144 |
| Kit Number | 14581 | Primary Media | Styrene |
| Pros | Better kit than Amodel... | Cons | ...but not by much! |
| Skill Level | Basic | MSRP (USD) | $36.00 |
The Project
Well, here is another Rouch adventure that was supposed to start nice and easy but ended up more complex than I planned. You see, I bought the Amodel JC-130A precisely because of the subject matter. Roman nose and a hump. Perfect! Then I opened the box and was greeted with the same low quality plastic molding I found so many time before. Not impossible to build but certainly lots of work. The overall shape looked good mind you, it is just that it was let down by the low quality standards.
Then I noticed Minicraft's offering and jumped on it. CAD design was proudly displayed on the box. It has to be good I guessed and maybe I can combine the AC-130A and the JC-130A and get a nicely executed JC variant. I will cover the Amodel in another installment because I still like it and I find many aspects of its fundamental design better than the Minicraft kit. Obviously the Minicraft kit is modern by any sense of the word and it looks nifty and sharp in the box.
All the sprues got washed in hot water and Formula 409 to get rid of the grease. Then I started studying the parts so I could make a plan. Comparing the two kits was inevitable. Not happy that Amodel did not include a cockpit under that huge transparency but Minicraft did not either! No kidding. You get am interior ramp with surface detail and open loading bays but no cockpit! Totally half baked.
The windows are marked on the fuselage but not open. Easy to fix though. So I started by drilling out the windows and adding some weight on the front of the fuselage to accommodate for the tail heavy model. The wheel bays were installed as well as the cockpit bulkhead and the fuselage floor combined with the front wheel well.
While the fuselage halves were glued and set to dry I moved on the wings. That was another surprise. In the kit I got two port wing sets! They were both warped quite a bit so I decided to build them both and see which would be less trouble to fix. With some hot water I got both duplicates to comply to an acceptable level. Not sure if I like the Minicraft idea of inserting the wing into a glove type cavity into the fuselage. I certainly like the Amodel idea better of a solid wing top with no seams. Obviously, the lack of quality control by Minicraft forced me to procure another kit, this time the C-130A kit by Minicraft in white plastic.
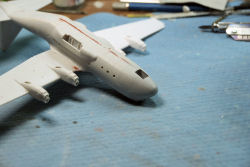
This one had the proper wing parts in it. Assembly went on and both wings were attached to the fuselage. The photograph included makes it rather obvious that the wings and fuselage top come with huge sink marks. Not sure if the plastic was pulled too fast from the molds but unacceptable just the same.
The next step was to figure out the cutting off of the standard radar nose and the attachment of the transparency to the fuselage. Note to the readership. The instructions are not to be followed. Stupid me, I thought that whoever Minicraft had doing the instructions looked at the model for more than 10 milliseconds. The instructions simply say to cut off the radar nose but not where exactly. There is a fairly large depressed area that has been marked on the inside of the fuselage but you just do not know if you are supposed to cut near the nose or near the fuselage side.

 I removed the nose and test glued the Roman nose to see how well it fits to fuselage. It does not. It is of a wider radius that the fuselage front. In the image you can see that the fuselage front is nice and tight and the nose is overlapping it. So I took off the nose again and tried to see how the transparency fit. Not happy there either. Too wide. The other part I do not like is the cross section of the front fuselage and transparency. Very exaggerated and slab sided. The lower side windows do not curve on the real thing.
The lower front windows do not dig into the Roman nose. The Roman nose has a mostly rounded top and is not polygonal. Not to mention that the Roman nose does not have the landing light or any other details on it. CAD design is nice but someone has to know how the real plane looks.
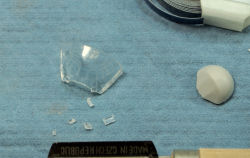
You can see from the photo that the CAD designer will have you cut into the nose small notches so the transparency lower front window will dig into it. Speaking of transparency, you will have to guess that you need to cut up the clear part so it can match with the Roman nose. Naturally the instructions tell you none of that! Minicraft did not provide a cockpit and I was not about to go hog wild on that either. I just wanted a basic something so that it did not look totally empty. I did not even paint the interior light green. I chose a dark combo that is not going to show much.
After the nose surgery and the transparency reduction I glued the clear part to the Roman nose and dipped both in Future both to give a nice gloss to the clear part but also to fill the small gaps between the gray and clear plastic.
The next big step will be to blend the clear parts to the fuselage and a possibly futile attempt to smooth out the obnoxious polygonal contours into something a little more realistic.
This kit has been nothing but trouble so far. At this day and age you would think that a modern kit would go together better. Especially when the "CAD Designed" label is all over the box.
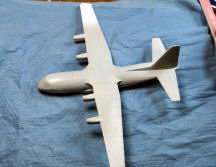
The fuselage required a lot of putty on the top and bottom and on the wing joints. The Roman nose to fuselage joint was very tough and there were no instructions whatsoever to tell you what was really needed to get it all together. This is going to be the keep it or toss it area of the whole build. I will try my best to make the front clear canopy fuselage area joint and the Roman nose smooth but I will also try to reshape the ridiculous forward fuselage cross section and maybe get it to look a little more like a C-130. It will require many runs of Mr Surfacer and 3M Acryl Red, some Acryl Blue and lots of fine sanding before I am happy. Too bad. This could have been the definitive modern C-130 kit.
This kits has me perplexed. How can a modern kit be so much work? Filling and sanding and priming went on to achieve a smooth surface that would take the white and aircraft gray paint nicely. If this was going to be an NMF model I would think twice before continuing.
It will be very difficult to reshape the front fuselage and modify the profile to make the kit look like a C-130. I am not interested in investing all that kind of time. At least things got filled in and smoothed out. I used the hump from the Amodel kit to convert the C-130 to a JC-130A. The hump is not meant to fit this fuselage but it worked well. I "framed" the location where the hump goes with Tamiya masking tape. I used photos for determining the exact location. Sadly, locating the side door and panel lines in pictures showed that the models has more inaccuracies. The dome was glued with slow curing superglue and then after verifying positioning the tape was removed before the glue was dry.
Fresh tape was laid down around the top radome and putty went all around to ensure a good smooth fit. The tape was removed before the putty was all dry and then sanding took place to smooth out the joint.
One more layer of Primer went on after that to ensure I did not leave any irregularities behind after sanding.
Also all the top fuselage panel lines were touched up prior to the final super thin primer and the white/aircraft gray paint job. The good thing is that I found period photographs which should be useful determining the accuracy of the completed scheme.
Liberal application of Tamiya masking tape followed in preparation for spraying the Aircraft Gray coat. This masking tape is good but it is amazing how fast it gets used up and how much it costs! After a few days of drying I masked the gray paint and got the model airbrushed with Insignia White. White is a tricky color and a few thin coats went down before the last coat. A few days later the model was masked and got ready for the black bottom nose radome, the top front radome and the black trapezoidal exhaust areas under the wings.
I chose to use the Amodel wing tanks as I felt they looked more accurate for an early C-130 than what is in the Minicraft box.
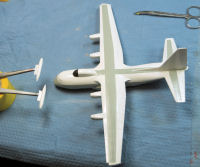
The landing gear and engine props were done next. Only notable thing is to cut the front landing gear cover in half since the early C-103s did not have the single piece cover but a more conventional dual piece instead.
The wingtip lights were done next. Minicraft, thoughtfully has already made small cuts into the solid wingtip clear part for the lights. I just drilled them a bit further, added Tamiya clear red and blue in the holes and got a nice effect, especially for 144th scale.
Next thing was applying the decals. I mixed some of the Minicraft and Amodel decals together. The Amodel decals are OK but are a bit too dull and prone to silvering. The Minicraft decals work great. I used the Minicraft national insignia on top and bottom to save the Amodel side insignia. I did that because as you can probably see from the last photo the side insignia is translucent and you can see the gray/white demarcation through the national insignia star. I hope if I lay over one more decal it will make it OK. The thin black stripes from the Amodel decals worked OK and add a nice visual with the cheatline. Only problem is that they should wrap around the front as well but there is not enough decal to do that. I will have to figure out something for that.
The side windows are done in CrystalClear. Once dry, I will add a drop of Future. It might fog up a bit but it will dry clear.
Conclusion
Well, the JC-130A is finally done. After the decals went on, I applied a light weathering and added some more details like the nose landing light and some other small stuff bellow and above it.
Overall, I am not very happy with this kit. It really looks like a lot more ideas were planned for it but money run short and it got no cockpit or interior. Even if there was no such problem the kit would have been just fine if someone had checked the front fuselage area against the real thing. It is just not right. I would take any kit that has a nice shape over any over-engineered kit full of bells and whistles that looks off.
I guess I need to try the AModel kit and see what that looks like when completed.


