Minicraft 1/144 C-54 Skymaster 'Candy Bomber' Build Review
By Fotios Rouch
| Date of Review | July 2012 | Manufacturer | Minicraft |
|---|---|---|---|
| Subject | C-54 Skymaster 'Candy Bomber' | Scale | 1/144 |
| Kit Number | 14520 | Primary Media | Styrene |
| Pros | Easy build | Cons | See text |
| Skill Level | Basic | MSRP (USD) | Out of Production |
The Project
This is the Candy Bomber version of the 1/144th scale Minicraft kit. This kit has been released in numerous schemes.
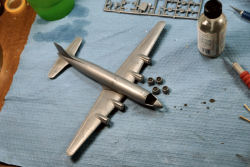
Assembly is extremely straight forward and the kit falls together rather easily. After completing the Amodel C-123 this job feels like the proverbial shake and bake!
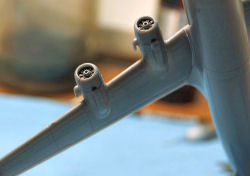
The engine faces are rather simplified but after painting the backing plates black for depth and engine cylinders metallic gray and polishing them up a bit the end result is convincing for this scale.
No cockpit whatsoever or bulkheads are provided. The only thing the instructions show for the front office is a 3/4 oz weight. I contemplated scratch-building something to avoid the nothingness but I think very little will show through the tiny front transparency in the end.
The fuselage went together very easily and so did the wings. The fuselage to wings upper joints are not that great. The instructions have the modeler assemble the wings and then mate the whole one piece assembly to the fuselage. If I were to do it again I would mate the tops of the wings to the fuselage first and then bring the bottom single piece and mate it to the wings. The gap left in the wing/fuselage joint was filled with thin Evergreen sprue which melted in more or less after applying the rather hot Pro-Weld liquid glue. What is left is sanding the joint and then gluing the cockpit transparency. Then prime, polish and paint.
The C-54 kit is progressing swimmingly (a term the contractor uses at work that drives me nuts!). The fuselage fit is great and very little putty was used. The wing to fuselage joint was great on the underside of the model but needs some help on the top. I inserted fine Evergreen styrene to fill the gap and sanded it down. Evergreen styrene is very soft and it sands down faster than the kit styrene. If I were to do this kit again and I probably will since I also have the Coast Guard version, I will glue the top wing parts to the fuselage and then finagle the bottom full length part to the top assembly. It is better to have a perfect top fit and work the bottom seams.
The clear front canopy cockpit section piece was dipped in Future and once dry it was test fitted to see how much work it would need to fit well. It fit like a glove and practically no putty was needed. How is it possible since this was not a CAD designed kit ;-) Speaking of fit, the shape is great in my opinion as well. I like the forward fuselage look and the general shape as well.
The model was primed with Mr Surfacer 1200 to see what fixes would be necessary. Practically none! What an easy kit to build this is so far. So little that needs attention.
After the whole model was rubbed down and the primer was polished, I laid down the first coat of Alclad II Aluminum shade. This in turn will be polished with 8000 and 12000 micro-mesh polishing cloths. Then I will add a few more metal shades but not too many since in all the period photos I have seen it looks like these planes were not mirror polished but were certainly not silver lacquer painted either.
In this YouTube video
you can see that many C-54 clearly show their various metal shades although they are not very pronounced.
Various metal shades were sprayed after masking and this time I also used Floquil Old Silver in combination with the different Alclad II shades. I noticed that the decals provided the deicer boots for all the leading edges so I decided to save some masking time and apply the included decals instead. What a huge mistake that was.
So after all the painting and assembly was done it was time to apply the decals.
They look great on their carrier paper. I decided first to do the more colorful scheme with the nice yellow and green stripes as it is depicted on the box art. The decals were dipped in warm water, and micro set and micro soft were standing by to help. The decals are hard, fragile and do not want to conform to any curves at all. They are so hard that I even dipped them in in micro soft solution just to see if they would soften at all. Micro soft will melt normal decals under the same conditions! Basically there was no way that the decals would work in any curved areas such as the nose of the aircraft.
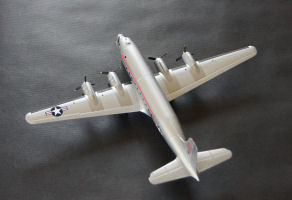
I went to plan B and decided to use the red scheme which you see here. Very difficult to apply. They broke too in various places. Then time came for the deicer boots. No way, no how they would work at all. Not only were they were hard to conform they were not cut right to wrap around and fill the complete area. So off they came and in the end I had to mask the model and be extra careful not to damage the already applied decals. The worst part is that the tail deicer decal pattern did not even match the contour of the tail leading edge and would not conform anyway.
Unfortunately the tail decals had been applied and the only way to fix it would have been to free hand mat black on metal shade undercoat. I did not want to free hand it and the model will look forever weird in my eyes.
Too bad that an overall OK kit was underrepresented by awful decals.


