Magna Models 1/48 Blackburn Firebrand TF.5 Build Review
By Larry Hornya
| Date of Review | December 2014 | Manufacturer | Magna Models |
|---|---|---|---|
| Subject | Blackburn Firebrand TF.5 | Scale | 1/48 |
| Kit Number | 4802 | Primary Media | Resin, Vac |
| Pros | Unique subject | Cons | See text |
| Skill Level | Intermediate | MSRP (BP) | £36.00 |
Build Review
Envisioned as a multi-role strike fighter for the FAA, the Blackburn Firebrand was plagued by development problems. By the time the final version, the TF5, went into limited production (68 entering service), the Second World War had ended. Too many changes in service requirements and delays because of engine problems led to this unique airplane falling short of expectations.
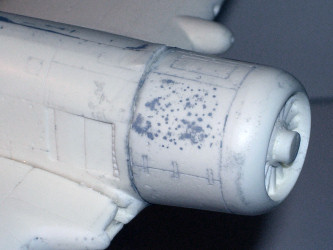
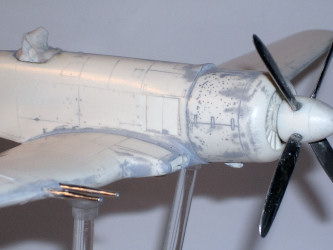
Magna Models of Spain has done a limited production resin kit of the TF5 version in 1/48 scale. This is a very limited run kit. I don't mean numbers as much as quality. The example I built had lots of bubbles! There were also a few warped parts. The white metal castings were pretty worthless, being pot metal or tin essentially. This was a commission build so expediency of time and materials figured in. To build a contest quality model, the first thing I would do is throw the metal parts away and replace them! As it was, I replaced the main wheels and scratchbuilt the interior as the cockpit tub was completely riddled with bubbles. That was about as far as I could afford to go in scratch building time. It took plenty of time filling bubbles and fairing in parts.
The fuselage went together pretty well. Each half was slightly warped but by the time I worked my way from nose to tail, it straightened out pretty well. Wing fit was also pretty good. There were some gaps in the underside and they cut right through the wheel wells. This is best fixed by using plastic strip as sanding inside the wells would prove difficult at best. The entire vertical stabilizer and rudder are separate from the fuselage. The reason for this is that the real aircraft had a slightly offset vertical stabilizer. The problem this poses on the kit is fairing the whole thing into the fuselage. This probably took up as much time as filling all the bubbles. There are two radiator intakes on the leading edge of the wings near the wing root. They are different sizes (they are supposed to be). Unfortunately they had bubbles in the corners. I fixed these with CA and re-carved and sanded the openings. Did I mention there were a lot of bubbles?
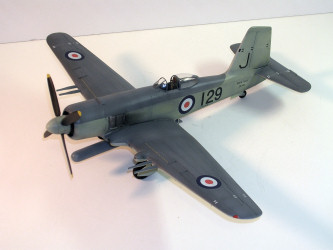
Once the airframe was together, the rest of the assembly is pretty straight forward. Again, the white metal detail parts are horrendous! By the time I had them pretty well cleaned up much of their definition was gone. I used a combination of Tamiya standard putty, Mr. Surfacer 500 and Tamiya surface primer out of a rattle can to get rid of the surface bubbles and imperfections. Did I mention I used a lot of all three? I pre-shaded the model with black and applied the two toned scheme of sky and extra dark sea grey. Clear coat was Testors acrylic gloss. I have been having issues with Future. I have read that the formula was not changed and that you have to use the "tile and vinyl floor finish" version, now bottled as "Pledge" floor care. It does not seem to produce a smooth and shiny sheen without doing several (and I mean at least four) coats. My old bottle, still called Johnson's Future Floor Wax, seemed to work much better. I am finding the Testors to work much like my "old" Future.
The supplied decals were the best part of the kit. They are a little delicate, but went on without a hitch (well, except the last fuselage roundel which stuck to my thumb and tore! But that was my fault). They conformed well using Micro Sol. This was followed by a light wash of MIG productions "dark" wash and then a flat coat of Testors acrylic clear flat.
The vacuform canopy (for which two were supplied) is very thin and delicate with little to no framing detail. My customer wanted the canopy open (naturally) which proved a bit of a headache. Needless to say, I'm glad two were provided. The frame for the canopy is black electrical tape that has been painted. I read about his little trick years ago but never tried it. It works great! You just cut thin strips of the tape and apply it where you want the framework to be. It conforms very well, even around curves and adheres nicely.
Lastly, the landing gear and torpedo were added. The landing gear turned out to not be the nightmare I feared they would. They may not be very detailed but they are plenty strong! The torpedo was one other big headache. Firstly, it was warped. Second, the fins were full of holes and did not line up well. Again, I probably would have been better off scratch building them (lesson 10,573 learned). But a nice heavy dose of the aforementioned fillers and primers fixed everything up nicely!
In the end, this is a pretty attractive airplane. I always kind of thought the Firebrand was a bit ugly but after building this kit, I kind of like it! I guess in the end that makes it all worth it (okay, that and getting paid to do it!). If you're a big fan of late and post WWII FAA aircraft, this would probably be worth the effort. Just be prepared to do a lot of filling and sanding and make sure your spares box is full of good parts to use! If you have more of a passive interest in the subject matter, wait for the inevitable Trumpeter release (BTW, Trumpeter HAS NOT announced they are doing this yet! It simply stands to reason that they will).


