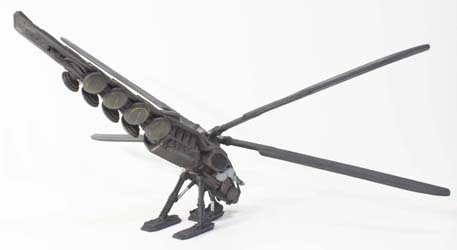
Loot Studio 1/48 Dune-themed Ornithopter 3D Print Kit Build Review
by Michael Benolkin
| Date of Review | April 2022 | Manufacturer | Loot Studio |
|---|---|---|---|
| Subject | Dune-themed Ornithopter | Scale | 1/48 |
| Kit Number | N/A | Primary Media | STL files (digital) |
| Pros | Beautiful details and fit | Cons | Nothing noted |
| Skill Level | Experienced | MSRP (USD) | See text |
Build Review
You may have read about Loot Studios in one of my 3D Printing and Modeling installments, but in a nutshell, Loot Studios is a subscription service that charges $15/month for an impressive number of figures, vehicles, props, busts, and accessories, primarily oriented to the gamer with a 3D printer. They have two tracks you can select when you subscribe - fantasy and science fiction. When I joined last month, the science fiction track had a number of figures and stuff in a Dune-themed group, but from the planet Lutba. With each month, you can download any and all 3D print files for your use anytime. I grabbed the entire Lutba library and printed one figure and this ornithopter.
The ornithopter kit is broken down into sections that will fit most 3D printers, and if you have the print volume, you can up-scale the model to whatever size you'd like. The stock files worked out to be around 1/48 scale, so I left the scaling alone. The fuselage consists of three sections, the landing gear module, and a canopy. Each of the four wings come in two sections. They all printed on my Phrozen Sonic 4K printer with no issues. The parts sat around in a group for a while with a number of other projects I had printed, but I hadn't figured out how I wanted to assemble these. In typical scale model fashion, you might just assemble the parts using cyano, but the glue cures into a much harder state than the surrounding resin. When I printed and assembled the Gambody Paul figure, I assembled the left and right arms onto the upper torso by dabbing resin into the seams and curing the assembly under a UV lamp. Then I remembered a product that I think is still available where you apply a clear epoxy resin to two parts, then use the UV LED mounted to the glue applicator to cure the epoxy. That gave me an idea...
I grabbed a syringe-type glue dispenser, wrapped it up in black electrical tape to block out any ambient daylight, then sucked some clear resin into the syringe. I dry-fitted two parts together, then applied a line of clear resin along one seam before exposing that seam to a UV lamp (while wearing eye protection). In about 30 seconds, the clear resin was hard and I rolled the parts to the next seam and repeated. Then went back around again to fill in any remaining depressions along the seam until the two parts were one solid part. The three sections of fuselage and each of the blades are now solid resin parts which were wet-sanded to remove any excess clear resin as well as any remaining support stubs from the printing process. The following day, I applied more clear resin into any seams that needed touching up, only to experience the very problem I was trying to avoid. When I was using the UV lamp to cure a set of seams, I didn't hide the syringe and the tip cured solid. Lesson learned, I grabbed another syringe, wrapped it up in electrical tape, and pressed on.
I looked at various ornithopter color schemes from the various Dune movies and artwork, and the one that caught my eye was one in a dirty bronze color so I used Tamiya's Bronze over a primer coat of black. The blades were painted Tamiya Iron and details were picked out with various colors. The distinctive ID stripe along the spine is Tamiya Orange that also color the shoulder boards of the pilot wearing a pressurized still suit. I've started the weathering with a light yellow oil pinwash though that may be revisited and done differently.
The final result is pleasing to the eye given the contrasts in colors and details. Using resin to glue the model together makes it easy to sand/clean up, and using clear resin allows the UV light to reach deeper into the seams than the opaque resins. Now to see how this technique works on much heavier/larger 3D prints.


