Kopro/Ciro 1/48 Su-22UM-3 Fitter
By Fotios Rouch
| Date of Review | April 2007 | Manufacturer | Kopro/Ciro/Etc. |
|---|---|---|---|
| Subject | Su-22UM-3 Fitter | Scale | 1/48 |
| Kit Number | - | Primary Media | Styrene, Photo-etch, Resin |
| Pros | Very unique subject in this scale | Cons | |
| Skill Level | Expert | MSRP (USD) | Depends on how much 'stuff' you add to your build |
Introduction
It is funny how we modelers complicate our projects so much!
This Su-22 was purchased some years ago just because the Su-22 looks so cool and because it is an important addition to my Eastern Block Aviation collection. Then the Hi-Decal sets and photoetch aftermarket sets came out.
Meteor came out later with a very nice cockpit, afterburner can, speed brakes, and wings with flaps and slats deployed. I though I had all I needed to start the project.
Then of course Ciro came out with their two seat conversion which was duly purchased and can be reviewed here.
The Project Begins
All the components were gathered up so I could evaluate what would be used and what would be saved for my Su-17 that is also waiting for its turn.
First step was to wash the resin parts with warm water and Formula 409 house cleaning agent. This project requires a lot of cutting and it is important to get the cuts accurate and sharp to minimize the use of putty as much as possible. For the cutting of both the plastic and resin alike I used the very sharp and very handy Tiger razor blades that can be found both at Meteor and GreatModels.
After studying the instructions I used a marker to shade the areas in the plastic fuselage that would have to be removed. I also used Dymo label making tape to help guide me in the cutting process and to also protect the plastic from unwanted scratches.
After the plastic was removed I had my first chance to test fit the resin conversion fuselage components. The front fuselage plug fit superbly to the nose intake area. I went ahead and super-glued the parts together.
The small over wing insert fit good too but I chose to leave gluing for later so I could afford adjustments if necessary. When I tried to see how the hump would fit to all that I realized that I had to cut more plastic since the hump includes portions of the main fuselage. I did say that it is important to read instructions carefully! I am glad that I did not cut more than I should have. The same work was performed on the other fuselage side with similar results.
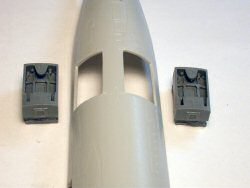
The next step was to use the Cutting Edge speed brakes. They look very nice and besides offering much more detail they also offer a nice and realistic speed brake well depth. The Part photoetch speed brakes look good too but I always prefer resin for such structures. The photoetch brakes will be used on the Su-17 later.
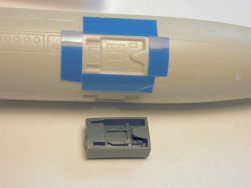
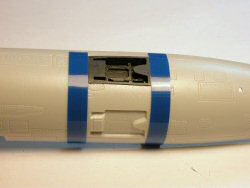
I started the resin speed brake installation process by making a template surrounding the area to be removed. I used my micrometers to ensure that opening would be just enough to take in the resin speed brake box. The cut was performed with the Tiger razor saw and the part was pushed out from the inside of the fuselage after I run an X-acto knife through the cut to help clean it up.
The resin part went in with no problem. I chose my first cut to be one of the lower fuselage speed brakes. It would afford me the chance to get familiar with the cuts and do a better job on the top brakes. After I was satisfied with the fit of the resin part I used some Dymo tape to align the present cut with the next cut that was to follow. It would be awful to go the distance and end up with speed brake wells that would not be vertically aligned.
Before super gluing the resin wells in place I wanted to make sure that the wells would have the best fit possible. My concern was that they were protruding out of the fuselage no matter how I tried to adjust them.
The radius of the curvature of the wells is less that the curvature of the plastic fuselage. I decided to allow the ends of the wells to protrude as long as the middle portion was totally flush with the plastic. The intent would be to sand around the wells to get a flush fit. If you look at the Verlinden Lock On book on the Su-22 on page 12 you will note that the speed brake wells are totally flush with the fuselage. The resin was super glued in place and sanded carefully until it became flush with the plastic.
I then repeated the same job on the other fuselage side only to find out that there were two wells named "D". The conversion set calls the wells A,B,C and D. This did not create an issue because they are almost identical.
Once the speed brakes were done I went back into test fitting the fuselage together. I taped everything together and realized that the project was in good shape everywhere but in the area were the hump is supposed to meet the fuselage. It appears to my eyes that the hump is bent a little but as it curves outwards while the fuselage is straight and level. I will study this area some more and then maybe I will straighten out the resin a bit.
I moved my attention to painting just so I could see the fuselage hump problem with a fresh eye at a different point in time. I chose the White Ensign brand for the Eastern Block Interior Cockpit Green color. It is a bit more subdued that the equivalent Xtracolor and I felt that it would meet my needs better. The paint was airbrushed and it dried well within a day.
The details will have to be picked out with a brush and then some careful weathering will take place before the cockpit gets built and the fuselage is glued together.
To Be Continued...


