Kinetic 1/48 Harrier T.4 Build Review
by Fotios Rouch
| Date of Review | March 2018 | Manufacturer | Kinetic |
|---|---|---|---|
| Subject | Harrier T.4 | Scale | 1/48 |
| Kit Number | 48040 | Primary Media | Styrene, Photo-Etch |
| Pros | See text | Cons | See text |
| Skill Level | Experienced | MSRP (USD) | $39.99 |
Build Review
For an inbox review of this model look here.
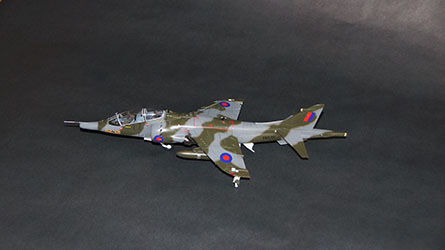
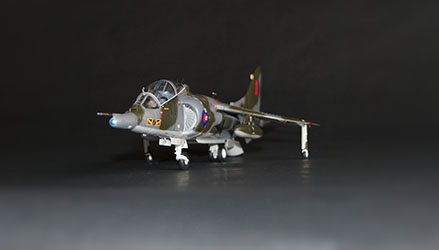
I have an affinity for the family version of the Harrier and I was excited to receive this kit for a build review. The box is full of parts and a significant number of these parts will never be used as the kit tries to cover all the versions of the two-seat variant. I decided to build the Harrier T.4, XW272/Z, IV(AC) Sqn, RAF Guetershloh, 1980 as it looks more interesting to me with its laser nose.
I started work with the intakes first. I like the open look of the aux ports and started by filling ejector marks which happen to be in visible areas.
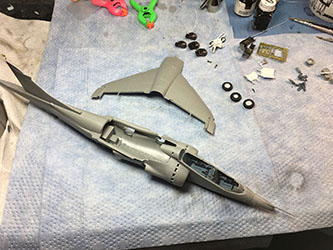
Next, I went to work on the interior. I surfed for images of the side consoles and could not find anything that looked close to the side wall detail provided in the kit, especially in the rear cockpit area. I left things alone as I was going to make every effort to make this an out of the box built. The kit provides a mechanism that links the four exhausts together. I like the way the front landing gear wheel well is executed as it provides a lot of detail that is easily accessible for painting. The intake area looks very convincing as well. Then I started looking at the instructions trying to find the intake fan. There is no step in the instructions or the parts diagram depicting the intake fan! The part thankfully is included in the kit!
Before gluing the fuselage together, I tried to see how the exhaust would work together. They do not. There is no way that I can see to have the mechanism in place inside the fuselage and at the same time a way to fit the exhausts from the outside. I decided to break them off and glue them in place individually. No big deal as I am not planning to play with this model at any point. The fuselage went together with no interference issues. One problem I noticed was with the main landing gear wheel well. Although the rear portion fits well within the fuselage, the wheel well box does not want to make good contact with the fuselage. I did modify the contact points with a sanding stick until I achieved a good fit.
As I was fiddling with the exhausts I also realized that it would be impossible to paint them after assembly and also very difficult to mask them prior to the camouflage application. I decided to partially paint the kit to help with assembly and painting later.
The wing went together well but the locating holes for the outer flap fairings are missing. I drilled them in place and while I was at work on the flaps, I decided to modify the fairings and drop the flaps for a better visual.
The wing assembly fit the fuselage pretty well with minor adjustments needed.
So far, the kit is coming along well. Next is the masking of the canopy and the camouflage application.
The next step was to apply the camouflage. I started with the bottom camouflage since it was the lightest hue. Xtracolor with the fast-drying agent went on and the next day it was good to handle.
Then the darker gray hue went on to be followed with the dark green.
The gear went on with no issues and the outriggers went OK with no balancing issues.
The decals are really nice with no tear issues but they do need softening solutions to sink into the panel details.
The semi-gloss protective coat went on and then the last step followed which was to remove the masking and reveal the clear canopy which is the showcase of the huge cockpit.
...and then disaster stuck. The canopy had fogged up on the inside due to tiny gaps between all the segments that allowed the airbrushed paint to sneak in.
The canopy was carefully removed in order to fix the fogginess inside it. I started with Goo Gone and a Q-Tip and it removed the majority of the over spray. A little more polishing and the canopy was wiped down with a dry Q-Tip and dipped again in Future. Then it was left to dry inside a box to keep dust from sticking to it. It is not perfect but pretty close. I then used the absolutely excellent white stripes from fündekals which I cut down to size to represent the canopy seals. I like the fündekals over other similar sets because of the quality of the pigment and how well they hunker down without any solvents. After the canopy was secured in place, I went on to apply a little weathering with the help of pastels. Looking at period pictures, it seems that RAF kept their trainers in very nice and clean shape. The model was finished with a coat semigloss ModelMaster sealant.
Overall, I like how the model looks. I wish Kinetic had spent a little more refining the way the main wing assembly fits to the top of the fuselage. Maybe a little more work on the CAD for the fit of the canopy and its parts to the fuselage. The instructions can use a little more work because they had some omissions, they showed some parts that do not belong to this variant and they did not include enough info about what antennae go with what exact variant. Not entirely an easy task though as there were so many variations with the Harriers. But the plan was to do a straight out of the box build.
My sincere thanks to Lucky Model for this review sample!


