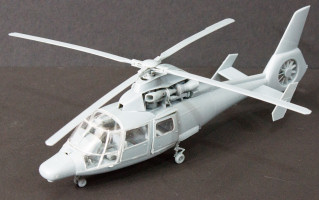
Kitty Hawk Models 1/48 SA.365F/AS.565SA Dauphin II Kit Quick Build Review
By Michael Benolkin
| Date of Review | December 2013 | Manufacturer | Kitty Hawk Models |
|---|---|---|---|
| Subject | SA.365F/AS.565SA Dauphin II | Scale | 1/48 |
| Kit Number | 80108 | Primary Media | Styrene, Photo-Etch |
| Pros | New-tool kit of this subject | Cons | See text. |
| Skill Level | Experienced | MSRP (USD) | $44.95 |
Build Review
For a brief background on this subject and a look at this kit out of the box, look here.
I decided to do a quick-build on Kitty Hawk's latest rotary-winged subject, the Dauphin II. They've indicated that we'll be seeing at least one more variant of this aircraft in our future, so let's test-fly the French version now. As mentioned in the first look, the kit is molded in light gray styrene which is soft and responds well to Tamiya Extra Thin Cement. I used no fillers or paints in this build so you can see the results for yourself. I did make good use of my Xuron sprue cutters, X-Acto knife, micro-chisel, and a few small files. The photo-etched parts were not used so cyano wasn't needed for this build.
First some general notes:
- Some of the sprue attachments are a little large for the part and using the sprue cutter will damage those parts. I put a chisel blade on my X-Acto knife and carefully separated those parts from the trees. Any excess on the parts can be removed with your files.
- The doors and some panels have a beveled edge on them replicating the full-scale parts. As mentioned above, care must be taken not to damage the door edges when removing the parts from the sprue trees. Once they are removed, the micro-chisel was ideal for removing remnants of the sprue tree stubs from the inside bevels of the doors/panels.
- A number of parts have stubs that come from the ejector pins and these are easily removed with sprue cutters or your micro-chisel.
- Please carefully remove all imperfections from the edges and even on surfaces that won't be seen as they may adversely affect fit later on.
- The clear parts are a hard plastic, so I carefully aligned my sprue cutters along the edge of each part, then moved out about 1mm before cutting. That ensured the parts won't have any scars that will be visible.
In general, the fit of the kit is very nice as you can see in the images. The soft plastic is almost self-filling. I test-fit every part and double-checked everything before gluing as there are a few minor bugs in the instructions but nothing that would slow you down (if you're doing that test-fitting). A few items of note:
- The instructions don't tell you to open up some holes in the bottom fuselage plate, so you won't know until too late that there are a few things that need those locating holes. I improvised.
- The instructions tell you that ballast will be needed, but not how much. I stuck a .75 ounce lead weight right behind the nosewheel well on the underside of the flight deck. As you can see in the images, that worked perfectly.
- A number of parts use locating tabs to mount bulkheads onto the main deck or engine bay deck, but the tabs are too thick to fit into the slots. I used a file to thin the tabs, but this kit is very sensitive to alignment. A bulkhead too far forward or aft could affect later assemblies.
I followed the instructions in building this kit and overall things went very well. As I said above, if you're not careful, one thing can start a cascade of challenges, but nothing that an experienced modeler couldn't work thought. Note that you're working with many very small parts, especially in the beginning. The build starts with the transmission and when looking at the instructions and then the really tiny corresponding parts, that can be an interesting transition. There were a few mold lines on two of the circular transmission housing parts that need cleaning up to get the parts to assemble correctly.
The rotor head is masterfully designed. I wish more folks would follow this approach!
The flight deck/main cabin floor receives a number of parts and before long, you're building the upper structure that holds the engine deck. Alignment is key here.
This kit is really nicely engineered but with all of the details in the kit, one or two parts out of place can adversely affect the overall fit of the model. That is why this kit is recommended to experienced modelers that can work through any challenges and turn out a nice result.
After this experience, I can hardly wait to see the next variants of this aircraft coming from Kitty Hawk. Definitely recommended!
My sincere thanks to Kitty Hawk Models for this review sample!


