Kitty Hawk Models 1/35 H-60 Blackhawk Kit Quick Build Review
By Michael Benolkin
| Date of Review | September 2019 | Manufacturer | Kitty Hawk Models |
|---|---|---|---|
| Subject | H-60 Blackhawk | Scale | 1/35 |
| Kit Number | 50006 | Primary Media | Styrene, Photo-Etch |
| Pros | Nice details and options | Cons | See text |
| Skill Level | Experienced | MSRP (USD) | $139.95 |
Quick Build Review
For a brief discussion of this subject and a look at this kit out of the box, look here.
Kitty Hawk has released two Blackhawk kits to date, the MH-60L and the HH-60G. The MH-60L is primarily set up to depict a 160th Special Operations Aviation Regiment (SOAR) aircraft during the events that were written in the book and later in the movie 'Blackhawk Down'. The more recent HH-60G depicts a contemporary USAF combat search and rescue (CSAR) aircraft with the later weapons options. There are many similarities between the two aircraft and this is reflected inside the kit boxes as the HH-60G shares all but one parts tree with the MH-60L. While I am using the HH-60G kit for this quick-build review, I'll be building it up without the special mission options to render a more generic UH-60 airframe. As a reminder, our quick-build reviews are done without paint, filler, or even cyano to let you see in bare plastic how well the kit goes together - warts and all. The focus will be on buildability and not so much on detail accuracy. Let's get started.
The instructions break the assembly process down into the following steps:
- Flight deck/main cabin interior assembly
- Doghouse including engines, transmission and IR suppressors
- Main rotor
- Install cabin interior into fuselage halves
- Add exterior details including stabilator
- Doors, avionics bay, windscreen, and tail rotor
- Main landing gear
The rest focuses on weapons and special mission equipment which we are skipping. You'll see in the following steps that I reorder the assembly process and why. You're fine following the instructions, but you might have a better experience if you consider the following...
The instructions start out with the main cabin. Here is the ceiling and the instructions have you build up the main cabin seats though for this project, the main cabin will be empty. Here I have added the two circuit breaker panels that are behind the pilots' helmets, and in this case, the HH-60G has an additional panel that mounts to the right side of the overhead console. There is a tab on the panel that is supposed to go into a slot in the side of the overhead console, but that slot is flashed over. You'll need to open that up.
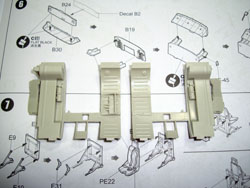
Here are the side walls that surround the sliding windows behind the pilots. These form part of the structure that hold the cabin interior assembly together and are nicely done, but these are also responsible for preventing the fuselage halves from closing. When I dry-fit the cabin interior into the fuselage, the structures on the other side of these parts need to be narrowed/thinned. I did a little at a time after assembling the interior and while I got the job done, it took some time to get there. Next time I will simply remove about 1mm of material on the backside before assembly. Be careful not to remove material on the backside for edges that will extend out through the fuselage halves. Some dry-fitting will reveal these. Just think of this as a resin cockpit interior that will require trimming and fitting to get inside the fuselage.
The instrument panel assembly includes the forward bulkhead and glare shield. The two tabs atop the panel fit into the glare shield's two open slots. You'll need some filler atop the glare shield as this will be visible through the windscreen.
The pilots' seats consist of some tiny and delicate parts. Take your time here. The floor rails (parts E9 and E10) mount to the rear frame (part E11) but I found that the instructions had E9 and E10 swapped. There is a tab on the inboard sides of E9 and E10 where the bottom of E11 meet, so dry-fit these to get your bearings.
Be careful with the cyclic sticks (E42) as they are very delicate. With the flight deck done, the rear cabin bulkhead and frame are installed along with the forward side frames and ceiling. The interior is done!
Here's where I jumped to the end and started working with the fuselage halves. As I described above, the fuselage halves eventually went together nicely on the bottom and with a small gap over the cabin on top. This upper gap will be mitigated by removing more material off of those forward side frames in my next build, but even so, that gap isn't visible once the doghouse is installed. When I got the fit I wanted, I added the tail wheel assembly between the fuselage halves and glued the fuselage together.
At this point, I jumped ahead again to add the main landing gear. I opted to leave the side covers off for purposes of this quick-build and you can see where the shock strut (E15) mounts to the fuselage. There is supposed to be a hole there for the pin at the top of E15, but there is simply a depression at the fuselage mounting point. A pin vise fixed that. Now the model is resting on its landing gear.
Jumping back to the doghouse assembly instructions, I opted to skip the T700 engines as I'll be keeping the engine bay doors closed. I build up the structure that mounts to doghouse (part C56 - identified as C66 in the instructions) and added the forward cover (part B20). When I glued C56 and B20 together, the instructions are silent about how they are supposed to fit, but since I had the fuselage built, I dry-fit the doghouse assembly to the top and made some fine adjustments for fit. When they had dried, I continued with the doghouse adding the compressor faces to the intakes, and then attempted to install the gearboxes (parts E1/E5). If I understand the instructions, the drive shaft plugs into the compressor face while the gearbox slides through an opening on the side of the doghouse and mounts to a vertical frame. Since I couldn't master this particular puzzle, I cheated instead. There is a slot molded into the gearbox where the drive shaft enters and that mounts to that frame on the doghouse. I cut through that slot and separated the gearbox from the drive shaft, glued the two parts into their positions and then glued the shaft back to the gearbox. This was repeated for the other engine. To ensure that the gearboxes were properly aligned with the transmission, I plugged the transmission (part C44 - not identified in the instructions) into its holes atop the fuselage, then dry-fitted the doghouse again. This allowed the gearboxes to dry while in proper alignment with the transmission.
I built up the doors and added the windscreen and lower windows into the nose. I am really impressed here - the fit of the windows is flawless.
All that remained for a vanilla Blackhawk was the main rotor and tail rotor assemblies. The main rotorhead is a work of art and while I was skeptical of the strength of the rotor blade mounts, these are all solid using liquid cement.
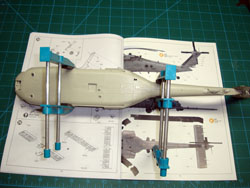
So here's a look around the assembled model. It is missing light lenses, antennas and the photo-etched parts, but again, the focus of a quick-build is to see if/where there may be challenges and how to overcome them. Another of the mysteries in this box is the three-piece stabilator. The stab is designed so that you could fold it for transport, but since the main rotor doesn't fold, all you get is a flimsy assembly with that stab.
Overall, this is easily the best Blackhawk kit available in any scale. This isn't going to be a weekend project, and even as a 'quick-build', it took almost a week to get this bird together. The nice thing about quick-builds, once you've identified the areas to watch, you can go full-out on the next build. Some of the parts left over from this quick-build will help with the upcoming full-build of the MH-60L as now I have the exterior-mounted ammo cans that mount atop the landing gear sponsons and a few other details to bring the kit up late configuration for the aircraft before they transitioned to the MH-60M airframe.
My sincere thanks to Kitty Hawk Models for this review sample!


