Kitty Hawk Models 1/32 F-5E Tiger II Build Review
By Michael Benolkin
| Date of Review | May 2018 | Manufacturer | Kitty Hawk Models |
|---|---|---|---|
| Subject | F-5E Tiger II | Scale | 1/32 |
| Kit Number | 32018 | Primary Media | Styrene, Resin, Photo-Etch |
| Pros | Nicest F-5E kit in any scale | Cons | See text |
| Skill Level | Experienced | MSRP (USD) | $129.95 |
The Build
For a brief discussion of this subject and a look at this kit out of the box, look here.
When Kitty Hawk first announced this kit last year, it was exciting news as the Hasegawa 1/32 F-5E was the only option on the market. Unlike Hasegawa, Kitty Hawk has also announced the F-5F in this scale, so all we could do is wait for Kitty Hawk's tooling to reach the market. Tanmodel had previously announced the F-5A in 1/32, but for whatever reason, that kit never materialized. But that's another story. During my Air Force years, I had the pleasure of supporting the aggressors at Nellis and had the pleasure of visiting them on a few occasions. In those days, both the 64th and 65th Aggressor Squadrons flew the F-5E. One such visit was during ACEVAL/AIMVAL which was a two-pronged test to evaluate new aerial combat tactics for the new (then) F-14 and F-15 fighters as well as the new AIM-9L Sidewinder, the first heat seeker to be able to be launched head-on. If you look at Wikipedia's description of ACE/AIM, any resemblance that summary has to reality is strictly coincidental. Watching several engagements from inside the ACMI trailer was fascinating as this small, low-cost fighter was consistently kicking F-14 and F-15 butt on the range.
Before the start of Red Flag at Nellis AFB, fighter pilots had been getting their aerial combat training from dogfighting one-another. While that does develop some skills, the lessons learned from WWII through Vietnam showed that you need to train against your adversary, not your friend. In those days, the MiG-21 was the greatest and most numerous dogfight threat, and the USAF selected the F-5E for dissimilar aerial combat training (DACT). The F-5E would remain at the core of Red Forces at Nellis and RAF Alconbury (USAFE Aggressors) for several decades before the focus would shift to training against the Su-27 and MiG-29. That led to the replacement of the F-5E with the F-15 and the F-16 as threat surrogates.
The Navy followed a parallel path for DACT by standing up Top Gun at NAS Miramar. After Vietnam, they still considered the MiG-17 to be a serious threat in third-world scenarios, so they pressed the A-4 Skyhawk into the MiG-17 role while the F-5E and T-38 took the role of MiG-21. The T-38 would be replaced with the F-5F, and while other US Navy line aircraft were brought through for DACT roles, the F-5E/F remain in service to this day. In fact, the service wanted newer/lower-time F-5Es for adversary duty and surplus aircraft were purchased from Europe for that role. Those aircraft were brought online as the F-5N.
Speaking of A-4 adversaries, I was TDY to Nellis about a decade after ACE/AIM and was driving along the flightline, watching the aircraft passing overhead through the sunroof. All of a sudden, there was a MiG-17 overhead. I slammed on the brakes, hopped out of the car, and watched the MiG pitch out into the downwind and there was a gray A-4 Skyhawk with a green and tan MiG-17 painted over the wings and fuselage. In the right lighting, you don't see the Skyhawk. Guess what subject is still on my bucket list...
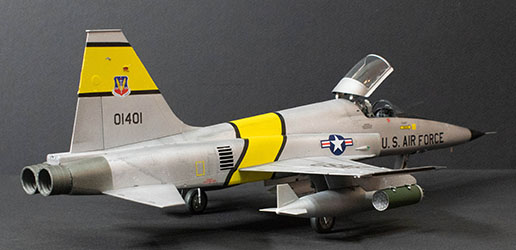
Back to this kit. After finishing my first-look evaluation of the kit and some of the 'nits' that stood out, I happened upon a thread over at Large Scale Planes (LSP) that went into much deeper detail about the perceived bugs and flaws. While I haven't seen a perfect kit ever produced to date, there were a few standout items that I want to address in this build such as the right side cockpit console was backwards, and the fuel fillers on the dorsal spine were molded on the right side of the spine instead of the left. Like the things I mentioned in the first-look, these are easily corrected. Oddly enough, no matter which of the seven subjects provided as decals in this kit, none can be accurately built straight out of the box with this kit. So for this build, I am building a 1970s era F-5E based at Williams AFB (I'll be doing a Nellis aggressor in a future build).
Starting with the cockpit, there are actually two issues here: first, the cockpit tub is a few millimeters too shallow; and second, the right side console is backwards. The image below-left shows the cockpit tub out of the box while the image on the right shows the console reversed thanks to my razor saw.
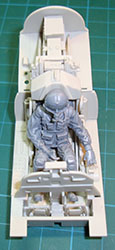
The revelation of the shallow cockpit tub came from that LSP thread, and comparing this tub to the Hasegawa tub, they are correct. One of the concerns they had was that the ejection seat and everything else would be compressed to compensate, but that, fortunately, is not true. In the image below, you can see the kit's resin seated pilot figure next to the partially assembled kit ejection seat. The seat, from the top edge of the seat pan to the canopy breaker atop the headrest is correct in height. The kit is simply missing some of the thickness at the bottom of the seat. You can see the True Details, TAC Scale Dynamics/CAM, and Verlinden ejection seats below in contrast.
One 'glitch' in the kit is that thing sitting like a rear seat cushion in the back of the kit's ejection set. The instructions have you glue that there, and in fact it is molded to fit into that concave back. As you can see on the other seats, that 'thing' is supposed to be the seat cushion that sits atop the hard box survival kit in the seat pan. That is easily fixed (since I hadn't glued those in yet). Which brings up another nit: the bolster that sits under the 'thing' and behind the survival kit is a bolster that the pilot's backpack parachute sits on when the pilot is strapped into the seat. That bolster is too high as you can see in the other seats, and to complicate things, the backpack parachute on the seated pilot is too big.
Even with the really low bolster in the back of the Verlinden seat, the backpack parachute still gets in the way as you can see here, but it does show that the height of the pilot is just right. Note the pilot's legs are pulled up a bit, this is due to the shallow floor in the kit, but if that's all there is for problems, I'm leaving the floor alone.
I've moved the seat cushion onto the survival kit box and shortened the rear bolster. I still need to add the rest of the details to the seat, but at this stage, I was still considering one of the aftermarket seats instead.
Once again, the razor saw trims the bottom off of the backpack parachute and now the pilot figure fits into the seat as intended.
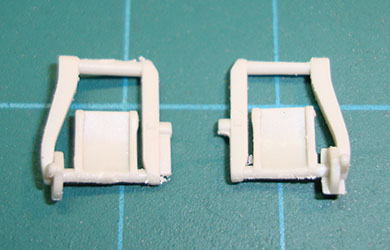
Here is where test-fitting each part pays dividends. These are the rudder pedals (parts F28/F29), and that pin and tab (left rudder pedal) are supposed to fit into a corresponding hole/slot in the box in the footwell. Unfortunately, while there is (sort of) a hole there, the slot wasn't molded into that box. I used my Funtec Carbide Scraper/Cutter to open up the holes and then removed the tabs off of the rudder pedals (right rudder pedal). Now they fit just fine.
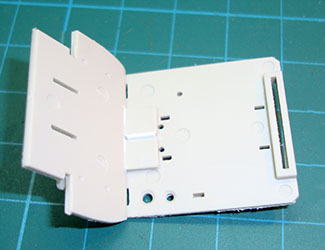
The image on the left is the rear deck behind the pilot (part E28). It is supposed to have a tab that fits into the mounting slot atop the cockpit rear bulkhead (part C41). Instead, both have slots, so I took some card stock and fixed the alignment mounting (right image).
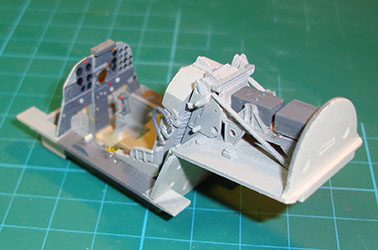
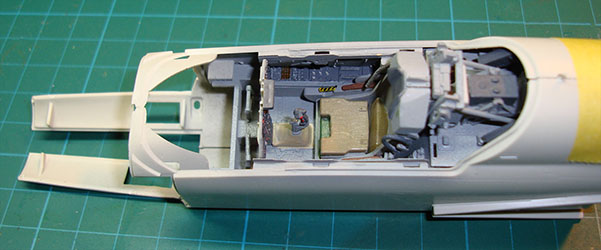
Here is the completed cockpit tub, ready for painting. There aren't any surprises in the build as long as you're test-fitting each part. There is a small ejector pin stub that extends out of an inopportune part of the avionics A-frame (parts E16) that holds the front avionics box behind the ejection seat. Despite the confined area, the Funtec Carbide Scraper made short work of the stub without attacking the surrounding details.
The ejection seat and instrument panel are not glued, so they can go off for separate attention. I've left the canopy lift system off until much later as I'll be keeping the canopy closed for painting, then it will get mounted when we're in the final steps.
Here's the cockpit tub with the pilot figure. I know some folks are not going to be happy knowing that the tub is a few millimeters too shallow, but they can either use one of the aftermarket cockpits made for the Hasegawa kit (the Verlinden cockpit dry-fits inside the Kitty Hawk kit) or wait for one of Harold's (AMS Resin) masterpieces.
I was going to really super-detail the cockpit, but I will save that effort for the next builds. This time, I want to get this first one completed to identify any issues before really getting into the AMS detail mode. I'll add the pilot figure before I close up the nose section, and I'll add the canopy lift mechanism and canopy after all of the painting is finished.
The cockpit is just about finished and dry-fitted into the forward fuselage halves.
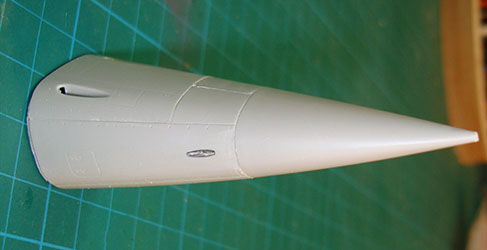
The fuel filler caps were molded on the right side of the spine rather than the left, and the antenna base in the center needs to go. I dug out my trusty Waldron punch set and found a punch the same diameter as the fuel filler caps. I punched out four disks, two to overlay the right side holes, and two to serve as new filler caps. I used a pin vise to drill out pilot holes for the new refueling points on the left side, followed by a drill bit that matched the diameter of the Waldron punch that I had just used. After opening up the two holes, I used a chamfering tool to bevel the edges, and then glued the disks into place as the new filler caps. I also opened up the hole for the antenna, inserted sprue stock, and glued the hole closed. I used my Sujiborido course file to remove the excess plastic in the old filler holes and the antenna base, then applied Mr.Surfacer 500 to find any imperfections. When all of that is sanded and polished, the spine is now corrected and backdated.
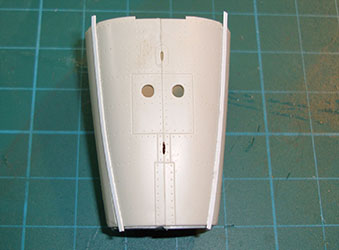
Here is the foundation for the nose section ahead of the cockpit - the nosewheel well. This serves as the nose gear mount, gun bay walls, and structural support for the forward nose section and radome subassembly. The kit was designed so that the nose gear strut must be installed as part of the assembly.
While the nose gear well is drying, it was time to backdate the forward nose section. The RHAW blisters are integral to the nose but don't exist on early F-5Es, so these need to go. Looking from the inside, the RHAW blisters are hollow so they'll be filled with cyano. Once the cyano dried, I used my Sujiburido planing file to remove the blister and as you can see on the left, the cyano filled in the void.
Since I'm building this model with the gun bays closed, I didn't add any of the details inside but added the structural frames fore and aft. The gun bay/nose gear well subassembly was glued into place on the left fuselage half, leaving the right half removable, for now.
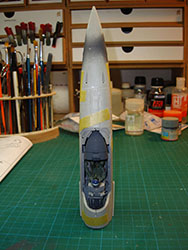
The forward nose section is assembled and the early radome is dry-fitted.
This step took some time. While I thought the gun bay doors were positionable, they were really designed to be displayed open. The latches on the upper door halves are molded open and will need to be filled-in. The doors themselves didn't quite fit onto the nose, but with a little dry-fitting and trimming, they eventually went into place.
The lower sides of the forward nose section had recesses left over from the slide molding process. these recesses were filled in with Evergreen styrene strips and then plane-filed smooth to the surrounding surface with the Sujiburido file.
I finished painting the pilot, mounted him in the cockpit with cyano (the figure is resin), then glued-up the nose subassemblies.
Here is my head-scratcher with this kit. Here is the lower rear fuselage half with the J85 engines and intake ducts installed. Yes, there are no ducts.
I thought about blanking-off the intakes like Hasegawa does with its 1/32 F-5E, but I opted to paint the inside of the rear fuselage black instead, so you won't see much of anything down the intakes.
With the rear fuselage halves together, I glued the forward fuselage to the rear. While there isn't that much of a mechanical joint here, I used liquid cement to fuse the two sections together solidly.
After studying reference photos, I found that the early and late LERX terminated at roughly the same point against the intakes. Rather that guessing the cut angle for the early LERX, I cheated and pulled out the Monogram 1/48 F-5E kit which does have the early LERX. All I needed was the angle, which I transferred to the kit wings and then a simple straight cut on each side with a razor saw.
Here are the wings dry-fitted to the fuselage. The reshaped LERX look good, so now to finish the intakes and mount the wings.
The wings and intakes go together uneventfully, but I couldn't get the wings to sit snugly against the fuselage. After lots of test-fitting trying to isolate the problem, it turned out that there was some flash in the slots of the fuselage wing mounts. Once I got a micro-file in there and cleaned that out, the wings fit very nicely.
I've added the leading and trailing edge flaps, and ailerons to the wings. The flaps mount nicely in the neutral position and wouldn't take much effort to pose them extended. The ailerons were molded with some complex hinge details, and when you slide them onto the wing, both ailerons sag downwards. While I've never seen an F-5E with that much sag and rarely with any at all (but the ones I would see were flown often out of Nellis back in the mid-1970s). I used a combination of tools to modify the hinges to pose the ailerons up in neutral. Here also is the vertical stabilizer assembled and dry-fitted to the fuselage. I've also applied 3M acrylic putty to the ECS vent on the rear of the canopy frame.
I was initially going to leave the stabilators off until after paint, but I'm glad I didn't. On my build, the left stabilator fits nicely in the fuselage socket, but the right fuselage socket is too large in diameter for the starboard stabilator. Instead, I opted to glue the stabilators while the main landing gear was still not installed. Sitting on its belly, the fuselage is just right to allow the stabilator tips to droop to the work surface, replicating the slight anhedral of the F-5 stabilators.
Here is the tailhook, and the only reason I bring this out is the instructions identify the tailhook as part A8. They fail to mention that the shaft is A8 and the actual hook on the end is part A9.
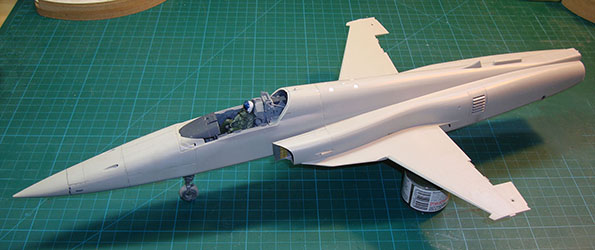
That magic moment in any aircraft build, when the model is sitting on its landing gear. The tail, wing pylons, and missile rails are all installed. The canopy frame has been sanded smooth around the ECS vent to remove the molded-on vent frame and blend the putty surface smooth.
The centerline pylon doesn't fit on the centerline. The mating surface of the pylon against the fuselage doesn't conform to the fuselage surface, so I beveled the front and rear ends of the pylon to conform to the fuselage, then added styrene to the anti-sway pads. After fitting and trimming the pads to conform to the fuselage, the pylon sits firmly in place.
Looking underneath the kit, most of the details are now in place. The clear lenses are about all that are missing, and they'll get installed after painting.
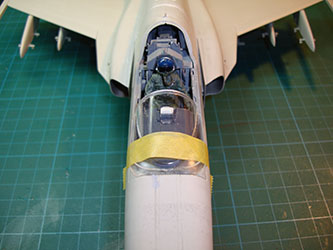
While I'm going to deal with the canopy separately, I needed to get the windscreen in place. The problem was that the clear frame didn't want to conform to the nose. I used tape to 'help' the clear part to fit (resistance is futile) and applied liquid cement carefully around the edges. I let this set up overnight.
While the result was more or less successful, I added more liquid cement into the seams around the clear part, and then applied Mr.Surfacer 500 to the seams. Here is the result after some careful sanding.
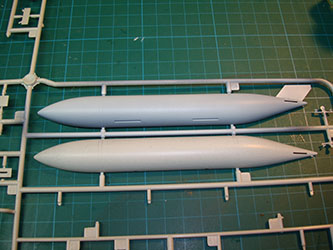
While the windscreen was being glued into place, I decided to test my paints. I'm not using the centerline tank in this build, so I applied Mig Black One-Shot Primer to one half of the tank and left the other half bare. I am still very pleased with the smooth texture and firm grip that this primer provides. Even when I have to touch up, the primer lays so smooth on the surface that you cannot see where the touch-ups were applied after it dries.
I had planned to apply a Southeast Asia (SEA) camouflage scheme to this model to represent one of the training birds out of the 425th TFTS at Williams AFB back in the 1970s. I had procured MRP colors for this project, and to be honest, I've never shot MRP before. I applied the FS 36622 (underside gray) to both halves of the centerline tank, and you can see how the MRP color shifts over black. It didn't do much for the bare plastic part, though I wasn't expecting anything drastic with gray-over-gray, I am disappointed that MRP is so thin that it can't be applied over other colors without changing the intended color. The best use of MRP is over gray primer and not over other colors as I'm used to doing with paints like ModelMaster or Tamiya.
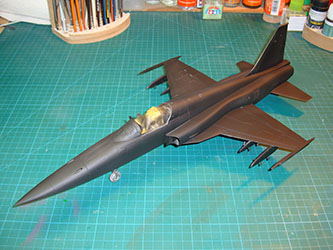
It was time to prime the jet with One-Shot. As expected, it revealed a few areas that needed a little more filler, but otherwise everything looks good.
After another round of filler touch-ups, I applied another primer coat and we're ready for the next step.
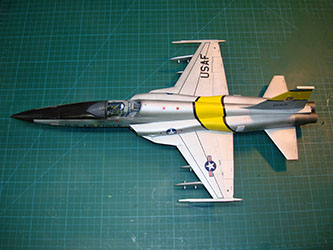
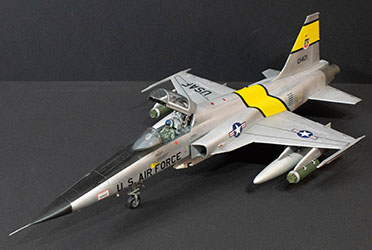
So my plans for the SEA camouflage were scuttled, what color works best over black? Silver! The kit also provides the markings for the 425th TFTS aircraft which carried the factory silver lacquer scheme with the squadron-applied yellow ID bands from the Korean war. I masked off the radome and anti-glare panel, then shot the airframe with Tamiya Flat Silver. This shot is after two coats of silver were applied and before I added the burnt metal rear fuselage section.
I applied a gloss coat over the flat silver to ensure an easy application of decals, but once everything had dried, I just wasn't happy with the Tamiya finish. The model sat for over a week while I stared at it, worked on a few other projects, and contemplated what to do next. In the end, the finish isn't bad, and it will be covered by many decals, so it was time to crack on.
The decal sheets from Kitty Hawk are crammed with decals. It takes time to carefully remove the needed markings off the sheet without harming surrounding markings. First to the test were the wing walkway stripes. Kitty Hawk printed the stripes as one decal per side, but without the clear carrier film between the front and rear stripes. I cut away the rear stripe to be applied later and laid down the front stripe. The decal lays down perfectly. I repeated the process on the other side and let the stripes dry. I added the rear stripes to each side of the wing, then added the stars and bars to the intake trunks. With each step, I am happy with the decals' performance.
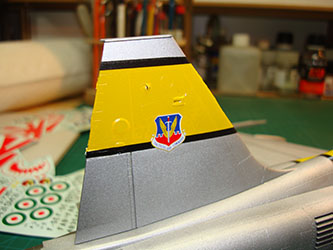
While the stars and bars were drying, I decided to try the yellow bands on the vertical stabilizer. These are slightly oversized (hang off front and rear) which made aligning the other side much easier. I used a cotton swab to work out air bubbles and push the decal to conform with the raised details. I came back the following day, carefully sliced the excess decal off the leading and trailing edges, then carefully poked holes into the few bubbles surrounding the raised details. Once again, I used a cotton swab and a bit of Gunze decal setter work out the bubbles and get more decal conformance to the surface. The results are quite nice.
The fuselage band followed a similar process - I applied the left and right side bands over the intake trunks and let them dry. Any remaining bubbles were again worked out with a cotton swab and setting solution. There are two more band decals that make up this part, the saddle decal that runs over the dorsal spine, and the ventral portion of the band. The ventral side is no problem, but I was curious how well the bands would align over the top side. Aligning the front black band, the rear black band doesn't quite line up. The solution was to cut the sides of the saddle decal along the edges of the trunk/spine, and while not perfect, it works well enough.
The decal process continued and I am impressed with the performance of the kit decals. If the decals did silver, where better than on silver paint?
The F-5E is sitting properly on its landing gear now that the main wheels are completed. I was a bit surprised that the tires had no tread on the nose and main wheels, but I'm not waiting for aftermarket on this build. The aircraft is portrayed as powered-up, so the gear doors and speed boards are all closed.
The main gear doors have the piano hinge detail on them, both at fuselage hinges and the outer hinges for the small doors. They don't fit. After filing and test-fitting each of the hinges with a microfile, they were finally able to interleave together. Don't forget to remove the fairing off the starboard main gear door for the chaff/flare dispenser if you're backdating your aircraft.
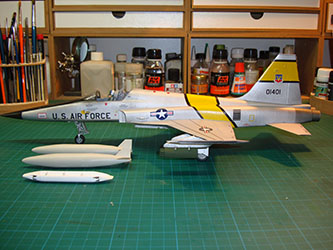
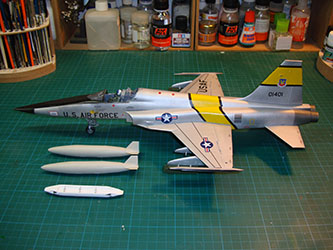
Here we are test-fitting the externals. Since I am portraying a 425th TFTS school aircraft from the early 1970s, I needed a suitable externals load. You'll recall that the kit comes with AIM-9B or AIM-9L Sidewinders (the majority of F-5s outside of the aggressor/adversary community carried the AIM-9J), I'll leave the wingtip rails empty. Besides, the rails are very nicely done. The kit also has the AIM-7 Sparrow (not used on any F-5, ever), Mk.82, and Rockeye bombs. While the bombs might be loaded for a final exam, the typical training load would be a bomblet dispenser and/or rocket pods. For this, I turned to videoaviation.com for their SUU-20 dispenser as well as their LAU-3 rocket pod sets.
In the next photo, the external wing tanks are ready for paint, the LAU-3 rocket pods are primed and dry-fitted to the outboard pylons, and the SUU-20 going on the centerline is also painted and waiting on the bomblets to dry.
In the early stages, I decided to keep the canopy lift mechanism off the aircraft until the end. With the model painted, lightly weathered, and now armed, there was no more waiting on the canopy. I masked off the inner-most lines in the canopy as well as the complete insides before priming the canopy frame with Mig One-Shot White. When that had dried, I masked to the second line, and painted the canopy frame with Mig One-Shot Black. Once the primer had dried, I painted the canopy frame the same color as the airframe. After removing the masks, I now had the white canopy sealant around the edges of the canopy. Flipping the canopy over, I masked the frames on the inside and painted them with Mig One-Shot Black. The canopy structure and lift mechanism had been pre-painted and were installed. All that was left was to carefully guide the lift arms around the sides of the rear avionics stack and plug them into their holes. Mission accomplished.
When I build a new kit for the first time, I usually do a quick-build without paint or filler, but this time I wanted to do more. There are some steps I will do in the next build that I opted not to do here because I wasn't sure how the overall model was going to go together. Now that I know what to expect, I'm going all-out on the next two F-5Es. You can see that it doesn't take much to back-date this kit to render an early F-5E, and with the help of videoaviation.com's external stores, I have a nice school bird.
In the next two builds, I'll be doing an aggressor from Nellis AFB and a Latin American F-5E with the extended vertical stabilizer fairing. I'm looking forward to seeing what aftermarket decal options will be coming for this kit and I'l really looking forward to Kitty Hawk's F-5F. Now if only we could have an F-5G/F-20A in 1/32 scale, or even step back to the F-5A/B/C/D/CF-5 family...
My sincere thanks to Kitty Hawk Models for this review sample!


