Kitty Hawk Models 1/32 T-6G Texan Quick Build Review
By Michael Benolkin
| Date of Review | October 2014 | Manufacturer | Kitty Hawk Models |
|---|---|---|---|
| Subject | T-6G Texan | Scale | 1/32 |
| Kit Number | 32001 | Primary Media | Styrene |
| Pros | First styrene kit of this subject in this scale | Cons | A few minor glitches (see text) |
| Skill Level | Experienced | MSRP (USD) | $79.95 |
Background
For a brief discussion of this subject and a look at this kit out of the box, look here.
The Build
Several of us on Cybermodeler Online are doing full-builds of this kit but before I started mine, I decided a quick-build was in order to see what, if any, pitfalls awaited. I actually started this 'quick-build' a few months ago, but due to a number of distractions not related to this build, the project sat almost completed for most of that time. As with our usual quick build format, we don't use filler or paint in this project so you can see any problems/challenges first-hand.
I did the unmanly thing of following the instructions but before I started building, I noted that there were the usual array of ejector pin holes and pin stubs that needed to be removed from each part.
Here are the side frames for the cockpit area and there are many holes here that will need to be cleaned up/filled. I found out the hard way that two of the lateral frame mounting points were flashed over and needed to be drilled out.
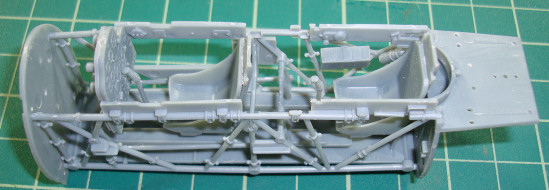
The first step is mounting the foot troughs to the cockpit floor, selecting either sticks or yokes and installing these as well as installing the seat frames and seats. The front seat frame mounts to the side frames as you'll see below but the rear seat has no mounting point until later. The next time around, I'll install the frames and leave the seat buckets out until later.
Here is the cockpit assembly with the firewall, rear bulkhead, and lateral frames all installed. The rear radio shelf is also mounted to the back of the rear bulkhead.
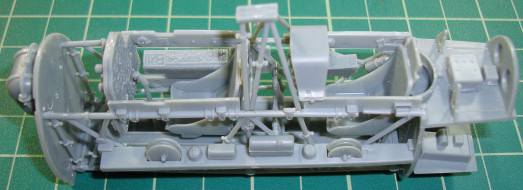
The cockpit assembly now includes the side control consoles, roll-over pylon, radio on the rear upper shelf, additional avionics on a new lower shelf, and an engine oil tank mounted to the firewall.
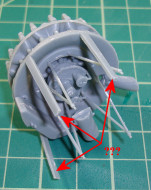
The radial engine goes together nicely and features lots of details behind the engine should you choose to display the model with the access hood removed. The engine also has scale engine mounts provided though the kit also adds three parts (arrows above) for what I assume is additional strength. Those three parts might represent the frames for the side access panels if those had been molded separately but they actually interfere with the installation of my engine. On the other hand, mounting the engine to the firewall before the cockpit subassembly goes into a fuselage half will require lots of care as those engine mounts are not very strong (in plastic). In the next go around, I'll leave off the three extra parts and replace the plastic engine mounts with brass wire bent and cut to be direct replacements.
Here is the engine subassembly mounted to the firewall with those three additional parts added per the instructions. They do make the engine-to-firewall join stronger, but they get in my way later on.
Here's the combined assembly mounted in the right fuselage half. So far, so good.
The fuselage halves go together quite nicely with the only exception being the exhaust collector ring heat shroud that also serves as the attachment point for those three extra parts. You can see in the images above how they're pushing the shroud away from the fuselage.
The rear deck mounts to the fuselage and it is slightly undersized. Next time around I'll add some thin Evergreen styrene strips to the rear deck and raise it to the correct height.
Now here is a thing of beauty - the join between the fuselage and wing center section. Little or no filler will be required there. The cowling covers the gap between the fuselage and exhaust collector ring shroud.
In the final steps, the outer wing panels are assembled and mount to the center section. I was curious about the ailerons as I'd seen some builds with both ailerons drooping like this aircraft was a fly-by-wire machine (it is, but not that kind of fly-by-wire) and if you accidentally swap the ailerons, they will droop incorrectly. Note that when they are mounted correctly, they'll be neutral on the wing and the aileron actuator link holes will also align.
The mounts for the main landing gear struts are not very secure. Next time around the struts will be mounted to the wing with cyano.
The canopies are very delicate. If you attempt to remove them from the sprue trees with sprue cutters, you will crack one or more canopy sections. Use a razor saw instead. I decided to assemble the canopy closed to see how things fit and you can see there were no problems except for a glue spill accident. After a moment of panic, I remembered the steps to clean and repair the clear part
and you can't see any hint of that event now.
Here's the completed model without any of the defining antennas nor external stores. This exercise was a test of the buildability of this kit and with the few minor points discussed above, this is easily the nicest kit Kitty Hawk has produced to date. Now I know what to watch for in my upcoming full-build and so do you! If you love the aircraft as I do, you'll want to build one or more of these beauties before Kitty Hawk sells out of the kit!
Recommended for experienced modelers.
My sincere thanks to Kitty Hawk Models for this review sample!


