Italeri 1/72 M4A3 75mm Sherman Build Review
By Llarry Amrose
| Date of Review | February 2012 | Manufacturer | Italeri |
|---|---|---|---|
| Subject | M4A3 75mm Sherman | Scale | 1/72 |
| Kit Number | 7518 | Primary Media | Styrene |
| Pros | Quick build | Cons | Wargaming mini |
| Skill Level | Basic | MSRP (USD) | $21.95 |
Build Review
It’s big, green, and the U.S. produced about a billion of them during World War II. It’s the Sherman tank. The M4 Medium tank entered service in 1942 and continued through the war and beyond. Improvements were introduced progressively, so as not to disrupt production, and in the end, over 50,000 were built, second only to the Soviet T-34. While individually, it could not stand up to the best and heaviest German tanks, like the Panther and Tiger, it was fielded in much larger numbers. As they say, “Quantity has a quality all its own.” The Sherman was used on all fronts, in Europe, Africa and the Pacific, and supplied in quantity to the British and Soviets.
With so many in service, it was obvious that specially equipped vehicles would follow, from the simplicity of the Cullin Hedgerow device to the Duplex Drive amphibious variant used at D-Day. There were flamethrowers, bridgelayers, and bulldozers, and mine-clearing vehicles.
Italeri offers a fairly broad variety of model kits, but one of the categories they are known for is 1/72 scale armor. They hold the classic ESCI molds from the ‘70s, and have been gradually reissuing many of them, including some believed to be forever lost. They have also released some very nice new-tool kits. Recently, they have been supporting a war game system (ALZ0-ZERO), with quick-build kits. These have simplified construction details such as one-piece suspensions of wheels and tracks. Their M7 Priest/Kangaroo kit was quite popular as there is no other mainstream kit in 1/72 (others are 1/76).
Inside the standard end-opening box are two kits, each made up of two sprues, one for the turret and one for the hull, totaling 13 parts per tank. The simplified details include the lift rings on the hull and turret being molded solid, as are the brushguards on the head and taillights. The pioneer tools are molded to the hull, but as those go, are fairly nicely detailed. The decal sheet includes a variety of star types and an assortment of serial numbers. The construction instructions are on the back of the box; the only paper inside has the safety warnings and missing parts form on one side, and the painting and markings on the other.
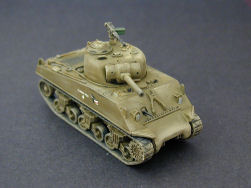
Italeri claims this to be an M4A3 with 75mm gun – so is it? Sure thing. I’ll have to leave the analysis of the road wheels to the true Sherman experts, but the VVSS suspension units look like proper mid-to late period parts. Unfortunately, the track detail is rather indistinct, so it’s hard to confirm the most likely T48 tracks. The hull is the welded design with the 47-degree front armor and large hatches, with the large engine grating in back which distinguishes the Ford V-12 of the M4A3.
The turret is a rather nice low-bustle 75mm turret with the mid-period oval Loader’s hatch. The lift rings are molded solid, which is a bit of a shame as the rest of the detail on the turret is very nice. One interesting feature is the optional rear-turret mounting for the Anti-Aircraft machine gun. I’ve seen drawings of it, but no photographs, although most photos are from angles where you can’t tell whether it’s there or not. I’ve never before seen this in a 1/72 scale Sherman kit.
With only 13 parts, construction is quick and simple. The fit is good, such that it can practically be completed as a snap-tight kit. The gun mounting is the most complicated section of the kit, and the most deserving of glue. There’s only one joint on the entire kit that needs any real attention, and it’s right up front. The upper and lower hull parts meet right across the front, in the middle of the transmission transfer housing, though it’s a pretty tight joint.
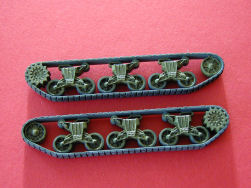
The one-piece wheels and tracks can be added right away or left off until later. Either way works just fine, depending upon how you prefer to do the painting. There’s a fairly prominent mold seam all the way around the tracks that will need to be dealt with. It’s easy enough to sand down, but that isn’t enough to save the chevrons on the track links, which look more like blocks than chevrons.
On the door in the super structure side, I used a razor saw to create a separation line in the bottom of the door; two holes were drilled on the side of the door and a grab handled made of thin brass wire was attached. A hole on each side of the rear super structure was drilled as well. Fuel cans from the Academy Accessory Set were added to the right side. These were detailed with three handles made of .010 plastic rod added to the fuel cans to replace the one piece molded handle.
On the engine deck, there should be a set of tools. Instead of adding tools, I took .010 plastic and made two U shaped channels on both ends of the space between the engine covers and then added two .030 rods across the channels and a tarp made from Apox-I-Sculpt. I mixed the Apox-I-Sculpt into a ball and rolled it paper thin using a plastic tube and baby powder so the putty would not stick to the tube. I then cut a square long enough to cover the tool rack but not so long that it would interfere with turret rotation.
On one of the two kits, I went ahead and tried to drill out the lift rings. I’m not entirely satisfied with the results. It might be more effective to cut them off and make them from scratch (or the spares box), but I suspect that’s more than most wargamers will want to do. I used one of the rear-turret MG mounts and cut the other one off so as to represent both configurations.
You can have your Sherman in any color you want, as long as it's olive drab. Well, that's not exactly true, but it's the way to bet. There were some two-tone camouflages, and winter white schemes, but olive drab predominates. There were specifications, but no matter how closely they were followed, variations will exist. Whether due to a bad batch, bad application, or just differences in wear and tear, two tanks sitting next to each may be different shades. Lifecolor has a whole series of shades of olive drab of varying degrees of weathering. I have a couple of them so that my US armor builds don’t all look alike. To get a better finish, I started with a sprayed black primer coat so the Lifecolor paint has something to bite into.
There are four marking schemes, three in overall olive drab and one with a winter whitewash. All are fairly generic with no specific unit information. The first is from the Philippines in 1944 and includes a name and art, and no stars. The other two olive drab tanks are labeled as Germany, 1945 and ETO, 1944. The winter white machine is from the Ardennes in the winter of 44-45.
I chose the Philippines tank and the winter whitewash. Winter schemes tended to be field-applied, crude affairs, generally hand-brushed, and there are even reports of paint being applied with mops. To that end, I usually slap it on with a pretty big brush with slightly thinned paint. The paint they used was water soluble, and would wear off over the course of the winter. I kept the wear and tear light to represent the tank earlier in the winter.
Make no mistake, this kit is targeted at wargamers. It’s a quick, easy build, suitable for whipping up a handful to send your platoon into tabletop battle. Given that, the degree of accuracy is spectacular. This would also be a great kit for a young beginner, with its simple construction a gentle introduction to modeling skills.
For the serious builder, this kit comes up a little short. The solid lift rings and brushguards around the headlights and taillights, and the weak track detail, are the fatal shortcomings. Undoubtedly, we will soon see some master detailer who has taken one of these and produced a stunning display with incredible detailing skills and details scavenged from other kits, but that will remain the exception rather than the rule. For most of us, there are better Sherman options out there, but that’s fine with Italeri. They have hit their target dead-on.
I would like to thank MRC for the review sample.


