Italeri 1/72 M13/40 Build Review
By John Kelley
| Date of Review | November 2011 | Manufacturer | Italeri |
|---|---|---|---|
| Subject | M13/40 | Scale | 1/72 |
| Kit Number | 7517 | Primary Media | Styrene |
| Pros | Good detail and fit, accurate shape | Cons | Missing rivets on most of the super structure |
| Skill Level | Basic | MSRP (USD) | $21.95 |
Build Review
In 1940 The Italian Army began using the M13 tank. While the running gear was used from the M11/39 tank the rest of the tank was new. A 47 mm cannon was carried in the turret along with a 8mm coaxial machine gun. In the right side of the superstructure were 2 x 8mm machine guns. The M13 was a greatly improved design over the M11 but it was not without its own flaws. The armor was thin and riveted in place instead of welded. The crew intercom system was poorly designed and prevented good communications between crew members. The main gun was effective on the British light and cruiser tanks but not against the infantry tanks. The M13 eventually was improved and became the M14/41 but in spite of those improvements the Italian armaments industry was unable to provide enough tanks for a war time army. As the M13s were lost replacements were rare or not even made whereas their German counterparts usually were able to make good on their losses to some extent.
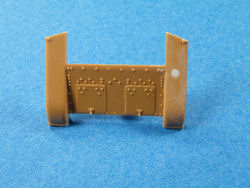
Italeri has released a kit of the M13/40 tank in 1/72 scale and includes 2 complete kits in the box. The kit is designed for war games and as such it is a robust model albeit simple for the display modeler. While the suspension is one piece and the detail is molded on, the kit is very well done and lends itself to further improvement for the display modeler. I compared it to plans and found it to be very accurate in scale. There a number of rivets missing from the super structure and no tools for the engine deck but in spite of this I found the kit to be accurate overall and a good representation of the real thing.
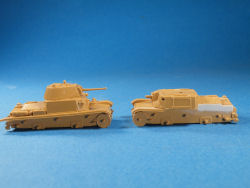
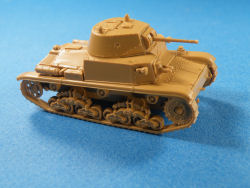
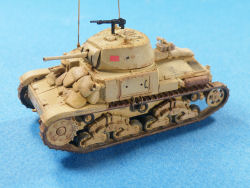
I built the kits in two ways. The green camouflaged tank is built as a table top war game model while the sand colored kit has been further detailed and converted to a radio command tank as well.
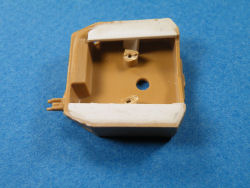
Starting with the green tank I assembled the lower hull and added the glacis/engine deck assembly. When I added the superstructure there was a gap between it and the engine deck. By removing the super structure location pins I was able to move it closer to the engine deck thus minimizing the gap.
Since I glued the whole kit together removing the pins was not a problem. I found out later after I assembled the upper hull that the track assembly would not easily fit under the attached upper hull. This is because the tracks are so close to the fenders and the fenders themselves are just wide enough to clear the tracks. Because of this I recommend you assemble the lower hull first then paint it and the tracks. After they have dried add the tracks to the hull and begin to assemble the upper hull and turret. The mantlet was a little narrow creating a small gap which I filled with white glue and painted over. These were issues that were common to both models.
The sand colored tank was worked on more extensively. First, the fenders were cut at an angle to where the super structure sides start. The rest of the fender was removed from the engine deck as well as the stowage boxes. The jack was sawed off the fender and was glued to the back of the tank and the hole filled with plastic and sanded smooth. The opening under the super structure and stowage boxes were filled with plastic and there was a slight step between the engine deck and hull that was filled with .010 plastic. The mufflers had the openings for the location pins filled and sanded and these were attached to the sides right behind the stowage boxes.
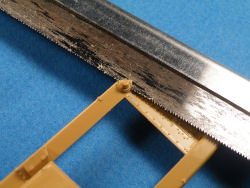
On the door in the super structure side, I used a razor saw to create a separation line in the bottom of the door; two holes were drilled on the side of the door and a grab handled made of thin brass wire was attached. A hole on each side of the rear super structure was drilled as well. Fuel cans from the Academy Accessory Set were added to the right side. These were detailed with three handles made of .010 plastic rod added to the fuel cans to replace the one piece molded handle.
On the engine deck, there should be a set of tools. Instead of adding tools, I took .010 plastic and made two U shaped channels on both ends of the space between the engine covers and then added two .030 rods across the channels and a tarp made from Apox-I-Sculpt. I mixed the Apox-I-Sculpt into a ball and rolled it paper thin using a plastic tube and baby powder so the putty would not stick to the tube. I then cut a square long enough to cover the tool rack but not so long that it would interfere with turret rotation.
I laid the tarp on top of the two rods and added a box from the Academy Accessory Set. I used ship rigging string to tie the tarp to the rods and the box. While I had the Apox-I-Sculpt out, I made sandbags for the glacis plate. This was done by rolling the epoxy into a very thin roll and then cutting each sandbag and flattening the top as I laid it in place on the hull.
The antennas were made with strip styrene for the mounting brackets and .040 rod for the bases. The antennas themselves are .015 rod. I drilled out the headlights on the sand camouflaged tank and on both kits, drilled out the machine guns and cannon. This completed assembly of both kits.
The green tank was painted with Tamiya XF-65 Field Gray. The same color was mixed with 40% XF-55 Deck Tan. This was then sprayed in a cloud pattern over the model. The tracks and muffler were painted XF-64 Red Brown and the road wheels and return rollers were painted Model Master Interior Black. The model was then given a coat of Future Floor Wax with Pledge and the decals were added. I added a drop of the floor wax under each decal to help hide the carrier film. The model was given a wash of Lamp Black to bring out the details. For weathering, I mixed oil paints using Oxide of Chromium and tinting white with just a little black added and this was dry brushed onto the model to highlight the details and fade out the paint further. After this had dried, the model was flat coated with Tamiya Spray Clear Flat and Tamiya Buff was heavily thinned and washed along the running gear. To this was added Mig Pigments Africa Sand. I applied this heavily to the running gear and lighter on the top. For the tracks and muffler, I added dots of Cadmium Orange Hue and Red to the surfaces and then blended them with a brush. After I was satisfied with the finish, I added Mig Pigments Brick Dust to the muffler to give it a little texture. The tracks were then gone over with a silver pencil on all the raised track detail including the drive sprocket teeth .
For the sand tank, the muffler, track and road wheels were treated the same as the green tank. The model was given a base coat of Tamiya XF-59 Desert Yellow. A 50/50 mix of Desert Yellow and Deck Tan were then sprayed in random spots on the model. Future was once again sprayed on and the decals applied with no problems. I decided I wanted to make this one a little bit more worn than the first tank. To start off with, I took a piece of Scotch Brite Pad and dipped it in Tamiya Dark Gray. This was dabbed heavily on the fuel cans and lightly on the engine deck and turret top to show paint chipping and wear. I painted the tarp and sand bags in various shades of brown to add interest to them. For the wash, I used Citadel Washes Gryphonne Sepia to emphasize the detail on the model as well as the sandbags and tarp. It also adds a little dullness to the paint as well. For dry brushing, I mixed Yellow Ochre and Tinting White to create a bleached effect over entire model. I used it to tone down the decals on the kit as well. I used Lamp Black again to bring out the radiator detail on the model. If you haven't tried using oils, you should. The nice thing about them is they are very forgiving and if you don't like what you did, simply take a clean brush and rub the area until the oil paint is completely buffed out. Unlike acrylic and enamels, oils are much easier to control. There are numerous videos and "how to articles" on the web and this is how I learned along with just practice, practice, and more practice. One area I used the lamp Black on was the turret main gun periscope and m.g. opening. After looking at my references again I realize this area should have been left in the base color and not painted black.
This was simply a fun kit to build. The nice thing about war game models is you don't have to worry about construction and you can concentrate on finish. They make ideal kits for the beginner or for the experienced modeler just wanting to learn how to try different finishes. I could have taken the model even further by adding rivets that were missing on the super structure and more tow shackles. I was impressed with the details of the kits in general and the quality of their moldings. If you haven't bought these kits, go to your local hobby shop and get one.
I highly recommend this kit to anyone interested in Italian armor of the Second World War.
I would like to thank MRC for the review sample.


