Italeri 1/9 Zündapp KS 750 with Sidecar Restomod Build Review
By Michael Benolkin
| Date of Review | April 2021 | Manufacturer | Italeri |
|---|---|---|---|
| Subject | Zündapp KS 750 with Sidecar | Scale | 1/9 |
| Kit Number | 7403 | Primary Media | Styrene, Vinyl |
| Pros | Nice details, easy build | Cons | See text |
| Skill Level | Experienced | MSRP (USD) | $69.99 |
Build Review
For a brief history of this subject and a look at this kit out of the box, look here.
This kit has been on my bucket list for decades. Before Italeri reissued this kit, I've had a few of the original ESCI releases on the shelf, but they're all the same kit regardless of the boxing. What has kept the kit(s) off my bench is my weariness over so many German WWII subjects on the market (and in my collection, though those are being thinned out). I figured an opportunity would arise where I would be enjoy tackling the Zündapp. Note that this kit is the Zündapp KS-750 motorcycle with a sidecar that was used by the German military with almost 18,700 examples built. ESCI first released this kit in 1973 and it has been released in Revell and Dragon boxes before the tooling was acquired by Italeri. Considering the age of the molds, Italeri has kept the tooling in great shape and the kit's level of detail stand up to today's expectations quite nicely. Nevertheless, the mold making technology of the 1970s is nothing like what is produced today, so there are mold lines on the finer parts that will need attention.
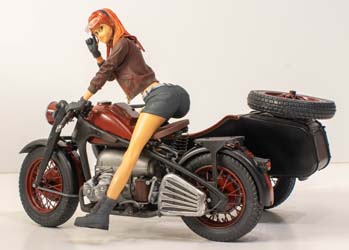
So what changed to get the Zündapp on my bench? Meng released this resin figure of an anime biker girl on one of their recent 1/9 motorcycle subjects. While I don't have any interest in modern motorcycles, I immediately saw the possibilities of posing her on the Zündapp. Rather than give her an anime Wehrmacht appearance, I'm going to build the Zündapp as a modern restoration/modification (restomod) bike used as a civilian daily driver. Off we go...
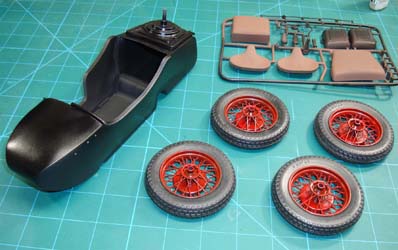
The first task was to tackle the four spoked wheels. Each spoke had the aforementioned mold line on either side of each spoke as well as around each rim, so using a combination of microfile, scraper, and hobby knife, I spent a few days cleaning spokes. That is almost as much fun as cleaning up individual track links, but I digress...
With the wheels cleaned up, it was time for some test-fitting of the wheel halves, first without the tire, and then with the rubber on. No problems here. Before I can glue these halves together, I need to prime and paint the wheels, but that will have to wait a bit.
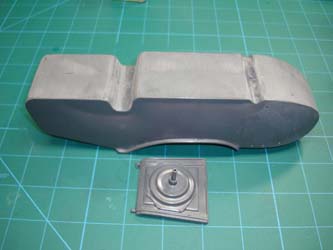
Here are the two halves of the side car shell dry-fit together. I could see a few fit problems that were cleaned up before gluing the halves together. I tend to use Tamiya Extra Thin Cement, but I find it isn't very effective with the ESCI plastic for some reason.
With the halves together, I ran a bead of gap-filling cyano on the seams of the body shell and then wet-sanded the shell smooth. I also filled the holes on the front where the mounting brackets go to hang the stowage boxes on the nose as I won't be needing these in my build. The 'trunk' lid fits nicely though I won't glue that into place just yet.
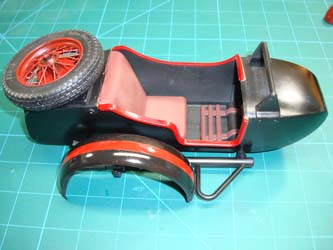
Time for primer. I used black Stynlrez primer on the body shell, wheels, and vinyl seat parts. Once dry, I used Gunze Aqueous Red Madder thinned with lacquer thinner to paint the wheels, applying several coats to build up the color. With those set aside, I saw some flaws in the surfaces of the body shell and applied more gap-filling cyano, wet sanding, and Stynlrez. Once I was happy with that effort, I thinned Tamiya Gloss Black with lacquer thinner and applied the base coat on the shell. Even with the self-levelling lacquer thinner, I had a bit of orange peel in the paint surfaces and used a 2400 grit sanding pad and water to buff the surface smooth. At this point, I opted to add the mounting bar on the front of the shell and the trunk lid with brackets on the rear. This will get another round of primer and base coat before installing the interior parts. Speaking of interior, I applied Tamiya Red-Brown to the vinyl seat parts as a base coat and will add additional colors to add that used look to the leather. The body shell has thick ledges on either side of the passenger seating area and while they're bare on the period Zündapp, they'll be painted an accent color on this restomod.
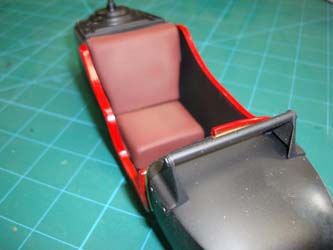
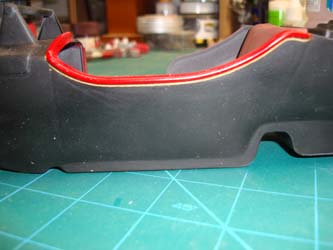
After the paint on the sidecar was touched up, I masked and painted the wood foot rest which looks good inside, and then masked the ledges on the sidecar shell. I thought about a few different colors to stand out from the black and decided to shoot them red like the wheels. The result looks good, though at the moment, it looks like something out of Batman. There's definitely more work to be done here.
As I pondered what to do about the plain red/black scheme on the sidecar, I test-fit the vinyl seat, looks good for now. I opted to trim the red with a gold accent paint pen and this does mitigate the caped crusader look.
I decided to pause on the step-by-step approach to the instructions and started work on the sidecar chassis and KS 750 bike frame. As mentioned above, the kit plastic doesn't respond effectively to Tamiya liquid cement, so I use it to tack the parts together and when I'm satisfied, I apply thin cyano to firm up each joint, then gap-filling cyano on any visible seams. I worked each part with my Alec R-Boko seam scraper which is very effective and removing mold lines and seams without leaving flat spots (like a file) due to the different diameters on the tool. When I think I've finished each subassembly, I set it aside to apply primer in my next session. The trouble was that each next session finds another missed seam or mold line, so more work is done until the job is really finished.
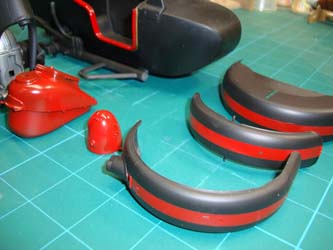
Again, I jumped ahead to grab the parts I'll need for my painting session: fenders, fuel tank, and headlight housing. They're all cleaned up, assembled (as necessary), and priming with Stynlrez black has begun. When I'm happy with the results, I'm going to apply red to the parts to create similar highlights as the sidecar. The upper half of the fuel tank and the entire headlight housing will be red as well. Once these parts are painted black/red, they'll receive a clear gloss coat like the sidecar and a few additional coats before they're buffed out. All subsequent parts will get the appropriate colors to 'busy up' the details of the bike, starting with the engine.
To start off the engine, the block and covers are painted Tamiya Metallic Gray and the cylinder jackets are black, with the heads in chrome silver and the edges of the cooling fins on each cylinder jacket made bare metal.
Most of the parts are primed with Stynlrez black, then they receive a coat of Gunze Red Madder. The fenders are masked for the stripes, then another coat of black Stynlrez, and with the masks removed, the parts are given a coat of Tamiya gloss clear thinned in lacquer thinner. The fenders and sidecar exterior haven't had the clear coat yet in this photo.
With the sidecar given its clear coat, the sidecar was mounted to its chassis and the previously completed parts are installed.
Here's the engine in-progress and being test-fit into the bike frame with the gas tank installed.
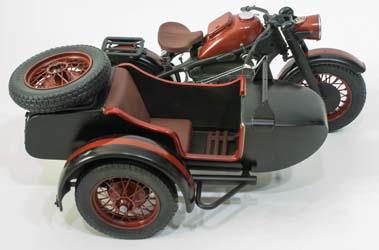
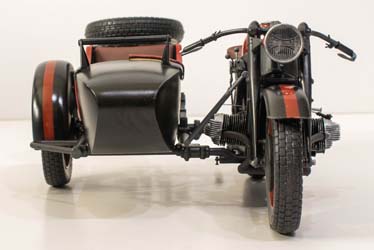
So you might notice that here is a bit more progress since the last photos were taken above. I finally dropped into 'the zone' with this model as the instructions aren't the best and none of the parts on the trees are numbered, so I would tackle each subassembly by studying the drawings, test-fitting the parts, gluing them together (before they changed their minds), and painting the subassemblies. Even though it seemed like a lot of effort to get here, I was really impressed with how well the parts of this 40+ year old kit go together. The engineering is very well done. In these photos, the motorcycle and sidecar are almost finished, but the two assemblies are dry-fit together. Here's a few notes worth mentioning:
- The chrome parts are done using the base coat of black Stynlrez and then using the Molotow chrome pen. This was done with the gas cap, headlight lens frame, and speedometer.
- The speedometer has a decal has the instrument face, but rather than applying the decal the usual way, I cut it out of the sheet, applied a coat of Tamiya clear to the now-chromed part and placed the decal onto the clear, then applied more clear on top of the decal to hold the clear lens in place.
- Inside the headlight and tail light, I also used the Molotow pen to create the light reflectors, and then a few coats of Tamiya clear red to the tail light reflector and to the lens. When all was dried, I used Tamiya clear to mount the taillight lens to the reflector, all without any glue marks.
I still need to get more small details installed but it is easier to park the model dry-fit together as the bike doesn't have a kick stand to hold it up on its own. For now, it is time to turn to the figure so can make any needed adjustments for her to fit on this motorcycle.
The box art for this figure kit is shown near the start of this article. Here I've carefully removed the casting blocks and I'm very impressed with just how exquisite the fit of these parts are done, there shouldn't be any filler required. The painting diagram gives you an idea of the final appearance. Painting is fairly easy as this figure is done anime-style, to subtle shades and tones are not required. When finished, this figure will have its left foot on the ground, the right foot on the foot peg, the left hand is resting on the handlebar, and the right hand is lifting her sunglasses up. The eyes are provided as decals.
While the box art and instructions depicted a blonde, I opted for a ginger (red head) by painting the hair Tamiya copper followed by a few light coats of Tamiya clear red. The jacket had the details for a leather jacket, so I changed up the colors accordingly and I'm pleased with the results. Once all of the parts were painted, I assembled the figure with thick cyano and you can see the results. While the figure was sculpted to sit on one of Meng's motorcycle kits, I think she looks fine here on the KS-750.
Once the figure was seated and there were not going to be any problems with foot pedals, shifter, etc. I installed those parts and finally glued the sidecar to the bike. While there are even more details that should be added to the model. I'm going to call this good.
This is what I had envisioned when I first saw the Meng figure for sale, and paired with the Italeri (ESCI) KS-750 Zundapp built as a restomod, the combination is looking good on my display shelf. The engineering of both kits is very nice as is the fit. Given that there are many decades that separate when each kit was first released, the only issues with the Italeri (ESCI) kit are with the mold lines that were common with older molds but these clean up easily with the help of my R-Boko scraper. Have some fun and see what you can do with different projects by going a bit off the trail.
THE END


