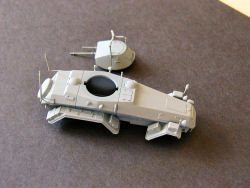
Italeri 1/72 Sd.Kfz.222 6-rad Armored Car Build Review
By Llarry Amrose
| Date of Review | June 2008 | Manufacturer | Italeri |
|---|---|---|---|
| Subject | Sd.Kfz.222 6-rad Armored Car | Scale | 1/72 |
| Kit Number | 7032 | Primary Media | Styrene |
| Pros | Good fit, unusual subject | Cons | Vague detail placement |
| Skill Level | Basic | MSRP (USD) | $15.50 |
Build Review
For the last few years, Italeri has been reissuing the classic ESCI armor kits, including a number of molds that had been thought to have been lost. While some have been superseded by newer kits, many are still the best available in 1/72. There was some concern that Italeri would rest on their laurels, but happily they have continued to release new subjects. These more recent new kits have been brought out in both 1/35 and 1/72 in a reasonably short period, and this is no exception.
Inside the standard blue end-opening Italeri box is one sprue in dark grey, and one small decal sheet nicely printed by an Italian company. The “mattress-spring” antenna and its mountings are separated at one end, where it could be omitted when the kit was reissued as the Sd.Kfz 231 version. The sprue connections are reasonably sized and located, though there are a few ejector pin marks that will need a little bit of care. Most of the tools are molded to the fender, but not all, and the storage bins are also separate parts. This kit best represents the Büssing-NAG version, though the differences are small enough that with a little elbow grease it should be possible to build any of them.
Once built, the kit scales out pretty close to the quoted dimensions I have. It seems to be just a bit long and narrow, but the variances are about 5cm at scale, which I think falls just fine within the margin of error on the measurements.
All of the hatches are molded closed, which does at least speed up construction. The underside of the gearbox needs to be inserted into the lower hull, and then the upper and lower hulls can be closed up. The axles and wheels are designed so that they can be easily added later, allowing the rest of the vehicle to be built and painted first. The turret builds up similarly.
Being an armored car, it seems like it’s positively bristling with little bits sticking off the hull and fenders. Headlights, taillights, corner position indicators, and four signal lights for the side of the hull. Here is what I consider to be the one real weak spot in the kit. None of these little parts have any sort of locating pins or holes. Most of the fender and bumper mounted parts aren’t much trouble, but for the signal lights, which are actually molded with pins, I drilled holes to mount them to. I can only guess that they are also not used in the Sd.Kfz 231, and that is why holes are not included.
At this point, I went ahead and sprayed everything with a coat of primer, since I was planning to use Vallejo paint, which really needs an undercoat to bite into. After painting the overall color, I painted the transmission and suspension parts in various metallic shades and assembled and mounted the wheels.
The antenna frame mounts to three points, two posts from the rear hull, and one to a frame on top of the turret. This mounting pretty much requires you to choose the orientation of the turret and commit to it, important to note if planning to use this vehicle in a diorama.
You can finish your 232 in any color you want, as long as it’s Panzer Grey. The back of the box shows 3 schemes, the instructions add a fourth. All are in overall early-war “Schwarzgrau” (black-grey) with Model Master call-outs. I used Vallejo’s “German Grey”, which is comparable.
There are markings for the 2nd and 3rd Panzer Divisions in France in 1940, as well as two for the ever-popular “Unknown Unit” – one on Training from 1937, the other from the Polish campaign in 1939. All have decals for license plates and one or two tactical markings front and rear. The 1940 markings also include narrow German crosses for the hull sides. The Polish campaign version has the solid crosses used then as well as one for the front grill, which the directions tell you to cut with a knife for the separate panels.
I chose the 2nd Panzer Division and finished it off with Tamiya Weathering Masters, which are a series of pastels in makeup-like cases with an applicator sponge/brush which excel for more subtle affects, and hold up better than regular dry pastels. I kept the weathering fairly light as this was a pre-war/early-war vehicle, so it had a chance to be a little better cared for. The decals went on quite well.
This is a fine, modern kit of an unusual subject, which will make a nice addition to any collection. The lack of mounting points for the small parts was a bit disappointing, but not a real problem.
My sincere thanks to Testors for this review sample to build.


