Italeri 1/35 M923 Gun Truck Build Review
By Michael Benolkin
| Date of Review | May 2014 Updated April 2019 |
Manufacturer | Italeri |
|---|---|---|---|
| Subject | M923 Gun Truck | Scale | 1/35 |
| Kit Number | 6513 | Primary Media | Styrene |
| Pros | New tooling for this version | Cons | See text |
| Skill Level | Basic | MSRP (USD) | $47.00 |
Operation Do-Over
I enjoyed building Italeri's release of the M923 'Hillbilly' Gun Truck but as I summarized at the end, there would be some things I'd do over if I had the chance. Several folks had asked why I didn't weather the final model and the reason is simple, any washes would simply highlight the wooded textures molded into the truck bed. By the time Cookie Sewell had let me know that the M923 had steel plank truck beds, my box bed was already assembed and painted. I got the project finished, but I wasn't happy with it. You can read the original build review below starting with the header 'Original Build Review'.
When Italeri released their second version of the M923 Gun Truck recently (please read our first-look
of this kit here), I decided to make some corrections. The first step was to carefully remove the truck bed from the chassis and remvove the armor plate and gun pintle from the truck bed. I am going to reuse as much of the original model as possible, especially the rusted steel armor plating.
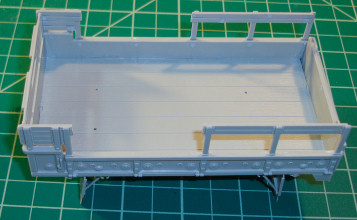
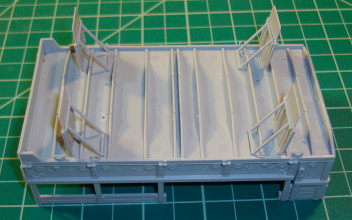
I took the truck bed out of the second M923 kit and used a course sanding stick to remove the wood texture. As I neared a smooth surface, I transitioned down to finer grits of sanding sticks.
I carefully removed the wood grain on the side rails and took care of the ejector pin marks.
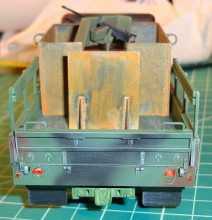
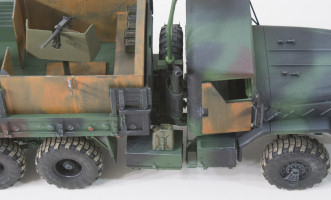
The new truck bed is assembled with the modifications to the side rails complete. As I mentioned below, don't believe the instructions about not installing the rear section of folding seats. If you look at photos of the real truck online, they had these in place. Now it is time to paint the bed to match the old one, bring the weathering up to where I left off on the truck, then add the weathering I wanted in the back before the woodgrain issue surfaced. You can see the result in the image to the right where the truck bed now has scuffing, dirt, dust, etc., back there. The old bed is on the right.
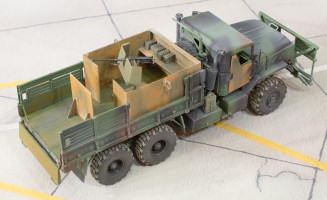
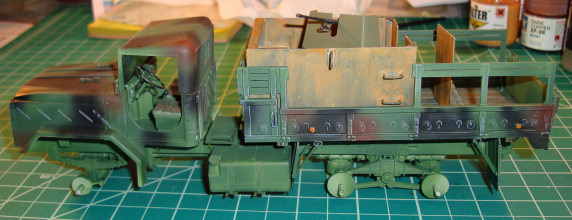
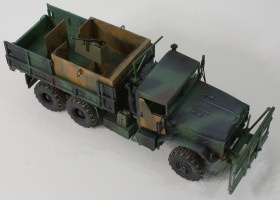
So here is the final result. While it may not look that much different than the previous version, I've been able to add some additional weathering washes to the truck now that there are no wood grain textures to improperly highlight that weathering. As before, this was a fun build and now that I've had the chance to fix that wood grain texture and a few other minor nits, I can put this aside for now until my vignette is ready.
Original Build Review
Please read our first-look
of this kit for an overview of the model.
I am starting a series of builds looking at some of the improvised gun trucks and tactical vehicles from Operation Iraqi Freedom (OIF) and Operation Enduring Freedom (OEF). This is Italeri's updated M923 'Big Foot' truck kit with new tooling depicting one of the improvised gun truck configurations from Iraq. I am not building this kit straight from the box, we'll be adding an M923 detail set from Legend Productions, and new wheels from DEF.
The materials used in this project:
- Italeri 6513 M923 Gun Truck
- DEF 35033 Big Foot Michelin XL Sagged Wheels
- Legend 1244 M923 Detailing Set
- Verlinden 1192 .50 Caliber Ammo Cases
- Eduard TP516 M1025 Humvee Placards
Let's get started.
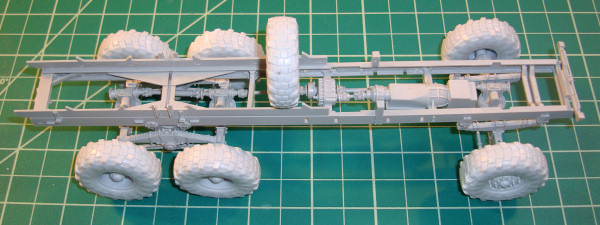
Following the first few steps in the kit instructions, this is the chassis with the frame assembled, engine/transmission and transfer case installed, and front end differential mounted on its leaf-spring suspension. We'll be upgrading this by adding shock absorbers and brake shields out of the Legend set, but not yet.
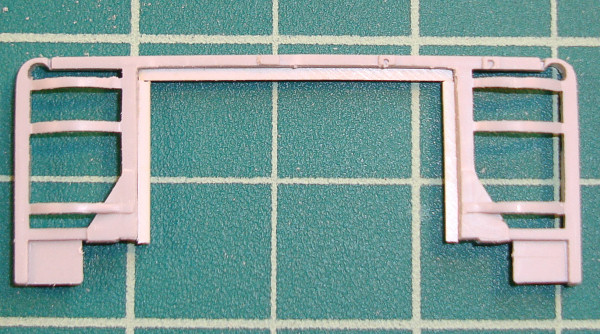
Here is the front grille. The kit has a reasonable grille molded in place, but the Legend grille is nicer, so I removed the kit grille screen from the frame. The replacement grille is actually two photo-etched parts, so I added a frame to the inside of the grille frame using Evergreen, then trimmed both photo-etched parts until they'd rest on the new interior frame. Once they were ready, I glued them into place using Future. That's right, clear acrylic floor wax. This is much easier to use and adjust than using cyano but it is just as durable in many applications. There are times when cyano is the only choice, but it is easy to use Future and remove it again than it is starting with cyano.
The image on the left is the cab floor and front wheel wells. The Legend instructions have you cut away the first part of each front wheel well to make room for plumbing and ducts that will run from the engine compartment to the outside. The image on the right looks at the tires that come with the kit (left) versus the nice tread pattern on the DEF wheel (right).
The chassis now has the full drive train installed with all three differentials and inter-connecting drive shafts in place. Next we'll be adding the fuel tank, air cylinders, storage boxes, and other details, but first it is time to test fit our new DEF wheels.
These 'Big Foot' wheels from DEF simply slide onto the axle shafts, they're pre-engineered to work with this kit. I must say they look great including the spare tire that will eventually go into a photo-etched mount that sits between the cab and truck bed.
I don't know about you, but the one thing I dislike about working with resin is having to remove the pour stubs. My solution is to simply set aside a time to remove all of the pour stubs and clean up the parts all at once so I can clean up the resin dust and be done until the next project. I removed the stubs on these DEF wheels as well as all of the parts that are included in the Legend Production set. The one minor annoyance about the Legend set is the same problem I have with the Italeri kit - the undersides of the fuel tank and storage boxes were open. I can understand this with the resin though, the parts below are fairly heavy even being hollow, they'd really be chunky as solid resin. Given that these parts sit on photo-etched brackets, weight is a factor. The solution is simple enough, I applied cyano to the bottoms of these parts and laminated them to sheet plastic. When they were cured, I cut and trim the bottoms flush and now they look right from underneath.
Here is a look at the cab module coming together and now nice that photo-etched grille looks there.
Here is the underside of the chassis with the fuel tank and storage box installed. I primed the assemblies with NATO Green because it is going to get more difficult to reach into some of these areas with an airbrush soon. Note the brackets holding the battery box are from the kit parts (plastic) whereas the brackets holding the fuel tank are photo-etch. These L-shaped brackets require some interesting work with the photo-etch folding tool, then when I folded the part into the L-shape, I tried cyano to hold the 90 degree bend (that tank is heavy as I mentioned) but the cyano isn't strong enough for this job. I soldered the parts and they are holding very nicely now.
Here is a close-up of the resin storage box (note the cast-on lock on the lower left) and the resin air tanks behind it, all out of the Legend set. What are really nice are the photo-etched entry steps on the left and atop of the box.
I wanted to finish the headlights and mask them before I start painting camouflage. I used Tamiya gloss black inside the lenses, and when that had completely dried, I used a Q-Tip with Uschi van der Rosten Chrome powder to create the chrome lenses. When I was happy with the result, I applied a coat of Future on the lenses, and while the Future was wet, inserted the clear lenses into the lights where the Future will act as the glue. The results are almost as good as using MV lenses from the model railroad community.
Since I cannot install the plumbing, snorkel and exhaust pipes without the lower cab in place, I've glued this to the chassis. The crew seats are in place as well.
Here is the completed interior. I didn't bother with instrument faces as there is no angle where you'd be able to see them when the cab and roof are in place. I'll be posing at least one door open and that dash board was looking rather barren. Anyone that has spent time around military vehicles knows that the cab is full of placards warning of everything from safe operating speeds to common hazards. After looking at some photos of some M923 cabs, I applied a large placard above the steering column and several to the right of the instrument cluster.
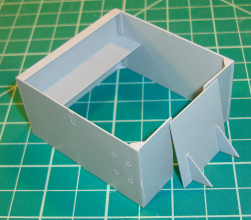
The truck bed was assembled and modified per the instructions to accommodate the improvised armor shell. On the underside of the bed are the four rock shields and mud flaps that cover the rear wheels. The improvised armor shell was also assembled and test-fit into the truck bed. Everything lines up nicely.
The windshield, cab rear window, and headlights were masked to protect them from the painting and weathering to come. This was a good time to test-fit the cab shell, truck bed, resin wheels, and armor shell altogether and once again, it is all looking good.
The improvised armor parts were primed with Vallejo Panzer Gray, then the process of the MIG Productions Rust system was applied. You're looking at two intermediate steps here.
While the armor was receiving its rust treatment, I primed the truck bed with Vallejo NATO Green primer and then painted the mud flaps on the underside Vallejo Black primer. The deck inside the truck bed has an exaggerated wood texture molded into it even though they were steel. Rather than sand this smooth, I'll use it as a start for some dry-brushing that will be the starting point for the weathering to come.
The steel plate that mounts the gun pintle looks good in the bed with the M2 .50 caliber machine gun and shield in place.
The NATO tri-color camouflage is applied according to the US Army paint guide. The chassis will receive its camo after the remaining details are installed. As before, the subassemblies are only dry-fit into place at present.
After posting the above update, I received a nice email from Cookie Sewell complimenting the painting and weathering so far, but the one problem is that the M939 series of trucks do not have wood truck beds. A quick touch-up with the airbrush took out the wood colors, but it was too late to remove the wood texture. Next time...
It was at this point I began seeing some problems with the Italeri instructions. The loop bumpers on the rear of the chassis mysteriously appear in the final steps of assembly with no mention of installing them. These are parts 60 and 61, and anyone with an older Jeep will recognize these features. The pintle tow hitch was also not mentioned and added as well. The instructions show that the rear side reflectors on the truck bed are the same as the front (orange) but as I examined some photos of the vehicle, these should be red. That's when I discovered another missing item in the instructions - the truck bed folding seats. You can see in other online builds of this kit that other modelers followed the instructions, but a look at the original photo of this gun truck showed that while the front sections of rails and seats were removed, the rear rails AND seats are there. I cut down my parts, installed and painted them accordingly.
The Legend M923 Detailing Set provides some nice detailing for the chassis, intake and exhaust ducts, spare tire mount, fuel tank, battery box, and storage boxes. The only problem is that their instructions are difficult to follow. There are lots of illustrations, but they are not well thought-out nor are they easy to follow. I managed to get most of the details installed but I finally decided to cut my losses and finish up.
The shelf inside the armored shell needed something on it so I've started with some Verlinden .50 caliber ammo cans. I'll eventually put a few personal weapons, MOLLE packs, and additional five gallon fuel and water cans inside the bed. This is just the beginning.
Here is the current state of the truck and believe it or not, it isn't finished yet. While it is 'mostly done', I still have some additional weathering to apply along with some figures and personal gear. I added the unit markings from the Italeri decal sheet and tried out what I hoped would be the replacement for Future as the gloss coat (look here) before installation of the 'Road Warrior' front bumper and truck bed.
During this project, I had searched for some good figures for such a display and settled on the CMK 1/35 Humvee Crew set. This set has two seated figures and one standing up in the gun turret. When I test-fit one of the figures into the cab of truck, it was too large. Granted, the figure has the type of body armor and MOLLE vest worn at that point, but the Humvee should be even tighter to sit in. Measuring the standing figure revealed the problem - these are 1/32 figures. At 1/35, these three guys would have played varsity basketball at 6' 5" tall but they're a more reasonable 5' 7" in 1/32 scale. We'll skip the figures for this truck...
I'm pleased with the this project even though it took much longer than anticipated. I used the 'dry-fit a little, build a little, paint a little' approach though I'm sure it would have been faster to build the subassemblies before first painting. The choice and techniques are up to you.
If I were to do this again, I'd definitely want those DEF wheels on the truck as well as most of the Legend detail set. There are some minor errors in the Italeri kit such as the wood textures on the truck bed and side rails that need to be cleaned before assembly. The details on the side reflectors and missing rear bumpers just reinforce why we should have some reference photos handy. The original photo of this vehicle shows an improvised spotlight mounted above and behind the cab as well as an improvised SINCGARS radio installation on the passenger side. I may add these details in the future.
Overall, this is a fun project and we'll see where it ends up in the future. A project like this certainly provides some opportunities to experiment with various materials and techniques that you can take forward into future projects.
Definitely recommended!
My sincere thanks to MRC for this review sample!


