Italeri 1/12 Alfa Romeo 179C Kit Build Review
By Michael Benolkin
| Date of Review | February 2020 | Manufacturer | Italeri |
|---|---|---|---|
| Subject | Alfa Romeo 179C | Scale | 1/12 |
| Kit Number | 4704 | Primary Media | Styrene |
| Pros | Beautiful kit | Cons | See text |
| Skill Level | Intermediate | MSRP (USD) | $207.50 |
Build Review
For a brief history of this subject and a look at this kit out of the box, look here.
It has been a while since my last automotive build, but I've been collecting several of Tamiya's 1/12 Formula 1 racers over the years for that time when I can build for fun. When MRC offered a Formula 1 car not covered by Tamiya and driven by Mario Andretti, I was all-in. As I mentioned in our first-look of this kit, the layout of the kit is straightforward, but as I sat down to step one in the instructions, I realized I needed to do some preliminary work. The larger body and chassis parts have mold flash that needs clean-up, and this was quickly tackled with my Sujiborido file. A number of parts are attached to the sprue trees along long edges, so using sprue cutters will run the risk of damaging or breaking parts. This was an easy task using a fine razor saw. Several of the parts had mold lines that also needed to be cleaned up, but I took my time and the model is ready to go.
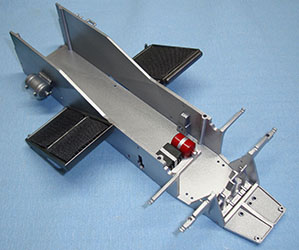
From what I could glean out of the instructions, most of the body parts were bare aluminum, and since I was in the midst of some painting experiments, I decided to continue those experiments here. One of the topics that come up in paint conversations is using lacquer thinner to thin water soluble acrylic paints. I've never thinned Tamiya acrylics with water. I was taught decades ago to thin Tamiya and Gunze Aqueous paints with 98% Ispropyl Alcohol which results in a rock solid finish. On the other hand, I've never thinned acrylics with lacquer thinner as it seems counter-intuitive to use water soluble acrylics with lacquer thinner instead of using lacquer paints, but I digress. I grabbed a bottle of Tamiya Chrome Silver and thinned the paint in a mixing cup with GSI Lacquer Thinner, then loaded my airbrush at about 10psi of pressure. Dusting on the first coat and gradually building up the paint layers, the coverage was excellent. You can see where I ran out of paint on the far-right body shell, but that was soon rectified. If you've applied chrome silver before, you know how easy it is to leave fingerprints, but in this case, the paint was dry enough to handle almost immediately. If I had applied the Chrome Silver to a black surface, the result would be highly reflective/shiny, but over white, it looked like dull aluminum. A friend asked how a gloss color reacts to lacquer thinner, so here is the car's fire bottle painted Tamiya Gloss Red using the same technique.
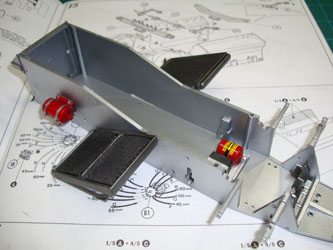
So here is a look at Step One, where the foot pedals are mounted to the chassis along with the part that has the fire bottle and car battery mounted. By the way, I applied NATO Black and Chrome Silver using the same technique, and I was able to mask the parts for the next color and not have issues with paint pull-up. But then again, I've never had a problem with Tamiya paints using the normal Tamiya thinner or my homemade thinner, though drying/curing times are longer. I used Tamiya Metallic Gray on the radiators, then applied the vinyl mesh to the front and rear of the radiators. This is THE most annoying part of this build. For a $200+ USD model, providing vinyl mesh instead of photo-etch is not good. It took several days just to apply each section of mesh, and white glue was the only adhesive I could get to work with vinyl. No bueno!
Step One continues with painting/detailing the external storage cylinders and adding a decal to the fire bottle inside the cockpit.
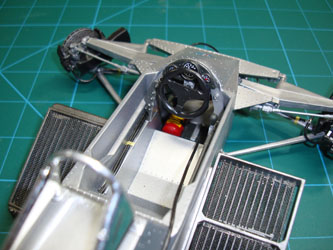
Here's the instrument panel ready for installation from Step 5.
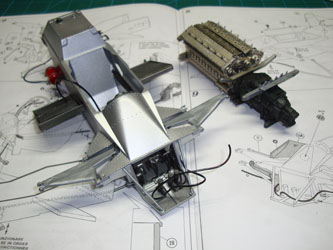
I jumped ahead to Steps 13-17 to build and paint the engine and transaxle assembly. The instructions call for gold with a bit of silver added for the engine block, but I found Tamiya's Titanium Gold to be the perfect match for the block. As before, I thinned the color with lacquer thinner and the color went down beautifully. Within a half-hour, I had the block masked off as I applied Tamiya NATO Black to the transaxle.
While the build is off to a slow start, this represents quite a bit of time to clean-up and pre-paint the major parts in the kit, which means the rest of the model should go together much quicker. Stay tuned!
Here's the subassembly that was masked off again to apply the lacquer-thinned Tamiya Chrome Silver to the suspension frames and exhaust rack over the transaxle. I used a Molotov Chrome Pen to highlight the bolt heads around the engine and transaxle.
When I first started attempting to connect the various-sized tubing inside the car body, I found the experience a bit frustrating until I realized I was staring at the solution. I had picked up some brass toothpicks (wood ones will work too) and inserting them into the ends of each line, I could stretch the opening and mount them to their intended connectors before adding a drop of cyano to make that connection final.
Here is a look at the body assembly around Step 7. Steps 6 and 7 have a statement that says "It must be in order" which is very helpful (NOT), but that they mean is that you want to take care to build the model outward. For example, in Step 6, there are a number of suspension parts that are mounted to the body shell, but if you don't put the small parts that mount directly to the shell on first, the suspension arms will make installation difficult later. The short answer is to study each step ensure you're getting everything mounted and properly oriented before gluing.
You need to take your time and test-fit, clean up any mold flash (and there is more than I thought), double check that you're not mounting a part up-side-down, then glue. Once I get an area completed, I apply a touch-up of Tamiya Chrome Silver thinned with lacquer thinner. You can look around the model and it looks like a single coat of paint, but this thinning technique not only goes down smoothly, you can't see any sign of touch-ups.
Here is the remainder of the front end installed with the axles and disk brakes. The kit provides brake lines, but the instructions have you use the included copper wire to bundle the lines against the frame. The wire is too thick of a gauge to use here, so I used 1mm tape for the job (not shown in these photos).
The kit provides flexible tubing of different diameters to represent ignition lines (black - same as the brake lines), clear for the fuel injection lines, and a gray for the transmission oil cooler lines. All of the lines are out of scale, and if I were to do this again, I'd obtain a finer gauge of wiring to replicate these details. While there were no problems installing the fuel lines, the distributor cap has an interesting mix of pointed mounts for the ignition cables along with unpointed mounts that were used for ejector pins. These mounts have an edge around them that block the cables, so you'll need to carefully trim these away with an X-Acto knife before you can get the cables into place. The larger gray tubing for the oil cooler doesn't flex much and attempting to connect the tubing to the transmission and oil cooler resulted in the tubing mounts shearing off of the oil cooler. I'll leave these tubes off the build. You can see here that I've used the 0.6mm tape to bundle the ignition and fuel lines as I did with the brake lines. This is much nicer (to my eye) than the included bare copper wire.
The engine is finished. The intake stacks mount to the top of the block next to each fuel injection line while the exhaust manifolds had a great deal of mold flash on them. It took some time to get them cleaned up before painting and installation. I had hoped that the exhaust had been ceramic coated, but online photos showed them a hot gray mess after extensive run time. I used Jet Exhaust to create the look here.
The various hydraulic lines have been clamped the car structure using 0.6mm tape and then treated with thin cyano to keep them there.
The big moment finally arrived, mounting the engine to the forward chassis. Don't do what I did. There are only four screws that hold the two subassemblies together and while then went together easily, there's not much structural strength. While adding the rear axles and suspension to the rear end, one of the screws holding the engine to the chassis slipped. The instructions suggest building up the rear end before mounting the engine to the chassis and I concur!
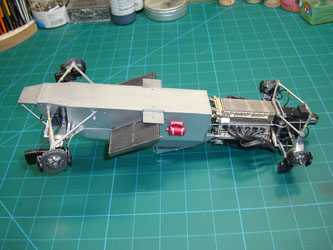
There's a lot of nice detail here, and if you opted to put the car on jack stands for display, you can show off your work. Once the body shell goes on, much of this will disappear.
The body underpan screws on to the chassis at the wings that are installed below the radiators and to a hole in the engine oil pan. After I loosened up the engine mount by accident, I had been nervous about handling the model, but with the pan installed, everything is rock solid.
I spent some time dry-fitting the body shell together over the chassis to find any mold flash or other obstacles before heading to the paint rack. The body goes together with screws as well, so you can theoretically remove sections from the car to display the details inside, but I think I'll be leaving mine buttoned up once I'm finished.
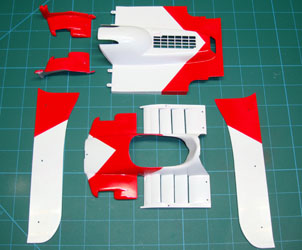
I masked the body parts according to the measurements in the instructions and applied Tamiya acrylic red thinned with lacquer thinner. I am quite pleased with the result. I waited a few hours and applied Tamiya Clear Lacquer from a rattle can.
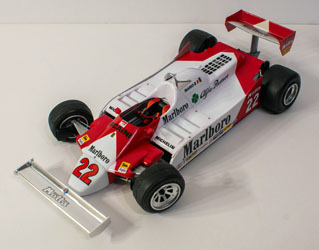
After letting the clear cure overnight, I began the process of applying the numerous sponsor decals. As I've noted in past builds, Italeri decals can be a challenge to work with, but I finally discovered how to make them work. This time I used hot water, as hot as I could get it out of the faucet, and the decals went down easily and conformed without using an setting solution. I did these decals in three settings to avoid damaging previously applied decals, and once everything was done, I let the decals dry overnight before applying another clear coat using the rattle can of Tamiya clear.
It was finally time to install the body parts on the chassis assembly. I took my time screwing the panels into place to avoid scratching the paint, and after a few hours of assemble a little and then take a break, the car is done.
There are a few things to note in building this kit. First, as I mentioned above, the method of mounting the engine to the forward chassis is delicate. Second, the attachment of the nose to the front end of the car is also delicate. I would recommend gluing the nose to the forward upper body shell. Third, I'm not sure what is unique about the styrene in this kit, but it doesn't react well to Tamiya Extra Thin Cement. There were several times I had to resort to thin cyano instead. Not being a bona fide 'car guy', I built this project as I would an aircraft model and I'm quite pleased with the results. I'm also happy to have found an excellent way of laying down Tamiya acrylics and applying Italeri's decals.
This Italeri kit is not over-engineered, and with some good tools to mitigate the flash, the model goes together smoothly as long as you dry-fit and adjust as needed before committing to glue. If I were to build this kit again, I'd substitute the vinyl mesh screens with aftermarket photo-etch and use fine wire to replicate the hoses and fuel lines on the engine which are a bit out of scale using the tubing provided in the kit. Otherwise, Italeri has done a great job on this kit and I'm now thinking about another open wheel racer project in the near future!
My sincere thanks to MRC for this review sample!


