Italeri 1/48 AH-1W SuperCobra Kit Build Review
By Fotios Rouch
| Date of Review | July 2021 | Manufacturer | Italeri |
|---|---|---|---|
| Subject | AH-1W SuperCobra | Scale | 1/48 |
| Kit Number | 0833 | Primary Media | Styrene |
| Pros | Not many other options in this scale | Cons | See text |
| Skill Level | Experienced | MSRP (USD) | $38.99 |
Build Review
The Italeri AH-1W kit is based on older Cobra variants from the same company, and it comes with most of the relevant components that make it an early W version. It is an older kit design, and it shows everywhere in the fit and finish of the parts. Back in the day I had bought two Cobra Company resin cockpit and exhaust update sets that brought the Italeri kit to a much better standard. A little later I bought two Olimp resin sets to bring the kit to the latest Iraqi war configuration.
The Olimp resin sets come with all the external updates, include weapons and consist of resin, photoetch and decals for one HMLA-267 Whiskey Cobra. The set does not include any of the necessary cockpit updates. The resin in this set is crude and very reminiscent of the resin aftermarket sets we used to get back in the late 80's. Lots of flash, heavy carrier backing resin and inconsistent panel lines and shapes. Of course, you see all that after you open the set. So, the project was shelved until the time that I would feel ready for a sound beating. Then much later Kitty Hawk announced their AH-1W kit and I thought that all the stuff I had accumulated for the project would be instantly obsolete. In early June, Kitty Hawk announced that they were done with making new kits and suddenly the project was back in the front burner.
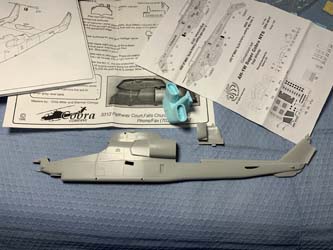
Work as usual started with cleaning the resin parts with 409 de-greaser and the study of all the parts, plastic and resin alike. The Olimp instructions are not super clear on where to cut the plastic but with a little study and careful cutting the project moved on. It is always better to remove less plastic and sand things down than cut too deep. The first disappointment was the ridiculous fit of the large exhaust resin part. It is a solid chunk of resin, way too large and uneven and misshapen. It took a lot of effort to get it to fit and reshape. An added difficulty was the Italeri kit has raised panel lines and rivets and it is almost impossible not to obliterate some details as you are taming the resin parts. The resin chunk of the exhaust was drilled out to lighten the rear portion of the model. Lots of lead weight was glued on the very front and under the cockpit floor as well.
No issues at all with the Cobra Company resin of course. The cockpit is very nice for what it is supposed to represent but not for the future version of the Whiskey Cobra. Truth is that I did not perform the updates myself and if you look carefully there are no digital instrument panels or any other such updates in my build.
The resin nose is okay, but it needed a little reshaping on the top where it meets the windshield. Also, the nose/canopy interface is of a different shape and the clear part has to be cut back.
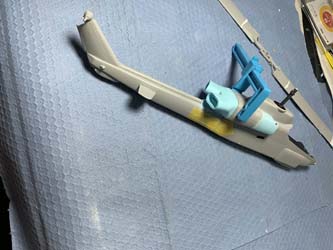
The resin intakes are mastered based on the kit parts and have been enlarged to represent the later intake shapes. Unfortunately, Olimp did not know how to make proper molds and the intakes have huge blobs of resin in the middle that have to be carefully drilled out.
The Flying Leatherneck decals provide instructions on how to update the plastic rotor blades to the proper shape. This was accomplished with cutting off the blade tips and grafting plastic Evergreen stock plastic.
The belly of the fuselage was also cut to make room for the resin oil cooler. The fit of the cooler was not to my liking, so I inserted thin plastic sheets to create a proper backing.
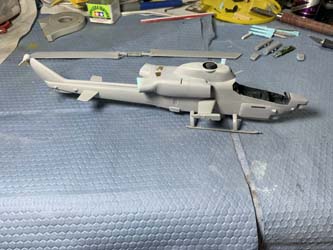
After all the resin parts were on, I sanded and blended everything using putty and spraying primer.
Work on the Cobra continued with adding the landing skids which are very sensitive, so be careful there. More primer was sprayed and more sanding and polishing until all the resin seemed to be blending in properly.
I then added the photoetch top engine grills and slime formation lights. Although Caracal decals provides formation light strips, I wanted a little more 3D look and I used photoetch generics as a base. At the same time, I worked on resin weapons.
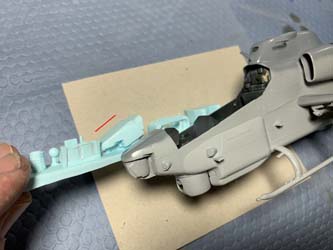
One other thing I did and forgot to mention is that I changed a bit the contours of the resin nose. The conversion set offers the nose with a totally flat top surface. Looking at pictures it looks like there is a very subtle bulge at the rear portion of the nose where it meets the canopy. I am trying to show that with a photo of what I did and the resin part from other set next to it.
Working on the canopy was interesting. I needed to cut it shorter to fit the new nose but I did not like that cutting the clear part also meant that there would be no front frame. I decided to create a front frame for it. This was scary because gluing plastic strip on a clear part poses the risk of messing up the transparency. To complicate matters worst, I decide to also cut the cockpit access clear parts. In the end, the goddess of plastic modeling was watching over me and things did not get screwed up.
The resin set provides the bigger IR jammer. I decided to paint it with highly polished Alclad II and the create the hues with clear exhaust hues also from Alclad II.
After lines were scribed and a few rivets were added I used my Xtracolor grays and finished the camouflage. Glossy paint helps with the decals and a semi-gloss varnish can always be added later.
Bits and pieces kept getting added on until it was time to build the turned brass gun. It makes a big difference for the final look of the kit, but it is fiddly, and care has to be exercised.
I used the decals from the Caracal set for the most part with a few of the Flying Leatherneck decals as well. As usual the quality of the Cartograph decals was great both in print quality and also on application.
My only problem is that I cannot find decals for my Hellfire rounds. There used to be some but nothing available now that I can find. If anyone that happens to read this article knows of something, please let me know.
The clear parts were added last and what is left to do now are minor adjustments and finishing touches.
The finishing touches were completed, and the model was placed in my office for a couple of days so I could look at it. Then the email came that my main rotor was installed backwards. Who would have known that Italeri got it wrong?
The fix method is easy, and I have done tons of that with my resin kits except the fix was done at the right stage of construction and not after the model was completed. I took a few days to think about the approach in order to minimize collateral damage. The skids are super sensitive, and the open glass just needs one wrong touch to come unglued. To make a long story short I removed the rotor blade assembly while breaking the actuators as I feared and then carefully razored off the blades. Brass rod was inserted for support and since I had gone that far I decided to give the rotor blades a pitch for visual interest. I also heated the blades to negate the molded droop. They looked okay in the beginning but with time they reverted back almost to their original shape. The rotor was carefully returned to position and then the model was really done. The only thing that is missing are the Hellfire missiles and that will remain the case unless I find decals for them.
All in all, I like the model and I will have to be content with it as KittyHawk folded. It is not an easy build, and the resin set leaves a lot to be desired both in quality and accuracy, but this is the way to get to a Whiskey Cobra presently.


