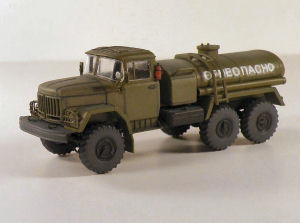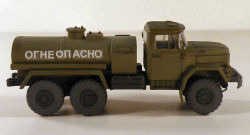
ICM 1/72 ATZ-4-131 Airfield Fuel Truck Build Review
By John Kelley
| Date of Review | Januarly 2010 | Manufacturer | ICM |
|---|---|---|---|
| Subject | ATZ-4-131 Airfield Fuel Truck | Sicmle | 1/72 |
| Kit Number | 72813 | Primary Media | Styrene |
| Pros | Unusual vehicle, good detail | Cons | Decals break |
| Skill Level | Basic | MSRP (USD) | $14.95 |
Build Review
The only thing that I could find on this vehicle is that it's based on the ZIL-131 Cargo Truck. The kit version, I believe, is for air field use.
Step 1: I began this step by filing the location notches on the engine/transmission Part A9 a little deeper so that the transmission sits flush with the top of the frame. This is important since the cab will not sit on the frame properly if Part A9 is not flush with the frame top. The same thing needs to be done to the power take-off gear box Part A24 so it too fits level with the frame.
The two air tanks that locate inside the frame Part B15 need to be either flush with or below the top of the cross members. This ensures they do not interfere with the fuel tank body when it is attached to the cross members. All this is important as I found out later on. I have to confess, I made so many mistakes on the review kit that I had to start over on another. On the second cross member there is a notch to accept Shaft B21. This notch needs to be widened so the shaft will attach to the front of the tandem axle Part A6.
One of the nice things about this kit is that the shafts don't slip into holes, but U-shaped notches in the axles and engine. This way, a shaft can be installed without completely assembling everything and gluing it all at once. The only real fit issues I had at this step were the differential covers Parts A13, A7, and A8. The bottom part that fits into the differential is too thick and needs to be sanded on the sides. If not, when you press it in, the sides of the differential will crack. I found the tandem axle stabilizer bar Part A4 to be too long so I trimmed it off so it would fit better.
I assembled the wheels but left off the hubs for painting. In spite of what the instructions say, wait until final assembly to install the wheels. In fact, install the tie rod Part B13 last as well. I broke it several times while gluing the cab and body on the chassis together.
Step 2: The exhaust crossover pipe Part B8 was not molded complete so I replaced the exhaust with copper wire.
Step 3: I assembled the cab interior but I left off all the small details on the outside cab until the end, except for the fire extinguisher. The nozzle broke off so I replaced it with plastic rod. There are two ejector pin marks on the floorboard and I removed these by scraping them with a knife blade.
Step 4: I assembled the tanker body with no trouble, but I did use putty on all the seams. I used files, sanding sticks, and a Scotch Brite pad to smooth everything. I also removed some flash on the cab grill work. I recommend leaving off the latter until decals are added, especially if you choose the Soviet version.
Step 5: The tank assembly 4, and parts E1 and E10, must sit inside the end cross member. The front mud guards are angled too far forward. This pushes them against the fuel cell, forcing the assembly too far back so that the tank does not sit level. To remedy this, this instructions have you make a cut on the underside of the guard and bend it back. I used a razor saw to cut just enough to bend the front mud guard. You only need to angle them enough so the tank fits inside the frame as it sits on the cross members and not the frame itself. At this point, I added the final chassis pieces and this completed the construction phase.
The entire chassis, gear shifts, steering wheel and hubs are painted Tamiya XF-69 NATO Black. The tires were painted XF-63 German Gray and the cab interior and exterior and tank were painted Modelmaster 4728 Olive Drab. The bench seat was painted Tamiya Red Brown. The headlights and turn signal were painted silver, and the turn signals were given a coat of X-26 Clear Orange.
The model was gloss coated, and I began to apply the decals. This was the lowest point of the entire build. When I applied the lettering on the sides of the tank, the decal broke into fragments. This happened also with the warning placards and license plate.
Since I had the second kit, I began applying the decals all over. I cut two letters at a time and soaked the decal and using a brush, I gently brushed the decal until it was loose from the paper. I applied them two at a time, but I still had to touch up some of the white lettering. Unfortunately, the front warning placard and license plate broke apart. I've never had this happen before and I thought it was limited to the review sample, but in fact it was not.
I still do not have a good solution for applying the kit decals except to take a great deal of care and be very gentle when applying them. Once the decal breaks, it then begins to fragment. In spite of having gloss coated the model and then flat coated afterwards, the decals still silvered.
At this point, I added the final details to the cab. I also added the clear pieces using white glue. The side windows are a little long so you may want to file these down, but make sure you test fit before doing anything. The fire extinguisher was painted Polly Scale RLM Red with black bands.
As a modern armor fan, I really liked this kit. In spite of the poor decals, I recommend this to anyone interested in modern Soviet military vehicles. ICM makes a variety of Soviet wheeled transport that no western company will produce and they are generally accurate. I like the detail on this kit and some of the features, such as the way the shafts mount into the various parts and I especially like how the windows are glued from the outside instead of the usual inside mounting. They even give you headlight lenses.
I have enjoyed building ICM kits in the past and I will continue to build them, but I feel that you should be aware that there are problems with the decals. Hopefully, they will correct this in the future. My local hobby shop has the command version so I think I will pick it up. I always liked the URAL series of trucks and ICM does 4 of them.


