ICM 1/48 Spitfire Mk.VIII Build Review
By Michael Benolkin
| Date of Review | December 2000 | Manufacturer | ICM |
|---|---|---|---|
| Subject | Supermarine Spitfire Mk.VIII | Scale | 1/48 |
| Kit Number | 48065 | Primary Media | Styrene |
| Pros | Easy build, best Spitfire in 1/48 scale! | Cons | Sink marks, tight cowling with all details installed |
| Skill Level | Basic | MSRP (USD) | $15.00 |
Build Review
Forgive me for not repeating the history of the Spitfire IX for the umpteenth time. There have been several Spitfire IX kits released on the market over the years, and one of the most promising, an offering from Ocidental of Portugal, suffered from a flaw in its nose profile in the first release. Despite coverage in the UK to the contrary, this error had been corrected in their second release, though the kit lacked detail in the cockpit. Enter ICM from the Ukraine. They've taken this subject to a new high in detail and accuracy. As we reported in last month's in-box review of this kit, ICM has set up the molds such that they can achieve a Spitfire VIII, Spitfire IXc and Spitfire IXe, as well as provide the correct wingtips for the standard and LF (clipped wing) versions, all on the same trees. The instructions indicate that the HF (high altitude) wingtips are also included, but my example did not have these on the parts trees.
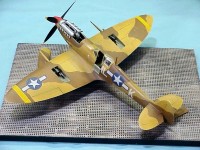
I had recently picked up another of Jeff Ethel's color photo books from WW2 and several photos provided excellent coverage of the Spitfires flown by the USAAF's 31st Fighter Group in North Africa. Since ICM had kindly provided me with the instructions and decals for all three Spitfire releases, I decided to build the Spitfire Mk.VIII as operated by the USAAF. The results turned out great, as you will see. Let's get started...
For purposes of this review, I decided to build this kit completely out of the box, even down to the decals. Before I started construction, I airbrushed Model Master (MM) RAF Interior Green on all interior surfaces of the kit. Due to the significant number of small parts on this kit, I'd strongly recommend leaving all parts on the trees until you're ready for them. While I didn't really notice it during the in-box review, virtually every part has a little bit of mold flash on it, so dry-fit each of the parts together as much as possible as there are close tolerances in this kit and one mis-fitted part will turn this project into a challenge rather quickly. I would recommend a good set of needle files, a fresh blade in your trusty X-Acto knife, and some medium-grit sandpaper taped to a flat surface to assist you in removing a flash/mold remnants. I primarily used Tenax 7R to assemble this kit, as the ICM plastic is soft and reacts very nicely with Tenax, though I did use cyano in a few spots.
This kit really consists of several models that just happen to occupy the same airframe. Construction begins with the first model, the Merlin engine. As I will repeat throughout this article, dry fit the parts before attempting assembly. I started by assembling all of the parts that would get airbrushed Model Master RAF Ocean Gray - this constitutes the bulk of the engine block and supercharger assemblies. Model Master Medium Sea Gray goes on most of the rest of the engine details. As you might see in the photos, there isn't much contrast between the two gray colors, so you might consider 'scale' coloring and/or weathering to achieve the look you want here. The instructions have you install the exhaust stacks at this point. I chose to install the stacks later to save on masking, etc., but next time I'll install them when directed. The time saved in masking in painting wasn't worth the effort needed to install the stacks later.
I used Testor liquid cement to install the engine mounts onto the firewall. The cement provides strength while retaining some flexibility that cyano doesn't offer. Once the mounts were dry, I placed a small bead of cyano on each of the four motor mount pads and installed the Merlin. Be careful handling this assembly as the motor mount/firewall joints are delicate (as I discovered). Set this completed model aside for now.
The fuselage allows for several configurations that need to be selected at this point. The cowling side panels come molded to the fuselage, while the top and bottom cowl panels are separate and can be installed to be removable or glued into place. ICM also provides a separate pair of side panels should you chose to display your Spit with the Merlin completely exposed. This is understandable given the detail in the engine. Since I didn't want to fabricate the additional hoses and wires between the engine and firewall, I chose to keep the side panels in place.
You'll also need to decide if the cockpit entry door will be open or closed. ICM provides a separate door if you choose to display your aircraft ready for action. I used an X-Acto knife along the molded-in cut lines to remove the door from the fuselage. At this point, I installed the O2 bottles, throttle and landing gear quadrants and other cockpit details onto the fuselage sidewalls per the instructions.
I laid the fuselage halves onto the taped-down sandpaper and carefully sanded the mating surfaces between the fuselage halves. With the little bit of flash removed, there was only a slight seam on the upper fuselage when joined. Dry-fit the fuselage halves around the engine/firewall to verify that all is well there. I had to do a little filing here and there to get a nice snug fit. Once everything was in place, I used Tenax to bond the fuselage halves together.
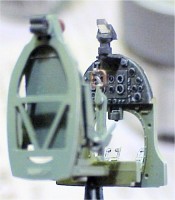
The next model is the cockpit interior. While there aren't as many parts here are there were with the Merlin, a little care and attention with painting will yield a stunning interior right out of the box. The only problem I found here was that the pilot's seat appears to be a bit wide. Nevertheless, the details include a seat height adjustment handle, armor plating, a nice control yoke and rudder pedals. The gunsight is nicely done, and the only aftermarket items needed in here are seatbelts/harness straps. The instrument panel is done nicely as well, though an Eduard photo-etch and acetate panel would be stunning in there.
Once again, dry-fit the interior into the assembled fuselage to look for any leftover flash and/or mold tree remnants. If all is well, the cockpit should slide into place with no effort.
I carefully sanded and dry-fit the wing halves together before boding them with Tenax. The instructions call for a special set of wingtips for the Spitfire VIII that were normal length wings, bit with narrower ailerons. I used the standard wingtips and ailerons for this project. The wing/fuselage joint was the most challenging part of the kit, but this is where a little sanding or filing and a lot of dry fitting resulted in a near perfect join. I still applied a bead of gap-filling cyano at the wing roots, at the rear wing/fuselage underside joint, and along that slight indent along the top of the fuselage. A quick session with the Flexi-Files and sanding sticks eliminated any signs of the seams.
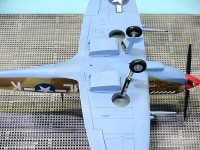
Next came the underside radiators and lower cowl. I chose to permanently mount my lower cowl and leave the upper panel removable. I also left the landing gear and other assorted details off the aircraft until the painting and markings were completed. I installed the windscreen and masked the window panels with liquid mask. Since I was going to pose the model with the canopy open, I used the one-piece closed canopy white-glued into position to protect the interior from the paint.
I decided to try out Eduard's camouflage masks. The scheme on this particular aircraft followed Pattern A, so I picked up a set of 'A' masks at my local hobby shop.
I painted the underside MM Azure Blue. When it dried, I applied the Eduard lower fuselage masks as directed. Just to be safe, I also added a bit of Tamiya masking tape to a few areas that might get into the line of fire from my airbrush.
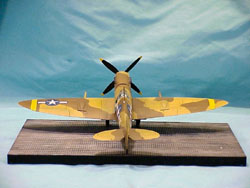
Next came the MM Middlestone on the upper surfaces. When it dried, I laid out the upper surface masks onto the wing and fuselage surfaces as indicated. The masks are low-tack; so a little burnishing will be required to keep them sealed to the surface. I applied liquid and/or tape masks over the areas indicated in Tamiya's instructions. After double-checking that all of the masks were properly settled down, I sprayed the exposed upper surfaces with MM Dark Earth.
When the paint had dried, I held my breath and removed the masks. As you can see, the Eduard masks worked perfectly and there was no paint pulled up either. I will be using more of these masks in the future! Speaking of future, I sprayed a coat of Future over the model to provide a base for the decals.
The ICM decals appear flat (lusterless) on the sheet, though they were in great register. They reacted very well to Micro Set and Micro Sol and settled onto the model perfectly with no silvering. When these had completely dried, I shot another coat of Future to seal the decals, followed by a coat of Future mixed with Tamiya Flat Base to provide the effective flat coat. (NOTE: I generally mix Future 50-50 with Isopropyl Alcohol for the gloss coats, and a nice dull coat is achieved with a 33-33-33 mix of Future, Flat Base and Alcohol).
It was time to get the aircraft up on the landing gear, replace the canopies and install the guns. The spinner is painted with MM Flat Red and the blades MM Flat Black. The instructions have you install the blades onto the spinner back plate first, then install the spinner. This is necessary if you also want to use the retaining cap to keep the propeller on the engine shaft. I prefer to remove the prop during transport, and I also prefer assembling and painting the spinner before adding the prop blades. The design of this kit allows you to do so with no problem at all.
I finished up by installing the exhaust stacks, though they needed to be threaded between the motor mounts and cowling sides very carefully. Before installation, I painted the stacks with flat aluminum that was weathered with RustAll, and then painted the exhaust openings with flat black.
Last month, I recommended this kit to anyone who has progressed beyond the snap-tite stage. Having built this kit, however, I might caution beginners to go really slow on this project, as it requires a bit of patience and skill to get a good result. Intermediate builders (and beyond) will have no problems with this kit. I had so much fun with this kit that I went out and purchased two more. These next two Spits get resin and photo-etch.
One parting thought - the detail of this Merlin engine is so nice that I plan on building one of these Spits with the cowl completely buttoned up so I can rob the engine and mounts without sacrificing the kit. This engine will look absolutely smashing on the exposed firewall of a Tamiya Mosquito!
Once again, my sincere thanks to ICM for this review sample.


