Heller 1/72 EC-121R 'Batcat' Super Constellation Build Review
By Richard 'RJ' Tucker
| Date of Review | June 2018 | Manufacturer | Heller |
|---|---|---|---|
| Subject | EC-121R 'Batcat' Super Constellation | Scale | 1/72 |
| Kit Number | 80311 | Primary Media | Styrene, Resin |
| Pros | Only kit in 1/72nd scale | Cons | Landing gear attachment points; stubborn tail-sitter |
| Skill Level | Experienced | MSRP (USD) | OOP |
Build Review
During the Vietnam War, some 40 EC-121s were modified from U.S. Navy WV-2 and WV-3 early warning Constellations for use with ground sensors to detect enemy troop movements along the Ho Chi Minh Trail. 25 were deployed to Korat RTAFB as a part of Operation Igloo White. The resulting EC-121R configuration was nicknamed the Batcat. Two Batcats were lost during the war, with the loss of 22 crewmen, one in a takeoff accident during a thunderstorm on 25 April 1969, the other on 6 September 1969, in a landing accident. Four Thai civilians on the ground were also killed in the second crash.
Batcat EC-121s were camouflaged in the standard three-color Southeast Asia scheme while the College Eye/Disco early warning aircraft were not. BatCat missions were 18 hours in length, with eight hours on station at one of 11 color-coded orbits used during their five-year history, three of which were over South Vietnam, six over Laos, one over Cambodia, and one over the Gulf of Tonkin. (1)
This Heller kit is typical for a mid-70s release: raised panel lines; soft details in the landing gear wheels and thick clear parts. Assembly is straight forward with no surprises, so I'll just cover the highlights. Looking at all the fuselage port-hole window parts, I decided that masking them for painting would be a major hassle. I used Micro Kristal Klear for the portholes after the exterior painting was complete. The only details I added was the flap set and wheels from Fisher Model & Pattern. The flaps were, usually, down when the plane was on the ground.
The first step was to paint the landing gear-wells gloss white. The issue with gloss paints on small scale models is the toy-like appearance a really shiny finish has. My favorite technique for painting gloss colors on small scale models is:
- paint the area with light coats in the flat color until the surface is completely covered
- thin the gloss paint with 50% -60% thinner. It will be water thin and translucent
- spray over the flat coverage until the color looks damp
When dry, if the finish isn't shiny enough for you, add another light coat: repeat until you're happy with it. The finish will be a soft gloss/satin look that's not too shinny avoiding the toy appearance.
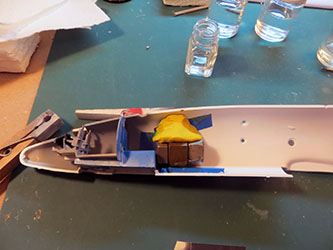
The internet gouge on the Heller Constellation family of kits is the model is an obstinate tail sitter. I used a large stubby bolt and a couple of nuts weights. I glued a piece of kit sprue (the blue runner in the picture) in the fuselage to act as the weight base then place some masking tape over the window holes in the fuselage. I super-glued the bolt and nuts in the fuselage and used modeling clay to help hold it place since cyanoacrylate adhesive performance with smooth metal is.....ah.....mixed. The tape ensures clay will not ooze out of the window openings as I push it down behind the bolt and nuts. A word of caution here: The weight I used wasn't quite enough. When the plane sat on the landing gear for the first time, it ever-so-slowly squatted back on its tail!....@#$%!*.... I had to pour lead bird shot mixed with white glue through the forward most window hole to get the nose heavy enough to sit on the nose gear (good thing I didn't use the kit windows, huh!). When you think you have enough nose weight, add some more!
I noticed on my reference photos that the elevators were relaxed when the plane was parked. So, I cut them out and reattached them at a downward angle.
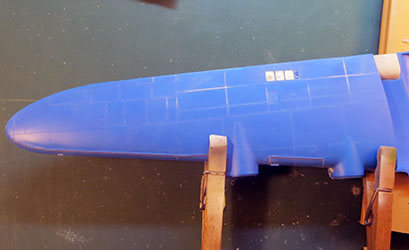
There are four vents molded in the wing. The EC-121R only had one vent, so the outboard 3 were filled. The raised lines for the deicing boots are grossly out of scale. I used the lines as a scribing guide and scribed recessed lines. I used a wash to show the lines, so they're visible in the picture. After I sanded away the raised boot lines and painted the deicing boots black, I use the new recessed lines to guide the trimming of the masking tape.
Dry-fitting the wings to the fuselage, I found the fit is very tight. So tight, if fact, when I pushed the wing into place it flexed the rear of the opening cracking the joint. So, I braced up the seam with a section of kit tree to prevent the cracking and hold the shape.
I cut the molded flaps out of the wing bottom and replaced them with the Fisher set. They fell into place; no hassles; no surprises!
I sprayed bottom a 50%-50% mix of Testors Model Master Camouflage gray and flat white. I started the SEA camo scheme with The Testors Model Master Tan FS 30219. This color doesn't look doesn't look "pink" enough to my eye. So, I added Testors light tan (that comes in the 1/4 ounce bottle) a little at a time until it looked right to me.
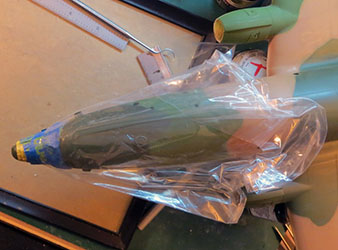
I cut copy paper free hand following a picture of the airframe. For the places on the plane that weren't visible on the photos, I reverted to the camo-diagram in USAF TO 1-1-4. And repeated for each color. Then I masked the radar dome with a thin strip of Tamiya masking tape followed by more tape. To protect from overspray, I cut the corner off a sandwich bag & pulled it over the nose until it stretched over the fuselage.
I weathered with pastels to give it a weather beaten look, airbrushed the exhaust stains & added pastels to them. Finally, I removed the deicing boot masks.
A real concern is the lack of mating surface to attach the landing gear struts. To improve stability, I drilled a hole in the top of the main struts, then glued in a metal rod I cut from a paper clip.
For the black edge on the propeller blades, I laid down thin, black decal stripes cut to length then painted inside the line so to speak. For the propeller tips, I scribed a line 4mm from the tip. As I painted the yellow, paint would flow to the line and stop, yielding a hard, straight edge.
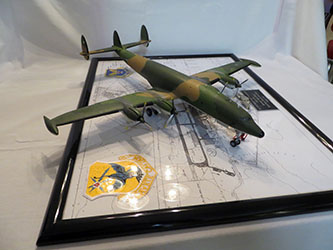
A model this large won't sit on a shelf; it needs large flat base. Using a medium poster frame, I placed the plane on a pdf reproduction of a surveyor's plat of Korat Air Force base (2).The framed plat was adorned with a patch for the 553rd Reconnaissance Wing, a USAF period patch, USAF pilot wings and a placard.
The final task is finish painting the ground crew figure and fire extinguisher, then mount him on the maintenance stand to add a visual scale reference.
Despite its age the ol' Heller kit holds up well. The 1/72nd scale size mean this is a big model and makes an impression on the observer. The Fisher flaps and dropped elevators give the model a causal, realistic pose. The time put into base and figure was worth the investment; they add context to the model and gives the plane a museum exhibit feel.


