Hobbycraft 1/48 F9F-3 Panther Build Review
By Michael Benolkin
| Date of Review | January 2007 | Manufacturer | Hobbycraft |
|---|---|---|---|
| Subject | F9F-3 Panther | Scale | 1/48 |
| Kit Number | HC1421 | Primary Media | Styrene |
| Pros | Simple build, positionable wing fold, flaps, lots of armament | Cons | |
| Skill Level | Basic | MSRP (USD) | Out of Production |
Build Review
The F9F Panther was Grumman's first design to employ the relatively new jet engine into a carrier-based fighter. Since this design was far from Grumman's first carrier fighter (the FF, which dated back almost 20 years earlier), Grumman had a great deal of experience with the dynamics of carrier operations. Powered by the Rolls Royce Nene, produced under license by Pratt & Whitney as the J42, the F9F-2 would become the US Navy's second carrier-based fighter (McDonnell was first with the FH-1 Phantom).
Like Lockheed's F-80 Shooting Star, the Grumman F9F Panther would be designed around a single engine which would provide less drag and fuel consumption. In action, the F9F would draw first air-to-air blood with the downing of a North Korean Yak-9. While the operational lifespan of many early jet fighters was relatively short due to the rapid advances in engine and aerodynamic technologies, the straight-wing Panther would serve as the carrier's strike arm until replaced by its swept-wing brother, the F9F Cougar.
For a look at the kit straight out of the box, look here. So how does it go together?
Since the kit was still in the final stages of production, neither instructions nor decals were available when I started this build. It turns out that with a couple of minor exceptions, instructions are really not needed as this kit is a gem to build. Thanks to the Hobbycraft team, the decals did arrive before the model was completed and electronic copies of most of the instruction pages also arrived before the model was finished.
As you might expect, construction starts in the cockpit. I used several references to get a sense of color and visible detail as the project when together. The cockpit interior was painted Chromate Green from the canopy sills downward while the instrument panel and side consoles were painted black. The instrument panel face is a decal while the side consoles have some nice raised detailing molded into them making the job of visually 'busying up' the consoles easy.
There is no doubt in my mind that we'll be seeing lots of aftermarket products for this kit given three releases scheduled from Hobbycraft as well as three from Trumpeter. I would love to see some color photo-etch in this cockpit!
The ejection seat isn't bad though it would benefit from some seatbelts, shoulder harnesses, and headrest ejection seat handles. See what a little extra does for the appearance of the seat?
The cockpit sits atop another part that serves as the nosegear well and the speedbrake well. I painted the interior of the nosegear well Chromate Green and Red inside the speedbrake well. With the cockpit mounted atop of the wells, this part was set aside until later.
The wings are divided into inner and outer sections to facilitate the option of folded wings. When I dry-fit the lower half of the inner section to the fuselage, I was pleased with the snug fit. The upper portions of the inner section likewise fit well against the fuselage. So what happens now that I install the intakes?
The intake ducts are triangular with the vertical portion being part of the fuselage. Part of the lower duct is actually the top of the main wheel well. So how to get seamless intakes? Well first I installed the two ducts to the lower inner section taking care to get a snug fit around the inlet fairing. When all was dry, I used Gunze Sangyo's Mr. Dissolved Putty to seal up the very minor gaps around the inlet and wheel well tops. When this was dry, I wet-sanded the insides of the ducts, then sprayed them Silver. One thing was obvious from the start - there was no backing to the ducts, you'll see back into the rear of the fuselage. I used styrene cardstock to blank off the rear of the ducts. I dry fit the lower inner section of the wing to the fuselage halves and made a few minor tweaks to the blanking plates in order to keep that snug fit.
The fuselage halves come together capturing the exhaust duct and the cockpit tub/lower bays. The fit is excellent all the way around. When this had dried, I literally snapped the lower inner wing section into place and applied a bead of liquid cement. The upper inner wing sections went into place easily as well. When all was dry, I applied a bead of Mr. Surfacer 500 on all of the seams, then wet-sanded the filler away, There really wasn't much visible putty remaining.
The outer wings were put together, top and bottom halves, with no problems. I assembled the flaps and installed them onto the wings in the 'up' position. While these outer flaps are positionable, the inner flaps under the fuselage are molded closed, and you wouldn't see the aircraft with the outer flaps down without the inner flaps down as well. I would suspect there will be some aftermarket options coming to provide the inner flap well and separate flaps so you could have this option in the future.
I assembled both nose sections to see what I could see. The oblique window on the recce F9F-2P is a bit small, but this can be overcome with a file and a bit of clear acetate. It is easier to make an opening larger than smaller. The gun nose goes together well with each of the four 20mm cannons mounted to a plate that slips inside the nose cone. The cone then mounts to two nose halves. The fit here was excellent and only a touch of filler was needed to mount the completed nose onto the fuselage, and that was likely my doing.
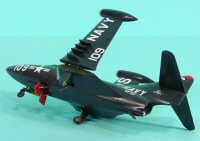
Let me apologize from this point as I had intended to provide more in-progress shots of this build, but I ended having so much fun that I forgot. The bird was ready for paint before I knew it. As I mentioned earlier, I did receive the instructions in electronic form near the end of the build phase as I was stumped on how the main gear retraction arms attached to the main gear struts. The short answer was that they actually connect to the gear doors and overlap the gear struts. It was clearly intended to provide a more solid main gear on the model and they are correct. Once it is all assembled, it looks right and the casual observer should be none the wiser on how it all came together.
At this stage, the various gear/flap wells, cockpit, etc., are all masked to preserve the interior painting. The outer wing panels, speed brakes, and main gear have not yet been installed. The first step was to spray the wings, fuselage, and other exterior surfaces (gear doors, speed brake petals, etc.) Alclad Gloss Black primer. This primer is just what is needed to apply Alclad Aluminum to the leading edges and to look for any problems in the surface as the reflective shine is excellent for detecting seams and surface flaws.
Next I sprayed the leading edges of the wings, tip tanks and intakes Alclad Aluminum. This stuff is rock solid and can be masked after it is dry. I use Tamiya yellow masking tape to mark off the leading edges, then I spray two coats of Testors Gloss Dark Sea Blue FS15042. I set all of this aside for a day or two to completely dry.
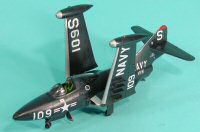
By this time, Hobbycraft was kind enough to send out decals for the bird and I chose Sugar 109, a early war Yak killer from VF-51, the Screaming Eagles. The decals required several doses of Mr. Mark Softener to get them to conform to the surfaces. I did an experiment with Solvaset to see if these decals would respond better, and while the clear decal film did indeed respond, the ink disolved. Don't use Solvaset!
I used a wash of diluted Lamp Black oil paint to bring out the details in the wheel wells, wheel hubs, etc.
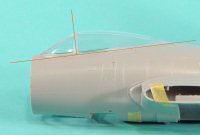
Noted Panther expert (and excellent model maker) Paul Fisher pointed out some of the bugs in the accuracy of the kit - one of which is the windscreen and canopy. Where the windscreen is a vast improvement over the Monogram kit, the canopy bow was misaligned. In the kit, the canopy bow (when viewed from the side) is perpendicular to the aircraft centerline (left photo). On the real aircraft, the canopy bow is perpendicular to the canopy sill (right photo) , which provided some much-needed knee clearance when ejecting out of a crippled Panther.
So how can you correct this little glitch? This one is a no-brainer. You merely set the windscreen on a flat surface and use a perpendicular sanding surface to adjust the canopy bow angle. Yes this does remove part of the molded-in bow, but you'll never notice the difference under a coat of paint. I have a sanding block that provides 90 degree surfaces that worked perfectly. I repeated the process on the canopy. Once both were squared up, I masked and painted their frames. The completed canopy parts were installed using watch crystal cement.
Installation of the main gear, the folded wing joints and the outer wing panels completed the process.
You'll note in the photos that the model is sitting firmly on its tail skid. Since I didn't have instructions during most of assembly, I didn't consider nose weight, but let me tell you that you'll definitely need some. Not as much weight as perhaps a P-38 kit, but take note of the need when you build yours.
This was an enjoyable build with no real challenges to assembly, even after the steps I had taken with the intakes. I am definitely going to do a few more of these kits after they're released as these are nicely engineered and will lend themselves nicely to aftermarket options that will take them to the 'next step'.
My sincere thanks to Hobbycraft Canada for this sneak peek!
Update
We received the production release of the Trumpeter kit (look here) and the canopy issues we addressed above have been fixed with revised tooling!


