Hasegawa 1/48 P-39 Airacobra Quick Build Review
By Michael Benolkin
| Date of Review | August 2006 | Manufacturer | Hasegawa |
|---|---|---|---|
| Subject | P-39/P-400 Airacobra | Scale | 1/48 |
| Kit Number | 09092 | Primary Media | Styrene |
| Pros | Beautiful detail, nice fit throughout | Cons | |
| Skill Level | Basic | MSRP (USD) | $30.95 |
Background
The Bell P-39 Airacobra was by all definitions a unique aircraft for its time. The standard approach to aircraft design then (and today) is to develop an airframe around a particular engine to accomplish a given set of missions. In the case of the Airacobra, Bell had been tasked to design an aircraft around a gun – American Armament’s new 37mm aerial cannon. The gun would have to shoot through the spinner to obtain the greatest accuracy and stability. In order to shoot through the spinner, you had to move the engine elsewhere, in this case behind the pilot. The propeller shaft ran under the pilot, under the gun, and into a gearbox that would turn the propeller.
The Airacobra was also the first aircraft designed with tricycle landing gear, and would definitely not be the last. As the aircraft was under development for the US Army Air Corps in 1937, a little backroom politics was going on as other manufacturers were concerned about sales of their aircraft in the face of the Airacobra. The solution was to have the Air Corps ‘improve performance’ by eliminating the supercharger, effectively limiting the performance envelope of the Airacobra below 12,000 feet.
As the Army Air Corps pressed ahead with development of the type, France placed an order for aircraft and Great Britain, also faced with German aggression from across the channel, followed suit. When France fell to Germany, the RAF started receiving those aircraft originally destined for France. At the time, the RAF desperately needed air superiority fighters, and the lack of a supercharger severely limited the capabilities of the Airacobra as an air superiority machine. As the US entered the war, the Army Air Corps pressed the RAF’s Airacobras as well as those aircraft produced for US service into combat.
 |
 |
 |
 |
 |
 |
 |
 |
As the USAAC gained combat experience in the early months of the war, they learned to play to the strengths of their aircraft. They learned the hard way that trying to fight an A6M2 or Bf 109 on equal terms in all flight conditions was a quick way to get flamed. In the Pacific, for example, aircrews learned that the P-38 was an outstanding interceptor at high altitude and could force the Zero to lower altitudes. If the P-38 followed, it too would get flamed. Instead, P-40s and P-47s could press the fight down below 10,000 feet where the P-39 reigned supreme.
As with any weapon that is not deemed ‘top of the list’, the P-39 was offered as a lend-lease solution to our allies. The Soviet Union took around half of the available Airacobras and pressed then into low-altitude service for their own layered air defense as well as for the aircraft’s excellent air-to-ground attack capabilities that would precede the arrival of the Il-2 Shturmovik in service.
The Kit
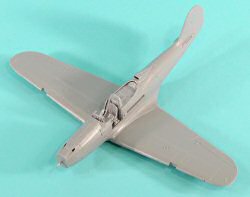
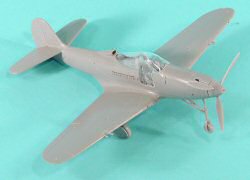
I assembled the Hasegawa kit according to the instructions. As with most aircraft projects, construction starts with the cockpit.
Step 1
Construction begins with the instrument panel and front cockpit bulkhead. The technique used allows the rudder pedals to recess into the leg wells just like the real aircraft. The top of the instrument panel has details on the backside as it can be seen from above. The two machine guns likewise extend onto the instrument panel as well.
The cockpit floor attaches to a single-piece nosegear well. The completed instrument panel and rear cockpit bulkheads install onto the floor. The radio deck attaches to the rear of the assembly. Once I’ve glued everything together, I clamp the drying cockpit/nosegear well assembly inside the fuselage halves so that the dry with the floor and bulkheads in proper alignment.
Step 2
The throttle quadrant is installed in the left fuselage half, then the cockpit/nosegear assembly is cemented into place. I clamp the fuselage halves back together and set the assembly aside to dry.
Step 3
The external stores are skipped for this quick build.
Step 4
The wings go together without problem. There are inserts that go into the underside of the wings that represent the shell ejector ports. These fit snugly. The inserts into the leading edge of the wings for the gun barrels will need a touch of filler after assembly.
Step 4
The wings mount to the fuselage okay, but there is a slight gap at the wing root/fuselage join and the dihedral of the wing is a bit flat. This is quickly overcome by running some liquid cement along the wing/fuselage joint and putting a rubber band from one wingtip over the cockpit to the other wingtip. I set this aside to dry. When I removed the rubber band, there was no gap at the wing root and the dihedral was just fine.
Step 5
The prob and spinner go together. Another nice touch is the polycap inside the prop/spinner assembly to allow the prop to be removed for storage/transport.
Steps 6 & 7
The landing gear installs without any problems. The wheels are weighted, so make sure the flat side is facing down. Some of the gear doors and smaller details are omitted for this quick build.
Step 8
The external stores and smaller details are omitted for this quick build
Step 9
The canopy fits on the fuselage flawlessly. What was surprising were the car doors - they have a slightly different shape at the top of the door that doesn't match withthe canopy. You'll probably want to pose the doors open if you have the same problem.
Conclusions
This kit fills a niche in the kit market. With the release of the Hasegawa kit, the less experienced modeler can also have a nice rendition of the P-39/P-400 that feautures state of the art detailing using injection molding instead of aftermarket parts.
This kit is highly recommended!


