Hasegawa 1/20 Großer Hund 'Altair' Build Review
By Michael Benolkin
| Date of Review | March 2018 Updated May 2019 |
Manufacturer | Hasegawa |
|---|---|---|---|
| Subject | Großer Hund 'Altair' | Scale | 1/20 |
| Kit Number | 64105 | Primary Media | Styrene |
| Pros | Easy build, nice details | Cons | Nothing noted |
| Skill Level | Experienced | MSRP (USD) | $89.99 |
Build Review
For a brief description of the Maschinen Krieger (Ma.K.) universe and a look at the basic Großer Hund 'Altair' kit out of the box, look here.
With the popularity of the Gundam and Macross universes in anime and in print, it is not surprising to see companies like Bandai and Hasegawa producing a variety of kit subjects that are successful and continue to attract younger modelers. More recently, Bandai has taken its Gundam engineering skills and crossed them over into the Star Wars universe, with a variety of figures and robots out of all three trilogies. These posable kits are highly sought after, and more subjects are being released. One genre out there called Maschinen Krieger (Ma.K.) has also appeared in kit form from several Japanese brands including Hasegawa. These robots and armored fighting suits are based upon a concept developed by Kow Yokoyama in the 1980s, and while the subject was published briefly in a Japanese magazine, the Ma.K. universe has continued without the benefit of any anime or manga production. There are rumors of a movie in the works, but who knows if/when that might appear.
Hasegawa picked up the Ma.K. series a number of years ago and has produced a variety of new subjects along the way. When I had a chance to build the Nutcracker hovertank recently, I decided to add my own twists to the design. That build was fun, and that led me to pull the Altair onto the bench while waiting for the putty to dry on another project.
The instructions are relatively easy to follow and each step provides the right guidance to get a lot of parts into a cohesive model. As mentioned in my first-look at this kit (link above), the kit is molded in white styrene.
Assembly starts with one leg and before you know it, you've also built the other leg. The joints are movable so you can pose the robot (or armored suit) as desired. Study the instructions as there are subtle differences in the orientation of the ball joints in the feet between left and right legs.
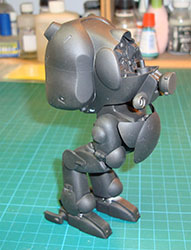
Like the Nutcracker project, I decided to use this project to test out some camouflage masks as well. Where I used the 'cloud' masks on the Nutcracker, I'll be using 'digital' masks on the Altair. First, I want to apply a primer/base coat in black so that any areas that are not part of the camouflage are not white either. Here are the legs with the lower torso. Before painting, I cleaned up the seams and applied Mr.Surfacer 500 to remove any remaining gaps in the seams. The kit's molds are older and there's a bit of flash here and there as well as a few gaps here and there. Once the bodywork was completed, I dismantled the legs and painted the parts black.
The main torso is completed along with the rocket pack. As with the legs, the seams were cleaned up and filled before painting. I used Ammo One-Shot Black Primer here and the results were good, though I did run into a problem that wasn't the fault of the primer. The Ma.K. kits have a persistent mold release agent on the parts and while I did rub down the assemblies before painting with isopropyl alcohol, well, did I mention the agent was persistent? There were a few spots on the assemblies where the primer literally rubbed off, so I cleaned those areas again and re-applied the primer. That worked out much better.
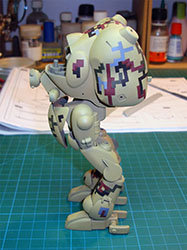
While there is still more building to be done, I decided to paint the upper and lower torso using the HiQ Medium Digital Masks from HobbyZone USA. These come in large, medium, and small, but for this experiment, I went with the medium masks. With the black base coat completed, I applied the first masks, then applied medium gray, then more masks, followed by panzer red primer, more masks, panzer green, still more masks, and then the final coat of panzer yellow.
I let the final coat set up for a day, then began the process of removing all of those masks. While there were a couple of small spots where the paint pulled off, the model was touched up and I am pleased with the results.
Getting back to building again, I am sure those of you familiar with Ma.K projects noticed the lack of hoses/flexible tubing in the above shots. I waited until the painting was finished for each subassembly before installing the hoses as you can see below. The arms are assembled and primed, the head is assembled with Mr.Surfacer 500 on the seams, while the shoulders are a work in progress.
I am enjoying this kit and while I am keeping to the theme of German WWII colors, the digital camouflage adds a unique element. Like the HiQ Cloud Masks from my Nutcracker build, the HiQ digital masks are easier to use now that the first experience is out of the way.
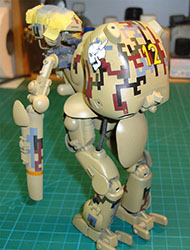
The painting, masking, and more painting process continued with the arms, shoulders, and head. As you can see here, I've also added decals to the torso. The masking tape on the head is because the digital masks pulled up the underlying paint. I evidently missed a spot in removing the mold release or some other contaminant got in the way, but the paint came up when the masks were removed. Here I've cleaned, re-primed, and have started the colors to replace the digital camouflage atop Altair's head.
Repairs to the camouflage atop Altair's head are completed. Time to add the final details and do some weathering.
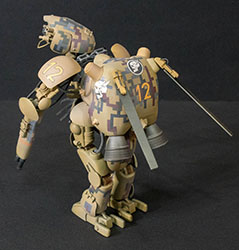
The hoses to the arms and main weapon are installed along with the various clear lenses. I used liquid mask on the lenses so I could safely weather the model. I used some washes for grease on the various hinges to bring out more details before shooting the entire model with an acrylic dust to provide some simulated age to the surface of the camouflage.
This was a fun project and provided some good experience on how to recover from paint failure, even after applying complex camouflage masks. The model itself is relatively easy to build, but you do need to study the instructions because there are some seemingly ambiguous steps that don't make sense until you look ahead and see what's happening. If you're looking for a fun alternative to the usual real-world kit subjects, have some fun with one of these Maschinen Krieger kits. It will give you your own freedom to try different ideas in your modeling.
My sincere thanks to Hasegawa USA for this review sample!


