Hasegawa 1/48 N1K2-J Shidenkai (George) Build Review
By Kelly Jamison
| Date of Review | October 2017 | Manufacturer | Hasegawa |
|---|---|---|---|
| Subject | N1K2-J Shidenkai (George) | Scale | 1/48 |
| Kit Number | 09254 | Primary Media | Styrene, aftermarket resin |
| Pros | Nice details, colorful decals | Cons | None noted |
| Skill Level | Experienced | MSRP (USD) | $42.95 |
Build Review
I like to write reviews for the real modeler that explain what happened to me and how I fixed (or not) each problem as it surfaced. I pulled Hasegawa's 1/48 JT73 Shidenkai 'Early Version'off the shelf and liittle did I know that it was literally the earlier version! I started digging through the kit and noticed that it had raised panel lines! Wait a second. I know Hasegawa is better than that. I got on the internet and found that the kit had been retooled and reissued in a few different versions. Loudly complaining to one of the guys in the local club, he said he had one of the new ones I could have. Saved!!!
I plowed into the new kit and compared it to the old one. There were many differences. A very nice cockpit, recessed panel lines and overall quality of the kit was much better. Much improved decal sheet. Hasegawa did well in their retooling. As I usually do, I started with the cockpit.
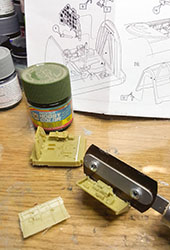
I had an FM Resin detail set available and started cutting them off the pouring lugs. Aqueous H340 (FS 34097), as the instruction sheet calls out, was airbrushed on the sidewalls, floor, firewall and aft bulkhead area. For reference, I used my Maru-Mechanic and Aerodetail #26. I detailed out the rest of the cockpit. Thin superglue got the control knobs in place and a bit of Testors Bright Red, I used a tooth pick to place a glob on the end of the handles to give a nice knob look to increase the three dimensional look of the photoetch. Silver highlights, yellow, wood tan and black details add to the busy look of the cockpit. A set of Eduard IJN seatbelts finish it out.
The instruments were printed on a clear sheet of plastic. The first thing I had to do is paint a little dab of half of the Airspeed gage a red orange I mixed on the spot. It is the first color you have to paint before I painted the entire backside white and the instrument panel with Vallejo Black. I sandwiched together (the photoetch panel and the instruments) with the resin backside panel with Future Floor polish. The clear acrylic acts like a glue and also gives a nice glass lens look to the instrument faces.
The fuselage halves line up with typical Hasegawa precision and were zipped up with some Tamiya liquid glue I was pleasantly surprised when the aftermarket cockpit dropped right in too! The lugs on the fuselage lined up perfectly with the notches on the floor of the pit. That battle down, I turned to the wings. Nothing special there. Basic building skills in this area. I really like what Hasegawa did with the deep area of the wheel wells. They are separate pieces but glue in perfectly.
It wasn't too long before the wings and the fuselage were mated. One area you might want to tackle is the wingtip lights. You can notch them out now and put the supplied glass in later or just leave it and paint the lenses later. I skipped the engine build for now and will tackle it later. At this point is the real-world smacks me right in the forehead.
I looked at a lot of reference pictures and almost all of the m had the flaps in the up position. I liked the design lines of the George and decided I would model this with the flaps up too. The kit has provisions to do the flaps up or down. I will say down is easier. So I was seeing what I need to do to get the flaps fitted in the up position when I noticed that the bottom of the left flap was damaged. Not just damaged but about 1/3rd was missing! It was on the tree this way. No big deal, right? We got skills! So I glued up what was left and got some sheet plastic cut to shape and filled in, puttied and re-scribed. Problem solved but what a strange problem to have from a Hasegawa kit.
Quickly the kit was ready for sanding, priming, detail sanding, priming and a coat of my new favorite silver. Vallejo Acrylic Metal Color 77.724 Silver. I didn't do this as a scratch coat for weathering. It is too fragile to use for that kind of weathering technique but it made a great pre-coat prior to painting the green. Also this George didn't use a grey underside but a bare metal underside. Vallejo Acrylic Metal is perfect for that. While I had the airbrush loaded I did the landing gear covers, inside and outside of the one-piece engine cowl, and drop tank.
One thing confused me a bit was the two-piece spinner. I was really dreading it but it glued up nicely and after a little sanding was just about perfect. I worried for nothing. So I guess they needed to mold it that way to get the openings for the prop blades in the correct shape. By the way the prop is molded as one piece and needed just a little putty to take care of some sink marks on the back side of the blade. Also they molded the prop tip lines into the blades. I sanded those off too.
I thought the engine could use a little dressing up so I put spark plug wires on it and took a little extra time detailing out the front. Most of the engine is closed up around the tight fitting cowl anyway so I wouldn't worry too much about it. The exhaust stacks got a shot of Tamiya red brown and a light dusting of flat black. The kit comes with open or closed cowl flaps. I chose the open ones. Dealers choice.
A friend mixed me up a custom bottle of Kawanishi Green. Most references say Kawanishi Green is a close match of FS 34077. I think it has a very slight blue tint to it that FS34077 doesn't have, hence the custom color mixes. I airbrushed it on lightly to get that slight translucent tone to the silver background. I slowly and very lightly built up the colors on the less worn areas and kept it thin on the high wear areas like wing roots and below the cockpit.
Before I got much further I put on the leading-edge yellow. My favorite color for this is a PollyScale Chrome Yellow. PollyScale is a very temperamental paint to deal with. It has to be mixed just right with water to spray out my Iwata correctly. Honestly, it is a real pain in the butt to paint this color after the top and bottom of the wings are painted because of the close area around the wing to fuselage joint. I would paint the yellow first then tape over it until the end of the painting process.
I did some weathering and chipping before the decals to get a feel of how I wanted it to look. It is so easy to over weather this subject. I used a Pentel silver pen to get the scratches in taking my time and building it up. I spent a lot of time looking at reference photos and then going back to add a little more. I took my airbrush to tone down some of the chipping and correct where I went too far in a few areas. Then using a wash of burnt umber wicked off a brush and built up over a few sessions got the look I was going for. A gloss coat of Future set up the kit for decals.
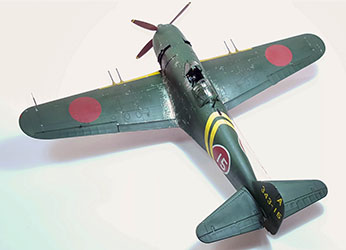
Yellowhammer supplied the decals with their excellent YHD48029 N1K2-JShiden-Kai sheet. I actually flipped and flopped on what plane I wanted to model. I ended up choosing Lt. Naoshi Kanno's aircraft but could have been swayed to change my mind easily. I wish I would have picked another scheme and I will tell you why. You need to put the white Hinomaru disks down, then the red Hinomaru then the white number 15, then the yellow stripes. That is a lot of decal film and yellow and white are notoriously transparent. Well on hindsight, the whites and yellows on this decal were very opaque and there really was nothing to worry about. But I cut the edge off the white and red Hinomaru so they wouldn't show but the geometry of keeping the white line and the red dot lined up was a daunting task. I barely got it done. Using my technique, you could easily ruin a nice set of decals.
A little more weathering, washes and chipping then the plane was ready to be put on its own legs. The landing gear was airbrushed Tamiya Simi gloss black had a good solid feel when placed in the wing. I added bare foil to the struts and brake lines using my reference material. The tail wheel mounts in the fuselage a bit different than I am use to. It is a slot and tab affair. All I had to do is put a bit of Tamiya liquid glue on the tab and it slid right up into the hidden slot. I made sure the glue was good and dry before putting any weight on it. Drop tank, wingtip lights, prop and we were looking good.
One of the things I hate to do is canopies. I am now a firm believer in the Eduard Masks so I put the build on hold until a set could be purchased online. I also picked up a set of Quickboost resin machine gun barrels since the kit ones look a bit toy like. The Eduard Masks take the pain out of the build. They are just so easy to use and really make the glass look good. Also the time and frustration saved are worth every penny to me. Others may disagree.
Overall there is nothing here to worry anyone from a novice to master modeler. Matter of fact, I would say this kit is a great candidate for those wanting to step up their game. The cockpit can be built right of the box and looks good. There is even a decal on the sheet for the instrument panel if you don't want to mess with resin or photoetch. You can use the molded in lights instead of cutting out the area and adding the clear ones from the kit and you can put the flaps up or down.
I liked this kit very much. The results are great and it has inspired me to tackle a few more Japanese subjects. Now where did I put my Rex and Shinden?


