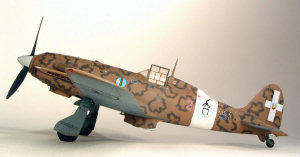
Hasegawa 1/48 Macchi C.202 Folgore Build Review
By Kelly Jamison
| Date of Review | April 2007 | Manufacturer | Hasegawa |
|---|---|---|---|
| Subject | Macchi C.202 Folgore | Scale | 1/48 |
| Kit Number | JT32 (09132) | Primary Media | Styrene |
| Pros | Beautiful detail | Cons | |
| Skill Level | Basic | MSRP (USD) | $23.95 |
Background
With the clouds of war looming over the European Continent the Italian Air Force better known as the Regia Aeronautica found itself no longer on the cutting edge of aviation as it ha been in the late 20’s and early 30’s. Setting one world record after another the Regia was riding a high. As new mono wing and all metal aircraft were coming on line the Regia realized that they were falling behind in aircraft design. Francesco Ricolo was inserted by Mussolini as Chief of Air Staff and he leaned on Fiat to produce the newly licensed German DB601 engine.
Aeronautica Macchi (sometimes known as AerMacchi) was ordered to build a plane around the new German engine, the company tried to use as many components as it could from its excellent but underpowered C.200 Saetta fighter. So was born the superb Mc.202 Folgore (Literally translated as Lightning. Italian aircraft were given official nicknames but the pilots rarely used these names.)
These planes were used in Africa, Malta, Russia, Tunisia, all through the Mediterranean and of course in the defense of Italy. They were considered a very able opponent to the latest series of fighters from America and England. On a small side note, the Ki-61 Hien was assigned the allied call sign of “Tony” because Air Intelligence had thought the Ki-61 was a licensed Mc.202 and assigned the ethically attached Italian name. Once it was proven that the new inline Japanese aircraft was not an import, it was too late and the code name stuck.
The Kit
Hasegawa had made one of the best kits of its time as far as fit and finish with the Mc202/205 line of aircraft. The only real drawback of the kit was the exposed wheel well area was very barren. The cockpit is good and passable straight out of the box. I planed to throw some resin at this kit and a few other goodies I have had piled up for some time. You can build this kit straight from the box and have a winner easily.
The Build
I used the True Details cockpit set on this kit. The definitive replacement cockpit is still the Jaguar kit but it is getting harder and harder to find. F.M. makes the next best cockpit in my opinion. A bit pricy but you get what you pay for. The True Detail floorboard is just a bit too wide and needs to be pared down just a bit to get the fuselage spread right. The cockpit instructions call for you to use the kit control stick but what it does not tell you is that the stick doesn’t need the bottom linkage that is molded with it. Cut the bottom piece off the stick. When you try to glue the unmodified piece to the resin floor, you will know what I mean.
Once I got the cockpit shaved down a bit and everything aligned, I glued the two fuselage halves together. The fit was excellent. Once again, you pay for what you get and Hasegawa does deliver. Ever tried to build the Taro version of this kit? Nuff said! The tail planes went on next with just a thin bead of liquid glue. No cleanup is needed. The nose gun covers are nicely molded and fit into place with precision. I used capillary action to get a good flow of Tamiya Liquid Glue to the two mating surfaces. It makes the cowl looked like it was cast as one piece. Do not forget the propeller shaft labeled A6. It has a small square lug end that the propeller fits onto. I tried not to glue mine on but that liquid glue got drawn in and glued it solid.
Also the air filter got drilled out and a small piece labeled A3 was glued on to get that long tunnel look of the filter. Using my Waldron Hole Punch, I made a small disk to replicate the shutoff valve to dress it up a bit more.
Next item on the list are the wings and that infamous snake pit behind the engine firewall in the open wheel wheels. I will tell you that if you have the ability to get your hands on the superb Jaguar plug, get it! I didn’t have it. So out came the brass wire, tubing and Evergreen plastic strips. The Mushroom Models Mc202 book is a fantastic reference for this area and was referred to many times. I dressed up the area using all my tricks to make the wheel wells look busy. The main spar was glued into place and everything was built up around that. I glued the bottom of the wing to the fuselage first then took my time fitting the upper wing panels into place to get the best wing root joint. There are four rectangle pieces of sheet metal that cover the wing attachment points. These were replicated using Mr. Surfacer 500 and a little light sanding. I wanted them to be built up just a bit but not too much. I held off attaching the pitot tube and there is no need for part B20 headrest. That is supplied by the True Details seat anyway. The bottom of the engine cowl finished off the major assembly.
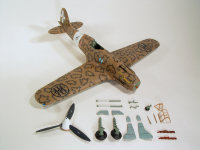
Here is where I concentrated on painting and not putting the landing gear and other accessories on deviating from the instructions. I did temp install the gear legs just for the plane to have something to sit on. A small bit of Blu-Tac kept the gear in place during sanding. There is a small horn (Parts F9, F10) that goes right in front of the tail wheel. Remember to use part A5 tail wheel for this version of the Macchi. I also held off putting the radiator scoop on until after painting. There is a small scoop numbered A2 that I lost to the carpet monster. Keep better tabs than I did and place it in front of the canopy per directions. Part A1 is the foot step. In all my research, I could not find one example of the thing being used so off to the parts bin it goes.
There is not a lot of sanding. I cleaned up and re-scribed the small seam that runs from the wind screen to the machine gun cover. Then since the leading edges of the wings and rudder are thicker than on other aircraft, I made sure and sanded down and smoothed out those surfaces. Some filler was needed at the wing root to fuselage and Mr. Surfacer was used in the wheel well areas. Once all seams were taken care of and the whole thing got a quick polishing from a cotton cloth and a nice warm soapy bath, the plane was ready for paint.
Painting
A pre-shading treatment was applied. I have started moving away from this technique but am still having a problem breaking the habit. I did try to go lighter than usual. The results are a more subtle and less animated final product. I painted the fuselage Tamiya Gloss White along with the front part of the spinner and set them off to dry for a few days. A quick masking and the light blue underside was ready for painting. The instructions call out for RLM 78. We could argue the different shades of “Grigio Azzurro Chiaro 1” till we are blue in the face (pun intended). I just went with good old Testors Model Masters RLM 78 and pressed on. Sky Models decal sheet calls for FS 36307. It is a very gray color with no blue tint to it at all.
One of the unusual aspects (besides the smoke ring camouflage) was the rap around camo on the leading edge. There is a tight curve around the wingtip that needs to be masked off. I solved this problem by cutting a thin strip of Tamiya Tape and slowly working it around the edge like a pin striper then using bigger pieces of tape to mask off the rest of the wing.
Now we could find the best “Nocciola Chiaro 4” paint color or go with FS30219 Dark Tan and press on with the model. It is so close to Nocciola Chiaro that the differences in your monitor, lighting and pre-shading make exact color matching a moot point. After the paint was dry, all the masking tape to include the white stripe area masked off earlier was removed. It was looking good but I had to make my final decision on what scheme I was going to do.
The beautifully printed Sky Models Decal sheet was no help in that you had so many really cool choices. One thing I did want was the smoke ring camo so that helped me cut down the selection process a bit. I decided to go with Sergeant Ennio Tarantola of 153* Squadriglla, 51* Stormo ‘Dai Banana!’ It had all the elements I wanted.
Decals
Now it’s time for the end of the world of modeling as we know it. I used the amazing Mike Grant Smoke Ring decals. They seemed too light in color but they are just opaque enough that when you put them on the tan surfaces they take on an almost perfect Verde “Oliva Scuro 2” or Olive Green to the rest of us. If you are interested in it, the FS number for this color is 34052. The plane got a coat of Future Floor Polish to prepare the surface for the decals. I had to hand cut each ring out since they are printed on one large carrier sheet. Try to trim away excess film but do not trim off too much or you will ruin the soft edge of the rings. Do not worry about the carrier film in the middle.
I had to refer back to pictures a lot to get the right shape and position for each of the decals. On the real article the rings look like they were sprayed on the diagonal with about 4 smoke rings per run. That is just an approximation. If you have proof or pictures to disprove that then use them! I wrapped a few around the leading edge and when it came to putting them against the white fuselage band, I just cut them off in a straight line and snuggled them up to the white band. The illusion is that the white is painted over the smoke ring.
Extra care had to be taken around the carburetor intake and gun troughs. I found it better to “droop” the decal in the middle. Place it where you wanted it and let the ends flop down to the surface. That keeps the decal in position and keeps from causing a “tent” effect from happening or the decals from tearing. They are fragile so be ready to tear a few. You get more than enough to do a whole plane. Mess up a few and do some more.Getting the grouping and spacing right to give it a realistic look was the hardest part. I had to do little things like paint and decal the bottom radiator scoop separate and use the smaller smoke ring decals on that area. Going slow and not trying to do it all in one sitting really paid off. Besides your fingers will get very tired cutting out all those circles. I still was not convinced that these things were going to work. I used MicroSol as the decal solution. Something like Solva-Set is just too hot for these decals and will melt them.
It still looked sketchy. I wasn’t sold yet. I pressed on. Another coat of Future sealed them in. The decals from Sky were put in place over the smoke rings. A final coat of Future and then the flat coat using Model Masters Acryl Flat Clear finished off the big painting chores. I looked back at the plane after it dried and was stunned. The smoke rings looked perfect. The carrier film disappeared completely and the Sky decals were immaculate. It really looked great sitting on the workbench. I am now sold on Mike Grant’s product. It just looked right.
I used a set of True Details wheels which I usually steer away from because of their castings tend to make the wheels look almost like they had a flat. The Italians used a low pressure tire for the rough dirt airfields they operated from and these True Detail wheels actually fit the bill. They were still too bulged and a few swipes with sand paper took that down a bit. I had to drill out the middle to match the kits axles. When I did this I didn’t notice that they were not aligned. When you try to put the unique yoke style landing gear on the wheels will not sit flat. I had to try to tweak it but it still does not look right. I will probably go back and remove the tires completely. The landing gear is highly visible and needs to be done right.
Final Assembly
The rest of the build is simply assembling the accessories like the propeller, spinner, antennas and pitot tube. I used a set of Ultracast exhaust stacks. The Moskit ones were just too big and the kit stacks look dull. There is almost no way to drill them out. The Ultracast stacks didn’t look that great until they were inserted into the engine cowling then they looked a lot better. But they are expensive.
Conclusion
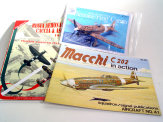
I've got to say that this kit was a real joy to build. Assembly of the main parts was so quick that I thought I did something wrong but it was there. Research is a bit short but there are some excellent publications such as Regia Aeronautica Caccia & Assalto 1940-1943 Part II, the Mushroom Models Orange Series MacchI C.202 and even the Macchi In Action book to keep you busy. The Mushroom Models book had the best landing gear and engine wheel well area photos I could find. I am sure there are a few more publications out there that are good too.


