Hasegawa 1/32 Ju 87G-2 Stuka Build Review
By Larry Horyna
| Date of Review | August 2014 | Manufacturer | Hasegawa |
|---|---|---|---|
| Subject | Ju 87G-2 Stuka | Scale | 1/32 |
| Kit Number | 08075 ST25 | Primary Media | Styrene |
| Pros | The best Stuka kit in any scale | Cons | See text |
| Skill Level | Basic | MSRP (USD) | $64.95 |
Background
Unarguably one of the most iconic German aircraft to emerge from the Second World War was the Junkers Ju-87 Stuka (short for Sturzkampfflugzeug, literally "diving combat airplane"). Designed primarily by Hermann Pohlmann, the Stuka made its combat debut in 1936 as part of Germany's famed Condor Legion during the Spanish Civil War. The B model gained fame during the initial Blitzkrieg in Europe in 1939-40 and by the middle of the Battle of Britain during the summer of 1940 the airplane's primary weakness (being vulnerable to enemy fighters) was demonstrated. The aircraft continued to serve the Luftwaffe on all fronts with varying results dependent upon German air supremacy in order to escort the slow moving ground attack aircraft.
By the summer of 1943 the threat of Soviet armor and problems with production on Henschel's HS-129 cannon armed ground attack airplane brought about the idea of fitting D model Stukas with twin 37mm cannon, one under each wing. The concept proved successful (in fact, downright devastating in the hands of pilots like Hans-Ulrich Rudel) and the G model was born (although the G-1 was a modified D airframe). The G-2 was an actual sub-variant of the airplane with longer wings and completely removed dive siren fairings. Although casualty rates were somewhat high due to the airplane's slow speed, once on the target the Kanonenvogel (cannon bird) was the bane of Soviet armor.
Two very interesting historical tidbits about the Stuka; it was the only dive bomber that was actually designed to operate in the vertical. It had an automated dive recovery system (not all pilots liked to use it) ensuring that the pilot pulled out of his dive even if he blacked out from excessive g-forces. Also, the G model and the exploits of Hans-Ulrich Rudel were required reading and study by those involved in the American A-X project in the mid 1960s which produced the Republic A-10 Thunderbolt II.
The Kit
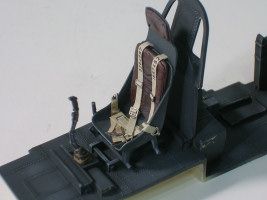
Hasegawa's 1/32 Junkers Ju-87G-2 Stuka is nothing less than impressive in size and "mean looking" factor! The kit itself is what you would expect from Hasegawa. This was built for a customer who loves interior detail and with such an impressive greenhouse canopy to see through, we opted to detail this one out a bit with a beautiful resin/photo etched interior by Voyager Models and few scratch built bits. As nice a job as Hasegawa did on this kit, the pilot's seat in particular is much improved with a resin replacement. I also used textile seat belts and Master metal gun barrels for both the 37mm cannon and the rear gunner's armament. Voyager also supplied a more "scale" thickness exterior armor plate for the pilot's cockpit than the kit's plastic part.
Assembly
The general build went very smoothly with no major fit issues. Minor trimming was required to get the Voyager resin floor in place. I had to do a little filling of the wing joints where the "gulled" section went together. Everything else pretty much fit like a dream on this one. I only have one big gripe and it's one I've had with Hasegawa for some time. Many of their earlier kits did not offer open canopy options. This is something they have addressed of late, but it does little good to offer a separate open section if it will not fit in that position. The pilot's canopy section on this kit does not fit in the open position without riding way too high on the middle section. This is something of a pet peeve with me but it really drives me nuts! I solved the problem by attaching some rails on the inside of the sliding section near the sills which splayed the canopy out until it fit reasonably well. The problem with this fix is that in just the right light, you can see the stress crazing in the plastic. It's really not happy being "forced" to sit that way! Someone needs to make a clear resin replacement (Hello Alley Cat! Can you hear me?). Or you can vacuform your own.
Painting & Finishing
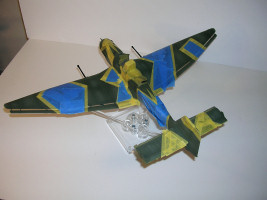
Well, I was back to my good old RLM 70/71 dilemma. As mentioned in my previous review of the Dragon 1/48 Ju-88, Testors RLM 71(dark green) is most certainly not "green" much less dark green as it is supposed to be. Before building the Stuka, I had built a Classic Airframes 1/48 Dornier Do-17 (that will be a review soon as well) in Battle of Britain markings. I decided on that one to mix my own colors with Tamiya acrylics using some very nice color chips by the Ministry of Small Aircraft Production. While the matches were good, the color variance was very difficult to see on the model. For the Stuka I used the same mixes but lightened the RLM 71 to give me just a bit more tonal variance between the green and black green. I was very pleased with the result and will most likely use this combination for any future RLM 70/71 subjects. Again, this is all for the sake of making my eye for color happy, which is part of the fun of painting for me. Color interpretation can be a pretty subjective business! Speaking of subjectivity, I painted the spinner with a lighter, brighter green than most references show (which looks to be RLM 71) just give a bit more color to what is otherwise something of a "drab" scheme.
Painting was done in a method I have come to really like. I pre-shaded the model with flat black, lightly painted the base color over that, leaving deepened panel shading effect, then went back and highlighted with a lightened version of the base color. I am finding the effect to be even more dramatic in the larger scales.
Finishing Up
The kit decals were used with little to no problems encountered. The model was sprayed with Future, decals applied followed by a second coat of Future. I did mask and paint the fuselage band, underside wingtips and tactical "V" marking on the wing. I don't care for decal fuselage bands because of the resulting seam and I wanted the tactical marking to match the color of the wingtips. For me, it is easier to just mask and paint than to try and match the color of a decal. The markings are for one of Hans-Ulrich Rudel's airplanes. After the decals were dried I applied MIG production's dark wash.
One difficult little detail on the Stuka is how to go about doing the canopy's inner framework. About 1/3 of the Stuka's canopy frame was inside the glass and not the same color as the exterior. Most modelers wisely just paint the entire frame the outer colors and go with that. The Voyager detail set provided photo etched brass strips to simulate this. I didn't want to risk gluing this in and screwing up the clear parts. My solution was to mask and paint the interior of the appropriate frames RLM 02. I added the rivet detail with a Gunze fine tipped paint marker. Overall I am happy with the effect. I scratch-built the flare pistol, windscreen/gun sight defrosting pipes and the windscreen mounted grab handles as they were all fairly prominent cockpit details. In the middle section I scratch-built the interior reinforcement framework. The two cannon were very nice representations and only required some wiring to detail out. Each gun mounted a small gas powered heater to keep the guns from freezing up. The little heater is well represented and just needs a few wires. I also scratch built the shell ejection chutes out of plastic card stock as the kit parts were solid. The actual chutes were hollow and open ended with a small pin to keep the spend casing from falling out and damaging the aircraft. It also looks nice to drill out the lightening holes in the rear gun mount bracket as these are cast solid.
Conclusion
Even though this was a slow, vulnerable ground attack aircraft, it just looks wicked! The somewhat sleeker lines of the D and G model Stukas gave the airplane a "rakish" look that is hard to not like. Add the sheer size of this in 1/32 and the cool factor is very high! I enjoyed adding all the extra detail stuff even though this would make a great model out of the box. The only problem was the pilot's canopy and that's only if you want it open. I highly recommend this kit. Hey, after building this one for someone else, I got one for me!


