Hasegawa 1/72 F/A-18A Hornet 'Adversary' Build Review
By Chuck Holte
| Date of Review | September 2013 | Manufacturer | Hasegawa |
|---|---|---|---|
| Subject | F/A-18A Hornet 'Adversary' | Scale | 1/72 |
| Kit Number | 00625 | Primary Media | Styrene |
| Pros | Good painting instructions and decals for two Aggressor Hornets | Cons | Fit issues for fuselage, engine inlets |
| Skill Level | Experienced | MSRP (USD) | Out of production |
Background
The McDonnell-Douglas F/A-18A Hornet was designed in the 1970's to replace aging US Navy and Marine aircraft, such as the F-4 and A-7, in both the air interceptor and ground attack roles. The multi-role F/A-18 prototype first flew in late 1978 and began Fleet integration in the early '80s. The F/A-18 eventually replaced the F-14 Tomcat and A-6 Intruder series and continues to serve Naval Aviation while celebrating its 35th Anniversary as a Strike Fighter.
Build Review
Japanese manufacturer Hasegawa started kitting the F/A-18 shortly after the prototype taxied to parking and shut down engines following the first flight. The legacy Hasegawa Hornets are now a bit long of tooth with some typical '70s era fit issues, but, with a little work, still make into a handsome model of the "Bug."
The kit I pulled from the stash is a 2003 reissue with a box-cover photo of an F/A-18A flown by Fighter Squadron Composite Twelve (VFC-12). The "Fighting Omars" are based at Naval Air Station (NAS) Oceana, Virginia and provide adversary training for East Coast air wings. Kit decals include painting instructions and markings for "Black 07," the VFC-12 aircraft pictured on the box, as well as another aggressor scheme from the Naval Strike and Air Warfare Center based at NAS Fallon, Nevada.
The kit was assembled out of the box (OOB), per instructions, with no aftermarket resin or PE, but I added painted masking tape seatbelts. I had some fit issues with the engine inlets and the aft fuselage, but with patience, fortitude and some gap-filling super glue, the model came to look like a proper "Bug." Although the kit provides ample under wing stores/weapons, I decided to model the blue VFC-12 aircraft, per the photo, with only the centerline fuel tank.

Painting began with Tamiya rattle-can Fine Surface Primer over all surfaces. After a few touch ups from the primer coat, the nose, and gear wells were sprayed with Tamiya rattle can Pure White, TS-26, and masked when dry. This particular aggressor scheme is intended to represent a Russian SU-27 and the white nose of the Flanker extends aft of the normal F/A-18 radome demarcation. I used the nose and main landing gear doors to mask the white gear wells. The cockpit was painted and masked.
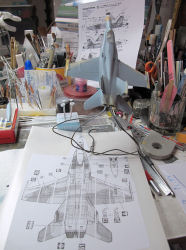
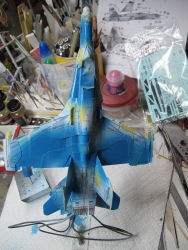
In preparation for masking the aggressor color scheme, I enlarged the kit painting instructions on my copy machine to the point where the actual kit wing span and fuselage length matched, per attached photos. After making several copies of the top, bottom and side profiles, I attached them to Grafix Frisket Film with Scotch Multi-Purpose Spray Adhesive. Next I airbrushed Model Master FS 36375, Light Ghost Gray enamel, to the wings and vertical tail surfaces. These were then masked to define the outline of the Flanker wings and tails.
Using various Model Master Grays and Blues, I mixed the light blue and dark blue to an eyeball match with the various photos found on the internet and the box art. I airbrushed the light blue over-all and when dry, cut frisket patterns to cover the model in preparation for the darker blue areas. Since the patterns and frisket paper are 2-dimensional and the surfaces they are to cover are 3-dimensional, some help from Tamiya masking tape was needed to connect areas and keep the patterns in place, per my photos.
Once the paint was dry, I removed the frisket and tape masks, did the inevitable touch-ups, and got ready for the decal phase.
I airbrushed the entire model with two coats of full strength Pledge With Future Shine (the "new "Future floor wax) to level everything out and provide a gloss coat for the decals. Many after-market aggressor decals are available for Hornets, but I was happy with the markings provided with the kit. The kit decals went down well with no silvering and conformed well to all surfaces. After some light panel line and flying surface weathering using diluted Polly S Grimy Black, I cleaned the model and airbrushed several light coats of my dwindling stock of Floquil Flat Finish. Cockpit decals were applied and the canopy/windscreen attached with white glue.
Conclusions
For me it was an enjoyable OOB build of an older kit in the colorful aggressor markings of VFC-12. Recommended for experienced modelers due to the complexity of the color scheme.


