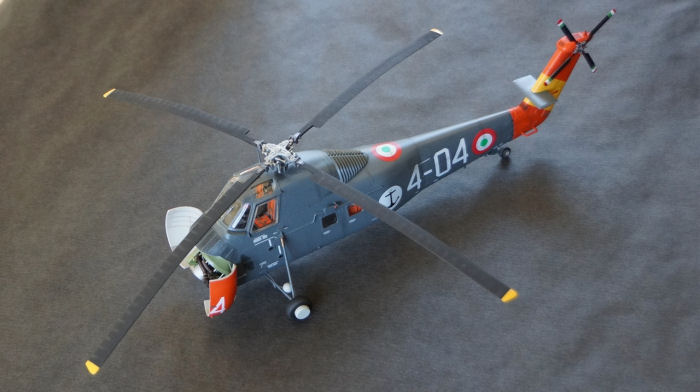
Gallery Models 1/48 SH-34J Seabat Build Review
By Fotios Rouch
| Date of Review | December 2012 | Manufacturer | Gallery Models |
|---|---|---|---|
| Subject | SH-34J Seabat | Scale | 1/48 |
| Kit Number | 64102 | Primary Media | Styrene, Photo-Etch |
| Pros | Nicely detailed kit | Cons | Minor fit (see text) |
| Skill Level | Experienced | MSRP (USD) | $55.98 |
Background
For an inbox review and history reference look here. The H-34 and H-19 are some of my favorite helicopters. First I read that Italeri was coming out with the H-34 in 48th scale, then Trumpeter and then a new company, Gallery models.
As soon as I noticed South Korean vendors advertising the Trumpeter TRU64101 and TRU64102 I went ahead and ordered both. I had heard rumors that the Gallery model would be better and that Sherman Collins was involved in the design and in the back of mind I thought that if the Gallery kit is that good then I would get more. What a surprise when I got the kits and they were actually the Gallery models! There has to be a story behind this.
All other hobby projects were dropped and work started on the Navy variant with the intent of making an Italian Navy SH-34J Seabat.
The Project
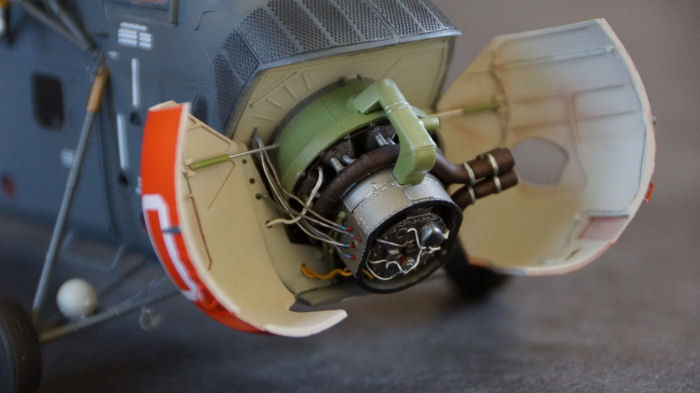
Assembly started with the engine compartment and the cockpit. This kit is amazing. There are so many parts to this engine, it's like a kit in itself. I decided to spend some time on the engine and found many good reference photos here. Some wiring and hoses were added to complete the engine.
The cockpit is also very well detailed. Same for the main cabin which reminds me in execution the Academy CH-47 and CH-53 kits. One thing that could have been done better is the instrument panel. It is represented by a clear part and a decal for the dials. It could have been easier for the modeler to have it done in photo-etch and still use printed paper or a decal for the dials.
The photo-etch screens for the engine compartment are a nice touch and should look great after painting.
The next big step was fiddling with all the sub-assemblies and getting it all to fit together. Well, it did not. I am not sure how tight the tolerances are in the design but most likely, due to my mistakes the two fuselage sides did not want to close up properly. I decided to split the engine - cockpit - main cabin assemblies and work each one individually until a satisfactory fit was achieved. Even so, I still had to file the main cabin rear lower corners before the fuselage would close. In the end it all closed up but still left a small seam open at the top of the fuselage and behind the main rotor area. I decided that this was not so important since most of it would be covered and the rest could be filled with putty.
In general the photo-etched parts went in OK with the exception of the tail rotor top rear bits. They were just not meant to go in their respective places. They would just not fit. The only thing I could do was to fabricate my own screens out of K&S Engineering Special Stock photo-etch stock. The results were OK but the screen pattern is a bit different from what is elsewhere.
One think of note is how to deal with the overhead console and the clear canopy part. The overhead console is hollow but the front end of it sticks out and can be seen from the top of the canopy. I decided to blank it out and paint the little styrene insert Interior Black. The clear part went down OK but it left some tinny gaps here and there. Liquid glue eventually filled everything up. The good thing is that the frames on the canopy are massive and that helps a lot with tweaking things with no fear of breaking anything. I do need to complement the kit maker on the clarity of the canopy. It is virtually perfect.
Once everything was in place a bit of Mr Surfacer 1000 was used to make sure there were no mistakes and blemishes and all was ready for painting. Xtracolor 16076 "Engine Grey" was sprayed over the whole fuselage.
Another note. I sprayed the photo-etch screens with black paint in order to penetrate the screens and get to the plastic. Then I painted the gray overcoat lightly over the screens in order to keep some of the black showing still. One the next H-34 I will not apply the screens until the background plastic is painted black and masked prior to fuselage painting and the screens will painted individually and affixed at the end.
After the fuselage paint was dry I painted the International Orange tail and engine cowlings. That was followed by the International Yellow Tail stripe.
Other work was performed in between like building the tail rotor and the main rotor parts. The main one went together with no fuss and looks great. The tail rotor was more complex with tiny photo-etched actuators and the top part was next to impossible to cut out of its sprues. In the end, both assemblies look nice and busy.
Next item to receive attention were the three ports on the starboard side that had to be painted red as per the photo. Luckily, the Waldron punch and die set's punch number #6 matches the hole diameters pretty closely. Masking tape was punched out and the ports were sprayed red.
The landing gear went on with no major issues but the instructions were vague about the proper location of the hydraulic pump balls.
The winch was not assembled as per the instructions. First the legs were put on the model and then the actual winch was placed between them. This way the assembly would align correctly and would be parallel to the fuselage.
I picked the navigation lights with insignia white prior to touching them up with Tamiya red and blue later.
The photo-etched aerials were affixed next. Do not follow the instructions and open up the receiving holes as big as the instructions show. You just need but a tiny opening for the photo-etch parts.
Conclusion
The Seabat is finally completed. It looks nice and it was a fun build but it is not quite right for an Italian SH-34J. Many lumps and bumps are missing:
- The inflatable wheel hubs are not matching the ones I see in pictures. I found many different depictions for the scheme and markings and they are in conflict with one another. Furthermore I used images of a restored museum example and that alone probably added its own number of inaccuracies
- Lots of detail that hangs under the engine compartment is missing although it is shown on the box art.
- The specific fared tail rotor anti-collision beacon is not present
- There are placement holes on the fuselage sides that have no associated parts that go onto them. I suspect they are meant for another version of the H-34
The engine compartment looks great but there is no provision to pose it open. I had to scratch build some details, like actuating rods and door handles to allow for the clam-shell doors to be posed open. It is a shame to give all this detail and not be able to see it.
This is a great kit and with some research for the example you plan to build and some added detail it really looks very impressive. (Click on an image to see a larger view)


