Fine Molds 1/72 Imperial Japanese Navy Midget Submarine Type A Build Review
By Kelly Jamison
| Date of Review | January 2018 | Manufacturer | Fine Molds |
|---|---|---|---|
| Subject | Imperial Japanese Navy Midget Submarine Type A | Scale | 1/72 |
| Kit Number | FS02 | Primary Media | Styrene |
| Pros | Easy build | Cons | Nothing noted |
| Skill Level | Basic | MSRP (USD) | ¥3200 (About $28 USD) |
Build Review
Unusual subjects get a bit of background history from me and a Japanese Navy Type A Submarine fits that bill. The A-Target moniker came from a bit of subterfuge to throw off any foreign intelligence service by implying that the submarine was used for target practice. It also picked up the nickname of the "Tube" by those who worked with it. The fate of most of the 50 production run has been lost to history. The first two were used for testing. five were launched against Pearl Harbor and a few more against Sydney, Guadalcanal and Kiska Island.
Since this is about the Pearl Harbor attack subs, I will focus on them.
- #16 was recovered just outside Pearl Harbor and salvaged but then dumped three miles South of Pearl Harbor. It was noted that its torpedo tubes were empty and it is believed that it had successfully attacked Battleship Row (USS Oklahoma arguably the target) but never confirmed. It was rediscovered by a research team from PBS Nova television show and positively identified in 2009.
- #18 was located by the US Navy at the opening to Pearl Harbor in 1960. That submarine was brought up and restored so it could be displayed at the Imperial Japanese Naval Academy located at Etajima, Japan.
- #19 was found grounded on the East side of Oahu. It was recovered and put on tour all over the US to raise War Bonds. It now resides inside the National Museum of the Pacific War in Fredericksburg Texas.
- #20 is the one that the USS Ward spotted, attacked and was lost during combat until August of 2002 when a University of Hawaii research team discovered it. Positive identification was established by finding the hole in the conning tower where the crew of the Ward said it would be. This signified that the first shot of the war was fired by the US.
- #22 was sunk by the USS Monaghan and later recovered only to be buried for landfill and recovered again in 1952 but the electrical batteries had corroded giving off chlorine gas and it was reburied. Sadly, the crew is still inside this submarine to this day.
The Fine Molds kit is very well engineered. Molded in a light grey and is all on one tree. There was a little flash around the propellers but nothing that a few minutes with a Xacto knife can't fix. You can build one of 3 versions with this kit. Number one scheme is of the version used during the Pearl Harbor attack. Numbers 2 and 3 are of subs at Narumi Bay Kiska and Ourasaki Hiroshima. I thought it was a bit odd to do these since the kit is titled "Pearl Harbor". None of the Pearl subs had any external numbers. The decals have small Japanese flags that are not used on any version. The kit also comes with an extra torpedo with a small stand. A nice touch.
There are subtle differences in scheme 1 and scheme 2/3. A thing like scheme 1 has net cutters, extra gear on the front of the conning tower and extra anti-fowling rings along with guide wires on the tail. The instructions do a good job guiding you to the version you want to do even though they are done entirely Japanese. The exploded isometric diagrams make it clear what you are supposed to do during the assembly process.
The decals are very well done. The small white stripes, depth reading numbers and dry land mooring indicators are opaque and printed with precision.
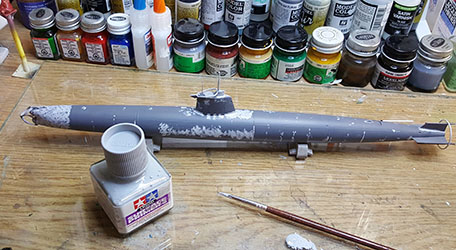
Once you pick the version you want to do, assembly goes quickly. I picked scheme 1 used at Pearl Harbor. You have to modify the front of the conning tower if you want to do scheme 2 or 3 and add some anti-fowling rails on the top of the conning tower if you want to do scheme 1. The long hull tube halves are a little difficult to glue together since you have so much surface area. I used Tamiya liquid glue and used a technique of "Zipping" up along the seam. Then went back and painted along the seam with the liquid glue to ensure that it welds into one piece. This means I have to wait a long time to ensure the seam is dried. You will get that ghost seam that keeps reappearing after you paint if you don't. Superglue just dries too fast and if you don't sand quickly then the superglue gets harder than the plastic and you have a noticeable seam.
I was having a hard time holding the hull without breaking it during sanding so I got double sided tape and put some on the hull sides. It really helped getting a "grip" on things. The tail fins had a loose fit that I decided to fill and then use some Tamiya Liquid Primer to build up a "weld seam." I did this in a few spots especially where the molded weld seam got sanded off. It takes more than a few coats to build up that welded seam look.
The conning tower went on with no problem at all but I wasn't real happy with the gap between the hull and the conning tower base. I intentionally left this area rough and even built it up a bit using the "weld seam" technique mentioned earlier. I also used a dappling technique to break up the smooth hull and to add texture to replicate the casted nose I saw on the real deal at the Nimitz Museum. It really adds to the look. Very subtle but needed.
Small Evergreen rods were used on the tail. The directions call out for the different length and diameters you will need for what version you are doing. There is even a 1:1 scale for you to use to get it just right. Now it is time for the forward net cutters. It is a bit fiddly but what I did was clip the rings off the tree, cleaned them up a bit and then glued all the attachment bars onto the rings. There is a support strut that comes out right in between the torpedo tubes that I glued on to help align the cutters. Now is the time to put the torpedo caps into place. They fit perfectly.
The cutter goes on next but take your time. I superglued the bottom one on and let them set up solid, then superglued the upper one on. This makes the side ones fit snuggly. Then I used liquid glue to get the side ones on and used clamps to hold them into place. This part of the assembly was the hardest part. Take your time and just think of it one step at a time.
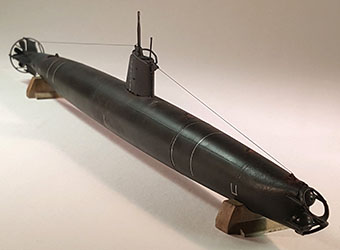
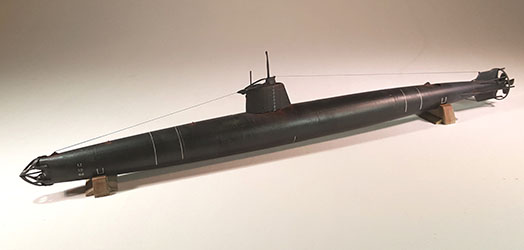
I airbrushed the propellers Titanium then over sprayed them in black making sure to feather the paint at the leading edge to replicate a worn look. The effect came off very well in my eyes. Small eyelets were added and the periscopes were added. I added just a few dots of blue to the black and airbrushed the entire model. It looks more natural than flat black. The decals were added and then many sessions of very light layers of rust color pastels, brown pastels, grey pastels and even black pastels was conducted. Go slow and add layers. Don't try to do all the weathering in one session. You can easily overdo it. I added EZ Line for the cable running from the nose to the conning tower and from the conning tower towards the tail. I honestly don't know if the cable was a radio wire or part of the torpedo net system or both. I am sure there are those out there that do know.
The kit comes with two paddocks for you to place the submarine on. You can paint them out like I did or use an idea of your own. There are many ways to display this model. I painted mine grey and spent a lot of time building up the layers of weathering. I think they look very nice against the black hull.
This was an easy build and I enjoyed it. You have to be careful about sanding the seam running down the sides so you don't flatten the round hull into an oval. A flexi-file works well on this area. I did find research material kind of scarce but enough to accomplish what I was going for. I think it is a great kit and looks good on the shelf with your Val, Kate and Zero circa December 7th 1941.


