Eduard 1/48 Spitfire Mk.IXb Build Review Revisited
By Kelly Jamison
| Date of Review | December 2019 Updated July 2020 |
Manufacturer | Eduard |
|---|---|---|---|
| Subject | Spitfire Mk.IXb | Scale | 1/48 |
| Kit Number | 84136 | Primary Media | Styrene |
| Pros | Cockpit is amazing, great surface detail, best ever injected exhaust | Cons | Two-piece upper engine cowl, complex wheel wells, fiddly radiator assemblies |
| Skill Level | Experienced | MSRP (USD) | $23.95 |
Build Review Revisited
As we enjoy our hobby there are a certain number of conclusions I have come to understand. One of them is that I cannot be an expert in every aspect of every subject of every model that I build. I have a good understanding of the Spitfire but made a few assumptions with this article. One assumption I had always thought is that a “B” wing had its own armament set. As I learned from a few experts on the Spitfire that this is an incorrect assumption.
There are many combinations of the different wings, engines and fuselages as the Spitfire was developed, refined and recycled. This subject can take you years to truly know and sorting out all the incorrect info makes the job that much harder. Add war time needs, erroneous or even misleading original source documentation, eighty years of opinions and assumptions and you can see where things can get sticky. I had relied on my gained general knowledge over years of absorption and not actual research in writing this article. And this led me down the path of making some wrong conclusions.
Let us address a few of the mistakes in the original article specifically the designation of the wings and the use of Bakelite to manufacture seats. The first thing we will tackle is all the different wing configurations:
- The A model wing came on the first of the Spitfire Marks and had eight .303 Browning machine guns. When Luftwaffe bombers started using armor, a machine gun with more punch than the .303 was needed.
- The B model wing was developed from the A model wing with two Hispano cannons and four .303 machine guns in outer wing.
- The C model wings were built to be a universal wing that could have many different configurations. This wing could also carry two 250lb bombs or one 500lb bomb under the fuselage and was mainly used on Spitfires above Mk V, but I am sure someone can find some exception to that rule. The C model wing could carry four cannons but usually two cannons were removed, and four .303 machine guns were used on the outer wings. Again, you can find examples that are contrary to this rule. It was said that the four-cannon configuration put too much stress on the wing to be good operationally. So, these different configurations were referred to as A armament, B armament, C armament. It is easy to confuse the B wing with B armament when a C wing used a B armament as the standard configuration. I know you can find exceptions to this rule too.
- The D model wings were used on some Photo Recon planes trading guns and ammo for gas tanks. There are high altitude Spitfires that look like Photo Recon planes but were high altitude interceptors. I bet you could find some of these with cameras field installed. This muddies the waters too.
- The E model wing was a refined version of the C model wing and could carry either four 20mm cannon or two .50 in Browning machine guns in the inner position and two 20mm cannon on the outer position. The C armament configuration was the most common and usually consisted of the two 20mm cannon and two 12.7 mm Browning machine guns. But this not a hard-fast rule either. The E model wing had the same ability to be configured to carry bombs like the C model wing.
There are photos of the same Spitfire with different armament configurations and even different wings. The rules are loose and there seems to be exceptions for every rule. There was overlapping development going on. Some crashed planes were recovered and got new wings. Some Spitfires got field modifications. Some got loaded with extra cannon only for transportation to a forward airfield then demoded after landing. The combinations could be endless on all the different variants and combinations used during the amazingly fast pace of war development and implementation.
Now let us address the Bakelite seat error in the original article. Spitfire seats were made from aluminum until about mid-May of 1940 when Mod 189 was implemented in order to conserve aluminum for more strategic use and production was switched to SRBP or Synthetic Resin Bonded Paper which takes on a reddish color from the resin and was misidentified as Bakelite. There is not a standard color for SRBP due to the different resins and can be a dark brown to a rather bright red/brown. Sometimes on the same seat! Also, SRBP is not to be confused with SRBF or Synthetic Resin Bonded Fabric which was used to make instrument panels and went under the name Paxolin or Tufnol. There are also a few other proprietary names out there too for this synthetic material. So, to be clear. Bakelite was never used as a material for Spitfire seats.
I wanted the thrust of this article to be all about the troubles you might find building this excellent Eduard Spitfire kit and I did not want to get bogged down in the different configurations and variants you could find all parked at the same aerodrome. So, I took some shortcuts in the article and was notified by readers who have spent a lot of time studying this subject of the errors. If we are going to be any kind of historian within this hobby, then we should be accurate and get the information right and not perpetuate misinformation. And that is what this revisit is supposed to correct. Even with this added info, I am sure someone out there can find a panel, lump, dial or switch out of place for the airplane I have built. You just can’t know it all and still enjoy this hobby. But you can try!
With that out of the way, let us get back to the build. I started out with one of my favorite kits in years. The Eduard 1/48 Spitfire Mk. IXc. Specifically the 84136 Eduard “Weekend Edition.” You can find a full build article on this site here.
I think the stock kit cockpit is simply fine without a ton of extras. But there are a few companies that make excellent upgrade kits if you feel like going that direction. I find some aftermarket seatbelts and a few bits of wire strategically placed will be more than enough for most model builders.
I painted it using ModelMasters Acryl British Interior Green and Vallejo Silver with controls and panels painted flat black. The seat is a custom mix to try to match the SRBP seats. The assembly of the cockpit is straight forward and easy. All the parts are clearly marked in the instructions and there really are no surprises. I will admit that part F40, the little bar that ties the headrest back to the next fuselage bulkhead is a little funky to get straight but take your time and it should not be a big deal.
I added some more wire and detailed up the areas with a black wash and picked out other details with a silver Pentel Gel Pen. Since I was not super detailing the cockpit, I used the decal instrument panel. What a surprise. It came out exceptionally good. I used a drop of Future Floor Polish in each dial and very lightly dry brushed a light grey wash on it. I think it came out just about as good as the photoetch panel that comes with the Profi-Pak. The Fuselage went together easily. Now to the wings and decisions that need to be made.
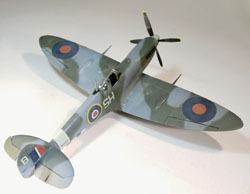
Since I had already built an Mk.IXe and an Mk.IXc, I wanted to do something a little different. I stumbled on a Mk.IXb from the Xtradecal sheet X48172 Spitfire MK805 SH@B flown mainly by "Peter John III", 64 Squadron, pilot F/Lt. Anthony Cooper, in the Summer of 1944. It had unique Invasion stripes, external tank, and some wing mods to bring it to a Mk.IXc with B armament.
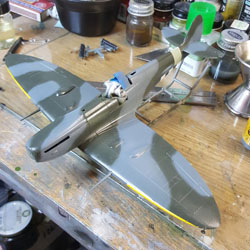
I looked everywhere for reference and found nothing. So I pressed on with what I thought was actually a Mk.IXb wing, but was really a B armament, modification using an old resin conversion set for the bulges and an old P-47 prop tips for the smaller bulges closer to the fuselage. I filled and sanded some panel lines, added a few more from a line drawing I found in one of my research books. The wing modifications were easy enough. Cut off the unused inboard gun ports and replace the outboard ports with brass turned cannon barrels from RB Models.
The assembled wings glued to the fuselage as any standard construction you would do. Fit was perfect and the only modification I did was for the short carburetor intake which comes in the kit but is supposed to be discarded for the “Mk.IXc Late” Spitfire.” I used a Barracuda engine upper cowl for early model Spitfires and an Eduard Brassin resin drop tank #648108.
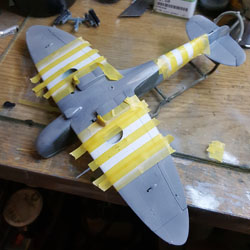
The rest of the build was just standard construction. I got it primed and sanded and it was off for pre-shading. I used Vallejo for the remaining of the paint in accordance with the Xtradecal decal sheet. I also painted the 10” smaller invasion stripes using Tamiya low adhesive tape. My biggest complaint is the exhaust stacks. I just have never gotten a good feel for how they are assembled and fit in the engine cowl. It never looks right or feels right to me. Next time I am going to spring for some aftermarket stacks for my next Spitfire build.
Well I found a pic of MK805 and then discovered the aircraft is still with us! It had survived the war by losing an engine in Belgium and having to belly land. F/Lt Cooper got out unhurt and was returned to England two days later. Maintenance recovery teams got the aircraft and returned it to England where it was refurbished and put back in action in Italy. The war was focused farther North and the plane never flew a combat mission again. It eventually became the gate guard at the Nettuno Firing Range where it sat for years. Eventually a group of aviation enthusiasts got the aircraft and restored it. MK805 is now a part of the Vigna di Valle Museum in, Rome Italy.
In my determination to build an Mk.IXb, which was clearly identified on the decal sheet, I had glossed over the fact that MK805 is an Mk.IXc. A period black and white photo clearly shows the wing as a “c” wing and modern photos of the actual restored aircraft (which you can’t always use for reference) shows the same “c” wing bulges and cannon. Once I was finally convinced of MK508’s true identity I decided…..well, I am finishing this “as is” even though it goes against my style of building operational aircraft. I am sure that some of you out there have been hit with this dilemma of finding contrary information at the end of the build. It is just too much to go back and correct it. Your choices are to junk it and start over or continue and move on. I chose to continue. Maybe later, I will repaint it and decal it but right now, it got added to the display shelf and I am off onto another project.
I think the Eduard kit is a fantastic kit. I enjoy building them and will continue to build more of these kits. They are predictable and the results are always satisfying to the eye. You can superdetail it with open engine and machine gun bays or enjoy a Weekend Edition. It is well supported by Eduard and the aftermarket community. I consider this to be the best kit in 10 years. But you could argue with that for sure.
Final Thoughts: I guarantee you that someone can find something wrong with something that I wrote in this article. A missing panel line, wrong spoke wheel, drop tank brace, machine gun barrel length, it goes on and on. I try to keep in perspective that I am modeling a subject that I am interested in and try to do the best I can, but compromise is always lurking and is the enemy of perfection. Very few of us ever reach perfection in anything we endeavor to do.


