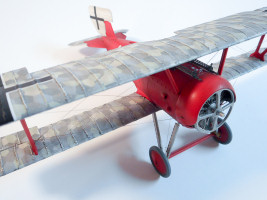
Eduard 1/48 SSW D.III Build Review
By Larry Horyna
| Date of Review | September 2015 | Manufacturer | Eduard |
|---|---|---|---|
| Subject | SSW D.III | Scale | 1/48 |
| Kit Number | 8256 | Primary Media | Styrene, Photo-Etch plus Brassin extras |
| Pros | Beautiful kit | Cons | Nothing noted |
| Skill Level | Experienced | MSRP (USD) | $34.95 (plus Brassin sets) |
Build Review
Near the end of the First World War, Siemens-Schuckert Werk's D.III was one of the last late war German aircraft designs to see action. The airplane was basically build around its 160 hp Siemens-Halske bi-rotary engine. This engine featured a propeller and cylinders that rotated opposite to the crankcase. This offset the typical rotary engine torque and allowed a slower propeller speed for the same power. The initial design was similar to previous ones in that it featured a large two blade propeller and long landing gear struts. After noticeable ground handling problems, a shorter four blade prop and shorter undercarriage struts were added. Rate of clime proved outstanding and the little fighter showed great promise, outperforming both the Fokker D.VII and Albatross D.V in rate of climb.
Unfortunately, Voltol mineral oil was used in place of the diminishing supplies of Castor oil and this proved problematic. The engines began overheating and seizing after just ten hours of operation. This was also partially due to the cowlings not offering enough open space for cooling. The aircraft were withdrawn from frontline service (only about 40 examples had been delivered by May of 1918). After redesigning the rudder and cutting away much of the cowling to improve engine cooling, the type was re-introduced near the end of July. Another 40 were produced for a total of 80 aircraft by war's end. One of the most famous aces to fly the aircraft was Ernst Udet, although it is not known for certain if he actually flew the aircraft in combat. There is a well documented photo of Udet sitting in the aircraft with his signature "Lo!" marking just behind the cockpit.
Eduard's new release of the SSW D.III in 1/48 is a complete re-tool of their previous release from the early 90s. The molding is very clean and crisp, just like any of their new toolings. Eduard's Brassin line makes a resin and photo-etched Siemens-Halske engine as well as Spandau guns. Eduard also produces a very nice set of fabric seat belts. This particular kit itself (8256) is a "Profi-Pack" edition with a very nice photo-etched fret that includes rigging anchor points and turnbuckles (and they are small!). The decals are excellent and quite complex, featuring separate rib tapes for the lozenge camouflage. This is most certainly the complete opposite of a "weekend edition" kit! (For a look at this kit out of the box, look here)
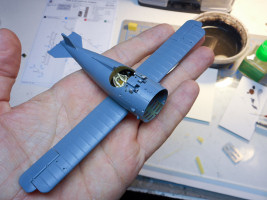
Assembly was fairly straight forward. The only tricky part is on the interior attaching the bar that supports the shoulder belts. There are two internal braces that attach to the cockpit sidewall as well as the floor. This is a bit difficult as the floor is attached to the lower wing and fits up into the fuselage. To help fit these parts, I glued one side of the fuselage to the lower wing and then attached the other fuselage half to this assembly. That made it a little easier to deal with the tricky internal parts.
Fit was superb on the entire model. Of special note are all of the struts, which fit into their designated holes perfectly and provided plenty of rigid support. Everything aligned quite well too. I did not need to use my biplane alignment jig to attach the upper wing. As far as building a biplane is concerned, this was quite simply one of the easiest to assemble I have ever done. It was pretty much like building a tiny Wingnut Wings kit! And it is tiny! The beautiful little Brassin engine is a gem, but be forewarned, you're not going to see too much of it! The Spandaus are equally nice, with more than a dozen parts each!
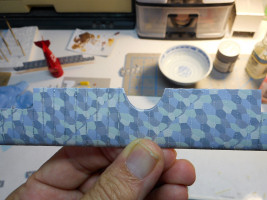
The decals went down with no major problems. I first painted the entire airframe flat white and then sprayed a coat of Future floor polish. The wing rib detail is very pronounced and it did take several treatments of Micro Sol to get them to completely conform. To add to that, the separate rip tapes took even more. But in the end, the rib detail is still visible! I was pleasantly surprised. Eduard supplied a small piece of extra lozenge which I did need for the upper wingtips. Otherwise, the decals fit perfectly.
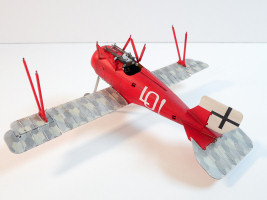
The only thing I decided not to try (partially wimping out and partially because I liked the look more!) I opted to not use the lozenge decals for the interplane struts. I think they would have been very tricky but when considering how well the rest of the decals went on, they probably would have worked. The real aircraft commonly had lozenge fabric wrapped interplane struts but I liked the renditions of Udet's airplane with the red ones (funny enough, Eduard's initial release of this kit featured Udet's on the box cover as well, but with red interplane struts!).
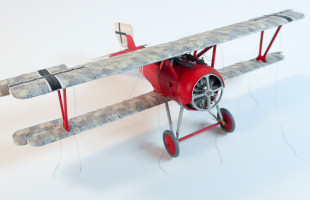
Now the rigging. I have a fair amount of experience rigging biplane models. But this was a bit of a challenge. Part of this is no doubt due to the fact that I have pretty much converted to 1/32 for my own WWI aircraft models. It's a bit easier when you have more room to work with and line that you can see! I used Uschi van der Rosten's fine elastic rigging line. It worked quite well with the photo etched turnbuckles and anchors. I attached the anchor points to the upper wings with one end of the rigging attached.
After attaching the upper wing, I attached the loose ends to the turnbuckles, which I glued in place before attaching the wing. The turnbuckles can easily be bent slightly to align the line straight to the anchors. The most difficult part being the attachment of the rigging lines between the cabin struts. These attached to a small photo etched part and let me tell you, there was not much room to work in there!
All in all, this was a very pleasurable build (except for where I temporarily lost my eyesight after rigging!). I would definitely categorize biplanes as a bit more challenging than most monoplanes. But in the end, it's mostly a matter of needing to take a little more time, nothing more (and don't drink coffee before you try rigging!). I highly recommend this kit for anyone interested in 1/48 WWI subjects!
My sincere thanks to Eduard for this review sample!


