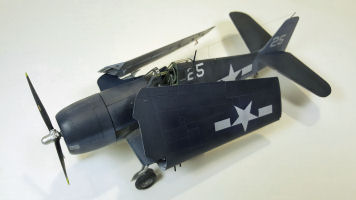
Eduard 1/48 F6F-3 Hellcat Modified to Early F6F-5 Build Review
By Kelly Jamison
| Date of Review | October 2015 | Manufacturer | Eduard |
|---|---|---|---|
| Subject | F6F-5 Hellcat (Early) | Scale | 1/48 |
| Kit Number | 8221 | Primary Media | Styrene/Photo-Etch |
| Pros | Most accurate kit to date | Cons | No detail behind cockpit |
| Skill Level | Experienced | MSRP (USD) | $39.95 |
Build Review
The reputation of the F6F Hellcat is well established and its history well documented so I will just go right to the build. I wanted a 1/48 scale F6F-5 Early to add to the collection but one was not available at the time. Since then Eduard has come out with kit number 8225 solving that problem. But of course it was after I started modifying this kit. Since the Eduard kit seemed to be the best on the market, I bought a weekend edition at a local model show at a bargain and I had some aftermarket stuff extra for the Hasegawa kit to add to the build. So off I was to build an F6F-5 Early Hellcat. I had wanted to do McConnell’s aircraft at the time and started looking out for the proper cowl I would need. The inspiration came from an unlikely place. I had acquired an excellent Obscureco engine cowl and with a little sanding and scribing it was easy to modify into the -5 cowl.
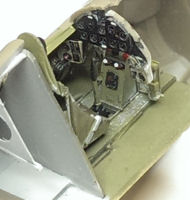
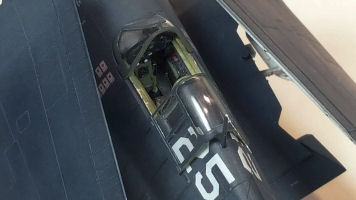
I broke out the extra Black Box cockpit and started cutting it off the pour plugs and cleaning it up to fit the Eduard kit. I scratch built that area that you could see from the small windows aft of the pilot’s armor plate. I looked for references to replicate that area and found almost nothing. Every picture always fell short of capturing that area. I did get a good view from restoration photos of a real aircraft at a museum and used that famous footage of the Hellcat that smacks onto the carrier deck island and breaks in half right behind the cockpit. Strange way to get a shot of that area but it worked.
The 'office' got a coat of Aircraft Colors Interior Green and detailed out with an Eduard Zoom interior photo-etch set. On hindsight, I would have bought a cockpit made for the Eduard kit or used one of their ProfiPACK kits instead. The Black Box pit just didn’t fit well. It was never designed to be in the Eduard kit to begin with and I couldn’t be mad at this choice. It was my decision and not my best one at that. But I did get it tucked inside with a lot of grinding and cussing.
The fuselage halves got a coat of light gull grey behind the cockpit and then I installed the small aft fuselage windows using Future Floor Polish to glue in the clear plastic. I find it works the best for this type of application giving a run of clear glue to the mating surface of the plastic and glass but it is a bit more fragile during the building process. Just take your fine tipped brush and load it with a dip of Future. Touch it to the edge of the glass and let the capillary action wick up the Future between the two mating surfaces. I know there are many techniques for gluing clear plastic and you need to be tactical where you use them to prevent things like fogging with superglue or heat distortion with epoxy but everyone has their own way of doing things. This one worked best for me. I have even heard of using watered down Elmer’s white glue. It dries clear and is easy to use. I commonly use MicroScale’s Krystal Klear also.
I took the tail wheel, part G39, and drilled out the small holes just to help give the part some extra detail. If you want to attach the external tank then you will need to cut out a little rectangle area at the bottom of the fuselage. It is easy to do and clearly marked on the instructions sheet. There is a small vent exhaust panel, part G2, which needs to be glued into place. I never really got a positive feel for this little piece and it was difficult to line up once the fuselage halves were glued together. It was in short order that the two fuselage halves needed to come together. The way the tail wheel is glued in is very solid. But I chose to not put it in at this time. If you put it in later in the build you will need to cut off the top of the gear peg or you will never get it into place.
Once the fuselage halves were glued together, I had to go back and revisit that part G2 to get it to align between the fuselage halves better and I also had to trim just a little off where the cowl meets up with the fuselage to get my modified cowl to fit better. Oddly enough since I was doing a wing fold aftermarket upgrade, it was time to paint the fuselage and I am barely into the build by a few hours. It was a real departure from the normal building procedures that I am use to. I decided not to put the exhaust stacks, parts G19/21/32/33, until after all painting was done. I would make new ones from microtube later anyway.
The section of the wings and cowlings were discarded (Almost all of page 5 of the instructions manual) and I moved onto the engine. It is an adequate bit of engineering but others might want to add an aftermarket engine. I decided to modify this one with a few plumbing lines made from thin wire and change the magneto heads with some spare ones along with a wiring harness. You can really get into this area if you want and go hog wild.
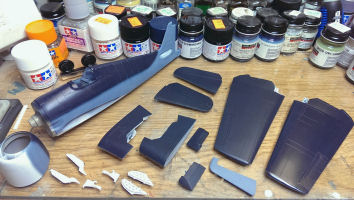
I put the engine off to the side for attachment later in the build and turned my attention to the resin wing fold modification. The Wolfpack F6F Hellcat Wing Folded Set for Eduard WW48003 was what I went with but there are a few other sets out there that will work just fine. The inner wing, parts 1 and 2 were easy to cut off the pouring lugs and just a few swipes with a file got them ready. The leading edges needed a bit of sanding and just a little filler to get them looking sharp. Everything else got razor sawed off and washed in soap and water. The resin is of really high quality and not brittle at all although the landing gear and wing fold covers have to be handled with a bit of care because they are so thin. I really like what they did with the detail in the exposed areas of the wings.
At first the way the wing fold attaches is a bit confusing but one dry fit and it will make sense. The parts near the wheel well areas are a bit more confusing but you will see what you need to do when you get there. I would paint the small bulbs and glue on the wing tip lights, blend, sand and polish before painting the wing in hindsight. They did not fit as well as I would have liked at the end of the build.
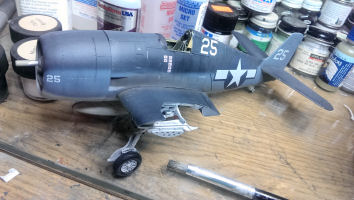
I went back to the tail planes and got them glued together. I made small tabs for the main tail plane parts and cut grooves in the elevator parts to replicate the hinge points. It is a little detail but I think it helps the look a lot with little effort. They got set off to the side ready for paint along with the rudder. Everything got polished with 10000 grit sandpaper and cleaned with alcohol. I used my trusty Iawata airbrush and painting instructions from the Techmod Zestaw Kalkomanii Decals sheet # 48019 specifically White 25 of Bruce Williams, VF-19, USS Lexington, October of 1944. I chose the tri-color scheme over the overall gloss sea blue because I wanted contrast with the wings folded. White 25 seemed like a great subject to achieve this.
Now here is something new I have been doing and absolutely love it. I use Tamiya Lacquer thinner with the Tamiya Acrylic paint. It works wonderfully. It was a tip from a friend and I looked into it more. I decided to try it on an old kit I had (ever seen a Navy tricolor P-39?) and it worked great! So Tamiya X-2 was used for FS 37875 Insignia White with all wheel wells and bottom surfaces getting a nice coat. I stopped for a while and got the landing gear done, tail wheel done and used a set of True Detail resin wheels that I modified to not look so flat (I think they still do) by sanding the sides down and building up the bottom of the wheel a bit with thin plasticard. I liked the inner wheel assembly on this set. Again there are many companies that make wonderful wheel sets for the F6F so go with what you know and pick the ones you like best. Everything got painted white while I had the airbrush out.
Model Master Acryl 4744 was used for FS 35164 Intermediate Blue and Aircraft Colors 3045 US Sea Blue Gloss was used for FS 35042 Sea Blue. There are many opinions about paint colors and quality of a lot of different products so I would go with what works best for you. This worked best for me. The lacquer thinner with acrylic paint for the Tamiya products is something new to me. I wouldn’t try it with other paint systems but Tamiya really knows what they are doing with this and I will continue to use it in the future. I used Model Master Acryl Gloss Clear over everything prior to decaling.
In order to get the wing stubs on straight and the landing gear lined up, I made a cheap little rig. I took an old butter bowl and cut it to the unique Hellcat fuselage shape. This really helped. I also used it as a mini-trashcan for all those extra bits and pieces that tend to gather on the desk. You can throw the whole thing away when done or turn it 90 degrees for another kit in the future! It really helped get those wing stubs straight. With those out of alignment, the whole kit will sit funny on the gear. The gear is very well done. They had a real positive fit into the new resin wing stubs. Tail wheel and some brake lines, a few little detail pieces and gear covers along with the True Detail wheels finished off the Hellcat legs in short order.
I had a set of Tally Ho! USN National Insignia Hellcat stencils but decided to go with the Techmod insignia decals instead. The Techmod decals went down excellent. I used MicroSet to get the decals to really bond and then after everything was dry, a small damp cloth to wipe off any dust, residual setting solution or any other flotsam or jetsam that will get imbedded into the flat clear coat before pulling out the Model Master Flat Clear.
I have accumulated many pigment powders over the year so I have lost track of where I have even got them or who made them. I do like the excellent Tamiya sets and they will work just fine. I like to do layer after layer to get an aged and wear and tear look. I kept the chipping down to a minimum after looking at many pictures. But you can find examples of heavily weathered aircraft right next to pristine aircraft all day long so weather until you feel it represents what you want. After all it is your interpretation of the subject. Under the fuselage seems to be the most covered with oils and grime along with the external tank which brings me to that subject.
I wish I would have photographed what I did there but basically I didn’t like the kit drop tank so I sanded both halves to just take a little out of each side then glued plasticard between the two halves. Then slowly trimmed and sanded the plasticard until I got that small lip around the tank. This really improved the look of the tank but I had to sand off the external bands that are molded into the tank so I had to replicate them. I used some soda can aluminum and superglued the photoetched ends to the new bands around the fuselage. I decided to keep them bare metal just to add some contrast but you could easily paint them if you wish.
This is where real world hits the fan. I pulled out my set of Cutting Edge Hellcat prop blades and noticed the blades were warped beyond use. Everything I did to try to straighten them made it worse to the point that they went to the butter bowl…. Anyway, I took the kit prop and cut the blades off the hub. Painted the Cutting Edge hub silver and started reworking the blades to resemble the photos I had. I never was satisfied with the blades or the whole prop assembly. Something I might change at a later date but I was ready to finish this kit. Have you ever just wanted the build to move forward and finish it?
Something I hate to do every time but a very important part of the build is the canopy and windscreen. They are always the bane of all my kits. I can’t speak enough about how much I like the Eduard Mask set. They are worth every penny! The set made life so much easier painting the clear pieces. Now on to the wings. I drilled out the machine gun ports and added microtube to replicate the machine guns, those pesky wing tip lights that I wished I would have blended in before painting and superglued them into place. You will see the tab that is attached to the outer wing but is actually part of the inner wing stubs fit perfectly. What I thought was going to be a real weak attachment point became a very strong one. Landing light lens, gun camera lens, fuselage lights, pitot tube, antennas, stretched sprue for the radio wire and it was finally done.
After taking pictures I noticed a few things. Somehow I had hit the small drop wire to the radio antenna and knocked it onto the other side of the fuselage. It should drop onto the right side of the fuselage where a small mounting point is. And I don’t know why but I never noticed the loss of detail around the front of my reworked cowling. I would have re-scribed that before painting had I noticed. Something I might address when I redo the propeller. But you know how build fatigue starts to set in and you just want to move on to the next project.
The final kit looks great! I was very happy with the Techmod decals and the paint choices but wish I would have thought more about the cockpit and propeller. I thought the Wolfpack wing fold was very good but it needed a little more filling and clean up than I expected. But the fit of the wing fold and all the bits and pieces that goes on the wings is fantastic! I highly recommend them if you wanted a wing folded Hellcat. Anyone with medium skill can knock this out of the park especially with the new Eduard -5 Early out on the market. It is a great kit for a very reasonable price.


