Eduard 1/48 P-40N Warhawk Build Review
By Kelly Jamison
| Date of Review | July 2020 | Manufacturer | Eduard |
|---|---|---|---|
| Subject | P-40N Warhawk | Scale | 1/48 |
| Kit Number | 8036 | Primary Media | Styrene, Resin, Photo-Etch |
| Pros | Nice detail. | Cons | See text |
| Skill Level | Intermediate | MSRP (USD) | Out of Production |
Build Review
This kit was first released in 2001 by Eduard. It was the reboxing from the Mauve kit with the addition of those wonderful Eduard aftermarket goodies. The original Mauve boxing can be traced back to 1995 and was in production until 2014 but can still be found at vendor tables and the usual online auction sites. You get decals for four great schemes. Kittyawk Mk. IV s NZ 18th Sq. NZAF Salomon Islands, 1944. Kittyhawk IV RCAF Boundry Bay British Columbia, P-40N 89th FS 80th FG Karachi India, and 74th FS Kweilin China. Any one of these schemes would look great.
The instructions come in a small 8.5 x 11-inch booklet form printed in black, white and blue to show you the part numbers and pieces not used during this version of the kit, with a nice assembly step pattern that is easy to understand. I deviated a bit with mine that helped me with the landing gear and external stores but bit me with the canopy which we will talk about later in this article.
You get 4 trees of plastic, one tree of clear, one Photo-Etched fret and 9-piece resin set along with canopy masks. Molded in an olive green (I have seen versions cast in a near black plastic too.) with recessed panel lines. They are not overly deep and consistent but there is no rivet detail at all. The resin is cast in a cream color and is up to the usual Eduard standards. There is also a film card with the instruments printed on them. The photo-etch fret is well done although I rarely use the entire fret. Sometimes using sheet plastic yields a more realistic shape than the razor thin frets, even folder over, can give you.
It is time to get on with the build! I have an affinity for hard luck cases, and this is one of them. I have had this kit for years sitting on the shelf of doom for many years. The box lid had come off and gotten shredded during one of my many moves across country. I saw the prices of the Hasegawa P-40N and availability lately, so this old Eduard kit was looking better and better. Up until I pulled it out of its replacement box and noticed how warped the fuselage and wings were. I had heard that these kits had a problem with warping but that did not scare me too much. I moved forward with the build anyway.
So, I had to see how bad it was (and it was bad) and formulate a plan. I thought I would mockup the wings which meant also getting the resin wheel wells in place that came with my kit. Later produced kits do not have these resin wheel wells. By taping the upper wings to the lower wings and the fuselage halves together I was able to see how bad they were off. I knew it was going to be bad, but I was a bit shocked at the results and this revealed more problems that will have to be addressed. The first problem was that the wheel wells were too thick to fit under the upper wings and interfered with the wing root to fuselage connection point.
While I was getting my game plan together, I primed and painted all the cockpit parts. The side panels are very well cast and a joy to paint and detail. I superglued them in place so I could start figuring out how far I needed to spread the fuselage out. The fuel tank behind the headrest helps set up the upper fuselage spread but the bottom needed serious work. I ended up cutting old pieces of sprue to use as a spreader bar. I would superglue one side and then test fit the wing to fuselage gap. I would use sheet plastic on the end not superglued to act like little wedges to get the spread fine-tuned. It kept me from cutting many “spreader bars” of different sizes. I needed to put at least two spreader bars behind the headrest area and two behind the instrument panel and another one down where the wings meet the lower engine cowl area.
In the process of trying to get the fuselage bent back into shape, I marred the left lower fuselage and had to repair that. I also got the cockpit in place minus the instrument panel and puttied the seams on the fuselage using my go to Tamiya gray putty. We all have had these little distractors that just eat up a little time and should never have been an issue but there you are wasting time, energy and effort on something that should have never been.
I spent time getting the oil cooler in place. I used the resin radiator splitter plate. It is that thing that looks like an upside down “Y”. I noticed that this piece is no longer in the later kits. Which is just as well. It did not fit right and knocked the symmetry off. I should have used the plastic part that came in the kit to begin with. Once you would get the symmetry right on one axis it would throw off the symmetry in another area. I was never happy with the final assembly of this area.
When I attached the wings onto the fuselage the extent of how warped the wings were really showed. This was going to be an exercise in chemical bonding, geometry, patience and luck. I started by using Tamiya glue but only “spot welding” a little area at a time buy regulating how much liquid glue got onto the brush. You do not want capillary action drawing all the glue up the seam before you have time to work it. I would glue and clamp, let dry completely and then glue and clamp and let dry, over and over. It took a few sessions of slowly working one wing at a time. Setting the dihedral was the most difficult and took a few tries. Once set, I went over the whole seam with thin superglue to lock it all into place then walked away for a day doing one wing at a time.
I noticed that the resin wheel wells caused the wing to not have that smooth airfoil shape but big bulges where the wheel well interfered with the upper wing panels. I should have taken more time and sanded the lower surface of the wheel wells since I sanded the top of the wheel wells to paper thin and it still was not enough. But it was too late. To solve this problem, I got out the sandpaper and reshaped the wing. It took progressively finer sandpaper to get it all polished out then it also had to be rescribed. Dynamo tape and a sharp scribe fixed that right up. Again, another self-induced problem that needed solving that should have never been.
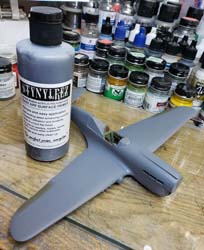
More sanding, filling and rescribing was in my future. This is where I spent the bulk of my time but eventually the plane was ready for primer. My go to weapon for primer lately has been Stynylrez Acrylic Primer. It levels nicely, dries hard and is easy to sand and takes any acrylic paint I have thrown at it. I also took this time to get my rivet wheel out and replicate the rivet pattern on all surfaces. I think it added but I did keep it kind of light. I can see an argument for doing this or not doing this depending on your taste, and time to spend on a project.
I went ahead and put the oil cooler flaps on. They were photoetched and real fiddly. If you want to tackle Photo-etch then go right ahead. But you might want to use them as a pattern and use some sheet plastic to get a better look. The Photo-etched flaps fought me the whole time. If you use them you need to pay close attention to how they are made, how they fold and how they should glue on. Sometimes it is better to use white glue in some applications, thin super glue in other locations.
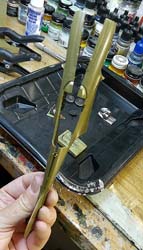
On a side note I have been making little jigs out of scrap plastic and bending them into the shape I need with a candle. They are inexpensive, easy to make, help you in handling your model until you get the gear on and can be thrown away when you are finished with them. A bit of non-curing putty on the tips of the contact points and it makes handling the model so much easier.
For paint, I used Vallejo Model Air line of paints and have been happy with the results. For my topcoat USAF Olive Drab 71.016 and for the scallops I used USAF Green 71.124 and finally on the underside Neutral Gray 71.051. I had to practice the scallop pattern a few times on an old paint mule before applying it to the wing. These scallop patterns were not completely standardized so refer to any documentation you have on the aircraft you are modeling to get it accurate. Do not forget to paint the spinner while you have the airbrush loaded up! Trust me on that one……
The landing gear was easy to install. I painted them plain old silver and did the same for the hubs. The resin wheels are very nicely done and just needed a little drilling to get the wheel hub to fit on the gear axel. Everything got a coat of Future Floor Polish. This knocks the brightness off the silver a bit. Once the final flat coat goes on after the decals you will notice the silver takes on a real nice and natural look.
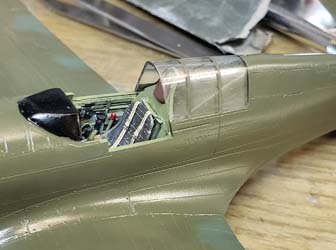
After masking and painting the aft canopy I noticed a big step where the lower structure of the glass is not at the bottom edge of the actual part, so I had no choice but to putty up that terrible seam and carefully sand around it. This took some finesse to not scratch the clear area of the canopy. I broke out the airbrush and remasked the clear areas. I got it to blend nicely. I think that I got away with the repair especially since I had already finished the overall painting! The reason the canopy frame was so far away from the bottom edge of the clear part is because the molds for an E model were used and this area got a different shape to it and they needed the clearance on that lower edge to get the clear area correct. I then finished masking and painting all the clear parts and got them glued on with Krystal Klear white glue. Another problem that I should have noticed prior to painting but did not and it cost me more time and effort that should have never been.
The instrument panel got airbrushed flat black (along with the propeller blades) then the proper instrument cluster got cut out of the film and trimmed to size. I used Microscale Krystal Klear to glue the two halves together. This also got the glue to look like lenses that protect the gages. I then painted the back of the instrument panel white and that showed through the film making the markings on the face of the gages more visible. Very convincing technique. Then the whole panel got glued to the kit panel that I had sanded smooth to get rid of the molded instruments and give a flat surface to glue the photo-etched instrument panel to. I saved the gunsight to the end of the build.
Off to the decal dungeon to gather up the decals I needed. I had seen a picture of an aircraft from the 74th FS, 23rd FG based in Kweilin China with M-9 rocket tubes and wanted to do that since it was a bit unusual. So, I had to piece decals from many different sources. The origins of most of these decals were long gone from my memory. One thing I did notice was after getting the Stars and Bars put on that the big star should be on the fuselage and the smaller one on the wing according to the reference photo. I had never seen that combo before but after looking at it, indeed they were reversed and contrary to what you are used to seeing. I did use the decals with the dark blue outline on them per my photo. The big white 45 on the tail is slightly overscale as it should not have any of the number on the rudder but the next size down, I had was way too small, so I made a compromise on accuracy with both of these issues. I think we have all faced this dilemma during our builds. They stick out like a sore thumb to us but, most people will not even know the difference.
The prop blades that were painted black when I did the instrument panel were pulled out of the box and installed on the propeller hub with no problem. There are little locating pins that make it quite easy to get the blade angle and spacing spot on. I stole the rocket launchers from the new Airfix P-51D kit and painted them a dark green color according to my photo reference. The tube assembly got a dark wash and some detailing then glued on with superglue. So did the ADF antenna right behind the canopy, the gunsight and each individual exhaust stack. The drop tank was a little more difficult. The sway bar struts that connect the tank to the bottom of the fuselage.
I have been using a Pentel Gel silver pen to do my chipping with lately. You have a lot of control with the amount of chipping you want to do, and I think it gives a good effect. A coat of flat will knock down the brightness and make it look more like aluminum. It was time for additional weathering with pastels and washes gets everything looking good and worn out. Weathering is something that should be done in layers and not all in one session. You will know when it is done by taking breaks between each session of weathering. I was never happy with the fit of the front windscreen. The gap at the front is more than I would like to have but all my patience and luck had been used on the warps and the aft canopy fix. I was ready to be done with this kit. Since this kit spent so much time on my bench, I decided the glamor shots should be done right there on the bench.
Although I think it is a good kit, I did miss the ease of Hasegawa’s shake-n-bake engineering. I tended to get bogged down fixing one problem and causing another through the build all the way to the end. These types of builds tend to wear you down over a long period of time and many of us just put it back on the shelf never to be built. It was a challenge and now I know I developed some skills to fix about anything a kit can throw at me. Now where did I put that Modelcraft F-82G Twin Mustang?


