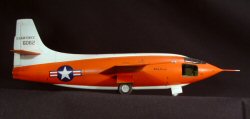
Eduard 1/48 Bell X-1 Build Review
By Kelly Jamison
| Date of Review | March 2005 | Manufacturer | Eduard |
|---|---|---|---|
| Subject | X-1 | Scale | 1/48 |
| Kit Number | 8032 | Primary Media | Styrene, Resin, Photo-Etch |
| Pros | Nice detail, multiple versions | Cons | See text |
| Skill Level | Intermediate | MSRP (USD) | Out of Production |
Background
October 14, 1947, was the day that the Bell X-1 became the first airplane to fly faster than the speed of sound in level flight. Capt. Charles E. "Chuck" Yeager would be the man to pilot the X-1 He and his charge would reach a speed of Mach 1.06, at an altitude of 43,000 feet. The X-1 would be air-launched at an altitude of 23,000 feet from the bomb bay of a modified B-29 bomber, and then use its rocket engine to climb to altitude. It flew 78 times total, and on the 26th of March, 1948, Yeager attained a speed of 957 miles per hour, Mach 1.45, at an altitude of 71,900 feet. This was the highest velocity and altitude reached by a manned airplane up to that time.
The plane was soon transferred from the U.S. Air Force to the National Air and Space Museum where it is seen by millions visiting the Museums grand entrance and hangs just a few feet from the Wright Flyer.
The Kit
Eduard continued to improve through 2000. Their kits went from some tough build, “Experience Modelers Only”, to near main stream Japanese release quality. The Eduard Profi-Pack 1/48 ED8032 Bell X-1 is molded in grey plastic, the forty-four parts are cleanly molded with recessed panel lines and surface detail. Each wing is molded as a single piece with nicely thin trailing edges. I think the main gear doors look a bit clunky. Not too abnormal for Eduard. Sometime their smaller pieces are a bit thick and not as finely detailed as Hasegawa or Tamiya.
The resin is top notch. Well molded and good quality. Well worth the extra money for the Profi-pack version of this release but a version is sold that does not have all the resin pieces in it. I think it was money well spent. You can build one of two versions due to an extra set of tail planes offered. One of the banes of limited run kits is the clear plastic. Many times the clear is just off of opaque. Eduard should be commended on the great quality of the windscreen.
There are 32 photo-etched parts include three different instrument panels. Choose the one that suits the version you are doing. Most of the photo-etched parts are for exterior enhancement but there are some great little cockpit pieces too.
The best part of the resin pieces has to be the wheels. Very well done diamond pattern is replicated with finesse. The interior resin pieces detail out the cockpit and are an improvement over the version without the extra resin. A nose weight is needed to keep the plane from sitting on its tail. It was a real bad tail setter on the real thing too. If you see pictures of it without anyone in the cockpit, you will notice how high the nose sits.
There is no real “gotchas” on this kit. Even without locater pins, the fuselage halves match up. I had to trim a bit off the cockpit to get the fuselage halves to fit. Not a big deal. The rest of the construction was straight forward and nothing the average modeler couldn’t handle. The instructions are well done with exploded type assembly diagrams. Take your time and get the wings on straight and level. I had problems getting the windscreen to fit right. I tried to give the windscreen reinforcement strips a more three dimensional look by using black decal film. I don’t think it worked as well as if I would have taken the time to mask all the horizontal lines, painted black then masked off the vertical lines and painted black.
Four paint schemes can be done and are illustrated on the instruction sheet. You might check on your own research to choose how you want to finish your kit out. The book “The X-Planes X-1 to X-45” by Jay Miller is a good book for reference. The plane was re-painted many times over its lifetime. I had to custom mix a paint using Testors International Orange as my base line. Slowly I got the perfect Mango Orange after a few visits to the real deal at the Smithsonian Air & Space Museum. I wasn’t too impressed with the decal sheets. Cutting Edge makes some aftermarket decals ( 48 ced48245) that can really make this kit shine. I feel that this would be a very good kit to cut your teeth on if you are starting to get interested in the more eclectic subjects that companies like Eduard and Czech Models have been producing.
Concusions
I would recommend this kit for experienced builders due to the photo-etched parts, resin and lack of location pins.


