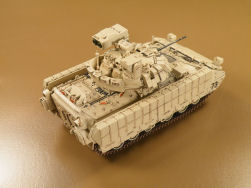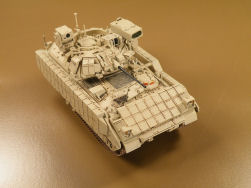
DML 1/72 M2A3 Bradley Build Review
By John Kelley
| Date of Review | January 2012 | Manufacturer | DML |
|---|---|---|---|
| Subject | M2A3 Bradley | Scale | 1/72 |
| Kit Number | 7324 | Primary Media | Styrene, Photo-Etch |
| Pros | Very good detailing; numerous parts; kit assembles without any fit issues | Cons | No interior |
| Skill Level | Basic | MSRP (USD) | $13.95 |
Background
The M2A3 is the latest improvement of the Bradley series of Infantry Fighting Vehicles. The most noticeable feature is the Commanders Independent Thermal Viewer mounted behind the commanders hatch. The M2A3 also has GPS and a complete Explosive Reactive Armor suit for the turret and hull. New systems allow the M2A3 to be integrated with the M1A2 combat systems making these the most advanced and potent armored vehicles in the U.S. Army inventory.
The Kit
A complete review of the Dragon model has been written by Cookie Sewell and can be found here.
Assembly
I was very happy to see Dragon issue this kit and I bought a copy as soon as I could. I had already built their M2A2 kit and was very impressed. After looking at the parts in this kit, I was suitably impressed again. The kit combines the M2A2 with a new set of M2A3 trees giving the modeler plenty of spare parts.
Starting with Step 1, I removed road wheels, drive sprockets and return rollers and cleaned off the remains of the sprue trees. Care should be taken when working on the wheels as the plastic is fairly soft and it is easy to create flat spots in the wheel and sprockets by removing too much plastic. I added the rear plate, C29 ,to the lower hull but on my example, the top bar for the troop compartment was bent so I assembled the troop compartment main hatch and attached it to the rear plate. I then added the upper hull to the lower hull and then clamped the rear plate to the upper hull to eliminate the bend. The back of the taillights are hollow and need to be filled in, otherwise the opening can be seen after the kit is assembled. The kit headlights have two small holes behind them which needs to be filled as well.
Step 2 went without any issues but when I assembled the TOW launcher, there were gaps between Parts C33 and C19 and I filled these with strip styrene and putty and sanded them smooth. The kit provides a photo etch arm for the launcher cover Part C12. The molded arm seemed quite adequate so I did not replace it.
Since my launcher was left in the firing position, I went on to Step 4 turret assembly. Again, no issues were discovered here but as is usual with all my reviews, I cannot help but lose parts, and this review is no different. I wound up losing Parts H16 - the GPS, Part H2 - the flag holders, and finally, Part C39 - the grab handle on the upper hull. All these parts were included in the kit but are somewhere on the floor, no doubt to be found years from now. On Part H18 - the Gunners Primary Sight, I left doors H7 and H10 open since I was building this with all the hatches closed. I removed those areas of the kit which Dragon instructs you to do for the A3 modifications and I then attached the upper turret to the lower turret. I followed the instructions all the way to Step 6 without any issues in the build.
Step 7 has you attaching the final details as well as the Explosive Reactive Armor (ERA). I found it is best to add Part E2 before adding the periscope guard Part C13. If not, Part E2 will not be able to fit into a notch in the turret top since the periscope cover covers the location hole. I found this out the hard way and while I was still able to glue it on, it would be easier to leave off Part C13 until E2 is attached. I left off all the antennas and main gun until the model was ready to paint. I did drill out the turret lifting ring that is located on Part C10. After this, I began adding the photo etch parts to the turret. Parts MA1, 2, 3, 4 and 5 should all be attached to the top most bolts on the armor plates. I used Super Glue and allowed this to fully dry before adding the ERA boxes. While the photo etch looks daunting, it is really quite easy to apply and the photos should help guide you through its placement. After the photo etch had dried, I attached the ERA boxes and proceeded to Step 8.
Before attaching the upper hull Plates C45 and H8, I drilled out the lifting ring holes on these pieces. There are two tabs on the side of Parts C41 - the crew hatch, and these need to be drilled out as they are lifting rings. On the front of the upper hull, there is another lifting ring by the spare track and one by the driver's hatch that needs to be drilled out as well. Following the instructions, I assembled all the details from Step 8 without any problems. Assembly of the side armor plates was my next task. I found that by gluing the photo etch pieces MA6 and MA7 to the armor blocks Parts G1 and G7 first, this made attaching them to the side plates C54 and C53 much easier. Assembly of the side armor plates posed no problems and I left these as well as the road wheels and track, off the model. There are several ejector pin marks on the inside of the side armor plates which are visible after the model is assembled. I filled all the holes that could be seen during dry fitting the side plates to the hull. I then attached all of the small antennas that had been left off in preparation for painting.
Painting
The model was given a base coat of Model Master Acryl #4720 Sand. When I reviewed the M1A2 kit, I researched the color schemes for the desert and found that this color is the closest to the U.S. Army paint that is used on all combat vehicles. The road wheels were sprayed with Tamiya TS-82 Rubber Black and the road wheel centers were then sprayed with the Sand.
After the model had thoroughly dried, I airbrushed a coat of Pledge Floor Wax with Future over the model. A wash of Windsor & Newton Van Dyke Brown was washed over all the details, the ERA blocks and the suspension system. For the air intakes, I used Vallejo Black Wash. I found the Vallejo to be too thick right out of the bottle and needed to be thinned. While I liked it, I don't think it covered as well as the oils. The model was dry brushed with Sand after the oils had completely dried.
The Gunners Primary Sight and the Commanders Independent Thermal Viewer sights were painted Model Master Aircraft Interior Black. The TOW missile launcher openings were painted Tamiya NATO Green. The handles of the tools were picked out in Model Master Wood while the main armament, spare track and metal portions of the tools were painted Tamiya NATO Black. Gun Metal was then painted over the metal parts and Red Brown was dry brushed onto the spare tracks to give them a slightly rusty look. The drivers sights as well as those in the hull for the troops were first painted Tamiya X-12 Gold Leaf. After this had dried, Clear Red X-27 was painted over the gold. This gives a reddish orange tint to the sights. The headlights and taillights were first painted Silver and Tamiya X-27 Clear Red was used for the taillights and X-26 Clear Orange for the turn signals on the headlights. The tracks were painted Tamiya XF-52 Flat Earth and the rubber portions were picked out in Tamiya Flat Black.
The decals were applied to the side armor skirts and Microsol was used to soften the decal so it would conform over the foot loops. Testors Flat Coat was sprayed over the entire model to flatten out the finish. After this had dried, Future was applied to all of the glass areas on the model and I then began final assembly, which consisted of adding the road wheels, drive sprockets, tracks and side plates.
The track is slightly long and while this eases assembly, it would not hurt to remove one link so that the track will be slightly tighter. Since the track is molded in DS styrene, it is easily glued back together. I found the location holes for the side armor plates to be too small, which caused them to project from the hull, leaving a visible gap. By enlarging the holes, this allowed the side armor plates to be glued closer to the hull without gaps.
Conclusion
I really feel this is one of Dragon's best kits. Like the Leopard 2A5, there is an incredible amount of detail and the model is very easy to put together. While the tools are molded onto the kit, with washing and dry brushing, the detail can be brought out to look as though they were separately molded.
I actually encountered virtually no problems in assembling the kit. There are a great deal of parts on this kit to assemble but if you take your time, you will be rewarded with a highly detailed replica of an important vehicle currently used by the U.S. Army.


