
Dragon 1/72 Saturn V - Apollo 11 Reluctant Kit (Re)Build Review
By Michael Benolkin
| Date of Review | August 2016 | Manufacturer | Dragon/DML |
|---|---|---|---|
| Subject | Saturn V - Apollo 11 | Scale | 1/72 |
| Kit Number | 50388 | Primary Media | Styrene |
| Pros | Huge display model | Cons | Many - see text |
| Skill Level | Experienced | MSRP (USD) | $299.95 |
Build Review
I had purchased this pre-finished DML 1/72 Saturn V model several years ago and stuck it away in storage since my office wasn't ready for a five foot tall model. Last year my storage unit had a dehumidifier unit fail and everything in there became damp from the humid summer. While the damage was minimal for the most part, the box on the Saturn V had started to fail at the glue joints, but when I was in the storage unit a few days ago, the box was falling apart and ready to spill its contents. The model is pre-built and pre-finished and only needs minor assembly to put it on display (in theory). The first, second, and third stages are separately protected as well as the Apollo command and service module assembly that also includes the escape tower. The engines for all three stages must be installed as well as the first stage fins and the attitude thrusters for the service module.
I brought the model into the shop for a look and while the model is impressive from a distance, there are seams, mold flash, sprue tree stub remnants/scars, and glue goobers that were never cleaned up when the model was assembled and painted. In addition, the second stage tank dome (top) and engine mounts (bottom) were loose, so repairs are required on a $300 model that has never been removed from its packaging. My expensive display model had become a reluctant kit.
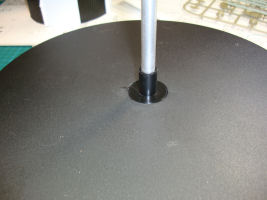
Since the second stage appeared to need the most attention, I decided to mount the first stage on its display stand to keep it out of harm's way. I inserted the metal tube into the base and SNAP!, the plastic insert popped right out of the base.
I'm not certain what type of glue was used to install that insert into the base but it has become brittle. I used 5-minute epoxy and it is better than new. With the first stage safely set aside, it was time to give the second stage a closer look.
The bottom of the second stage was all but falling out and when I snipped a few of the mounting pins on the inside of the airframe for the small side-mounted motors/vents, the bottom literally dropped out. The outside of the airframe was painted white with the appropriate areas painted black and the markings were printed/painted as well. You can see the seam where the fuselage halves were glued together and not very evenly at that. Looking up inside the airframe, the dome tank top was loose and you can see the reason - the part is too narrow for the diameter of the fuselage interior. I removed the dome top and set it aside.
Looking at the second stage motors, you can see the slight mold flash at the seams where the joints were not cleaned up prior to painting. I took a file to one of the motors to see how easily these will clean up.
Here's the bottom of the second stage with the representation of the fuel cell bottom, engine mounts, and heat shield (all simplified of course. There's some nice details in that dome bottom so I used some gray panel line wash and brought out those details (don't bother with this at home - you won't see this again once the assembly is back inside the second stage fuselage). What you don't see here is the ring of thin styrene strip that I added around the tank bottom to help it fit better inside the fuselage (it was as loose as the dome top).
Here is the dome top. It was painted orange at the factory but I added panel line wash to highlight the structural details there. If you look closer, I've added strip styrene to the edges already and it dry-fits inside the fuselage very nicely.
So now for the bodywork. The fuselage is broken up as two halves in the center with a one-piece conical fairing on top and one-piece ring fairings on the bottom. Since there are no visible seams on the ring fairings, the focus on those fuselage halves. I used Mr. Surfacer 500 to fill in the seam and scars from where the sprue trees were ripped away. The horizontal fills are dealing with sink marks. I applied masking tape over the United States to protect it from sanding and touch-up painting.
It took a little time and patience, but it was worth it to remove the seams, flash and sprue stubs from the second stage engines. On the right, you can see the results of the paint touch-ups. It seems that the lower half of the bells match Tamiya Gun Metal and the upper halves match Tamiya Metallic Gray.
Here's looking into the top of the second stage airframe at the dome top being dry-fit back inside. With a few minor adjustments to the strip styrene ring, the tank top now has good contact with the fuselage all the way around and can be glued into place.
When I dry-fit the second stage motors to their mounts, the white was visible inside the bells as they are open at the top. I simply painted those areas black for each of the motors and they're ready to mount.
The motors are installed and the bottom is back inside the airframe. I'm not convinced about the proper depth of this part, but once it is mounted atop the first stage, I probably won't see this again anyway.
The second stage was wrapped up with an application of Tamiya Flat White on the reworked surfaces and then the paint was buffed down to a smooth surface to match the rest of the airframe. With the second stage finished, it is time to assess the first stage. The good news is that the top and bottoms inside this fuselage are firmly in place and there are strategic airframe conduits covering any fuselage half seam lines. The only work will be those large first-stage motors.
Here is the step that took the longest time. These five F-1 (first stage) engines were pre-assembled and pre-painted as shown on the bottom of the first stage in the image previous. They are pre-painted in silver (plumbing) and gun metal (engine bells) but also had remnants of sprue stubs, mold flash, and other minor problems. There was no easy way to disassemble these engines but I found that the silver ring around the engine bell could be flexed until the glue join failed. I used sprue cutters to separate the plumbing assembly from the silver mount atop each bell. With these safely out of the way, clean-up could begin.
I used a set of micro-files to clean up the steps and flash from the bell seams as well as the sprue stub remnants. Because of the molded in relief on the bells, this took a great deal of time to carefully clean all five bells. The silver plumbing also had mold lines and sprue stubs that needed cleaning and once all of that was complete, I decided to change the color scheme of the engines to match the stage two bells. The upper half of the bells were painted Tamiya Metallic Gray, the lower halves Tamiya Gun Metal. The dividing line was the mounting points for the silver ring around the bells. The plumbing was painted Tamiya Flat Aluminum and all were set aside to dry.
I used gray panel line wash to bring out the molded-in details on the bottom of the first stage before installing the engines. When I dry-fit the engine bells onto the first stage, they fit as poorly as they did previously and I used a file to clean some flash out of the holes of the first stage bottom. When the engines and the plumbing assemblies would dry-fit smooth but snugly, it was time to decide the best approach here. Since I cut the plumbing assembly away from the bells, I thought briefly about gluing them back into place on the ring at the top of each bell. When I dry-fit the bell and plumbing assemblies together onto the first stage, I found this not to be needed as the silver ring around each bell keeps everything together as-is. I glued the engine assemblies to the bottom of the first stage.
The third stage (S-IVB) has a minor seam line and sprue stub scars on each side so I applied Mr.Surfacer 500 here as well.
The third stage engine suffered from the same mold line/flash/sprue stub scars as the first and second stage engines and these were quickly cleaned up.
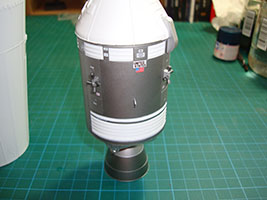
Here is the other side of the S-IVB and there is a conduit fairing covering part of the seam line on this side, so touch-ups are easier. This is sitting next to the command/service module assembly which requires the separately provided attitude thrusters to be glued to the service module sides. Note that the escape tower and shield are mounted to the command module (capsule). For an expensive display model, here are a few other disappointments: the escape tower and shield are glued to the capsule, so you don't have an option to see Columbia (the capsule) underneath; and, even though this pre-finished model represents the Apollo 11 configuration, there is no Lunar Module (Eagle) inside the S-IVB shroud. The model is designed where the first, second, and third stages can be separated (with care) and the command/service module can also be removed from the third stage, there is no LEM to see inside that shroud.
Here is the service module with the four attitude thruster units installed.
The S-IVB has its bodywork completed and touched up with Tamiya Flat White. The motor is likewise repainted using the same colors as the motors above and is installed on the bottom of the stage.
Well this was an unplanned project but it looks much better than what came out of the box. Ironically I don't have the ability to photograph a five-foot high model (sorry, wrong sort of model photographer), but you get the idea from these photos that this model is huge. At five foot high, I still don't have a place to park this model but it wasn't going to end well if I had left it in storage any longer. As it is, I am truly disappointed with the quality of this pre-finished model from Dragon. If you have a desire to own a similar-sized Saturn V model, buy the kit and do it yourself - you will do a better job than their factory process. Perhaps the kit version will offer the option for a LEM and removable escape tower shield. If you don't have time to build the model, buy it anyway and pay a good modeler the $200 you saved to build it for you properly.


