Collect Aire 1/48 B-45A Tornado Build Review
By Fotios Rouch
| Date of Review | September 2014 (Updated Jan 2016) | Manufacturer | Collect Aire |
|---|---|---|---|
| Subject | North American B-45A Tornado | Scale | 1/48 |
| Kit Number | 4873 | Primary Media | Resin, Vac |
| Pros | Only kit of this subject in this scale | Cons | Only kit of this subject in this scale |
| Skill Level | Experienced | MSRP (USD) | Out of production |
Build Review
The B-45 experience looks so much like an Arado Ar-234C redo in grand scale! We always downplay how much we benefited from the superior German engineering and that is like ten years after the war.
After a number of not so exciting and unreasonably frustrating builds, I decided to redeem myself with something unique, interesting and challenging before it too gets duplicated by the Chinese mediocrity enterprise. This Collect-Aire kit has some historical value as it was one of that last kits produced in Slovakia for Collect-Aire. Additionally, Mr. Meijer from Replicast provided the detailed parts like interior, wheels, etc.
This was a lengthy project. It started in 2002 if memory serves and was completed in 2003. I am happy to have had a tiny part in the creation of this kit. Sadly, Collect-Aire does not exist anymore although their kits are found on eBay now and then. Collect-Aire back in the eighties, nineties and early 2k was a source of unique subjects at collector prices. Eventually, they were surpassed first by the Czechs and then by the Chinese with the their cheap and mostly inaccurately-copied Collect-Aire kits.
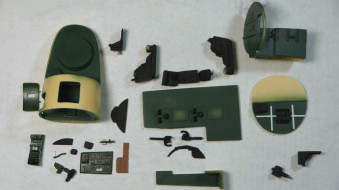
The B-45 Tornado by Collect-Aire included parts for the bomber and the reconnaissance versions. The resin was well executed overall with very small defects and very little warping. The usual process was followed once again with washing all the parts in warm water with a toothbrush and 409. The parts get air dried and then cleaned are up from resin flash and other minor molding defects.
The decision point was on what version to build. The RB looks great with bloodshot eyeball over the front camera lens cover and nose art but the bomber version looked like a bit more challenging with more scratch building involved and with no builds from anyone else that I could find on the web. The RB was done nicely by the way by Rod Lees over at the IPMS site. The challenge was set and decision was made.
The B-45A is defined by the glass nose and the gun tail. Two gun tail versions were out there. I chose the one with the decals provided for the one with the more complicated bulbous glass. One part of my research and Allan Rega's from the San Diego Aerospace museum back then in 2002 as well as the Dash-1 manual PDF scans indicated that many detail parts were missing from the kit for the bomber version. The only way was to scratch build them of course and this is brought back some of the old excitement with building Collect-Aire kits.
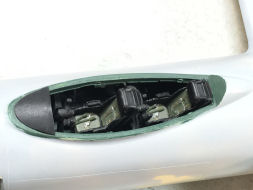
There were many parts missing from the bombardier's station (and only because I have the Dash-1). So I built a bunch of them and there is more to add if I like to add complexity. I am just not sure how much I would be even able to see through the front vac and the top window. I could add the tank maybe and even the curtains but it would make things even less visible. I will see when I want to stop adding details to the build.
The cockpit is OK with the amount of detail provided but not if you have the Dash-1. What is there is OK but more need to be added. I will keep adding until it gets too much and not visible.
The interior of the B-45 is similarly painted as the B-47. The March AFB B-45 is a big help and a great reference. I provided references to the makers through a great supporter. Through the years I have lost his name and contact and I would really like to get it back if he reads this article for proper credit.
I tried to match the interior paints to the images I have of the B-45 at March AFB which also coincide with period colors for the B-47 as well. The cockpit was spruced up a bit with extra parts but sadly little will be visible once everything is buttoned up.
The bombardier's station is full of detail and again little will be visible unless I leave the crew boarding entry door open.
The gunner compartment is simple but there is no need for too much detail other than adding some oxygen bottle since it is also going to be dark and mostly invisible in there.
Test fitting the main parts shows some interference here and there so the fuselage cannot be joined together yet. I have no problem with that and I anticipated some small issues that will be addressed. I have a problem when expensive injected kits have issues of that nature. After the fuselage is together, the rest of the kit should go together much faster.
As the Tornado build continues, every part receives attention. The exhaust shrouds were very well molded on the one side but had a bubble of missing resin material on the pointy end on the other side. This is easily fixable by adding a drop of superglue at the missing resin tip, hitting it with accelerator and then immediately wet sanding it to shape.
Monolithic castings (large chunks of solid cast resin) present uneven shrinkage problems that are difficult to address. This happened with the jet pod fronts and main bodies. They have shrunken at different rates and they do not fit well with each other or into the wing slots leaving large gaps.
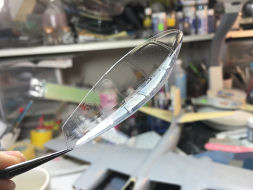
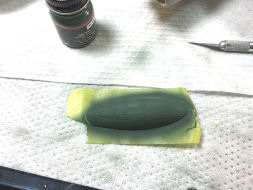
While I was working with embellishing the bombardier's station, I realized that it would be very hard to adapt the vacuform clear acetate top window at a later stage. I cut the vac part out and tried to make it fit but it is absolutely useless. I was thinking that mixing clear resin was out of the question. Eventually, I came to the idea that building a top window out of hard clear plastic would work because it can take sanding and trimming until it fits perfectly into the opening. After looking around the house for clear plastic that is already round to the same diameter of the forward fuselage I realized that the plastic cover that I use for mixing epoxies was roughly of the same circumference as the forward Tornado fuselage plug. After cutting a few samples and seeing how they behave under sawing and cutting, I fashioned a piece that fits perfectly into the top window opening. This part was then cleaned, polished and dipped in Future for later use.
Next I worked on joining the fuselage halves. Not very easy and better done is segments. Going from front to back and from top to bottom I superglued it a bit at a time. The fuselage came out OK with small gaps to fill.
The forward plug to main fuselage joint is another story. The cross sections differ. Not necessarily because of the masters not being right but mostly because of how the resin cured. I had to superglue the two units together while firmly squeezing the sides so the top and bottom edges would extend out and match with the top and bottom of the receiving main fuselage. It actually came out OK and very little sanding and filling seems to be required.
Lastly, the rear tail cone is being cut out to make room for the turret and the large glazing vac pieces. This will be the hardest part of the kit to get to look right.
Indeed building the tail gunner section was the hardest part of the kit. So hard that I started and stopped many times. The problem was (not the first time for this maker) that he never test-fitted the parts or so it seems to me. The process was slow and i tried to create as little extra work as possible. Alas, it was not meant to be. I added plastic stock, lots of putty and tons of sculpting and sanding.
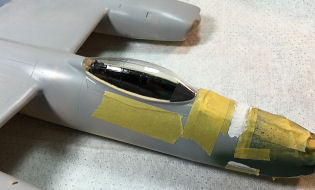
The next super tough ordeal was to attach the clear glazing over the gunner and bubble rear glazing. Nothing fit right and tinny cuts and adjustments had to be made. The interior was painted and outfitted with the gunner's gear. Once all was secured, it was masked to protect the clear vac parts and putty was applied to fair in the joints.
Next I worked the countless pinholes on the main wings. Vacuum casting was never used by this maker. I used 3M putty in successive applications. In the end I sprayed Mr Primer to see where I made mistakes.
The wheels were a total disaster. Quality control was also not known to this maker. Large pinholes were present, together with chunks of resin that cover the tread pattern wherever the rubber mold deteriorated.
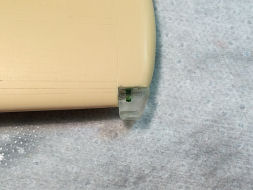
Then I moved on to building clear navigation lights. I used chunks of clear resin which I secured in place with CY glue and sanded and polished into shape.
The bottom of the fuselage needed the most work. The fuselage halves did not meet together correctly. I emphasized best fit on the top seam and allowed for more play and distortion on the bottom fuselage seam. This was fixed with layers of putty and rescribing.
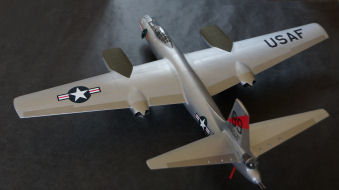
At the end I wanted to see how the main assemblies went together and to get another feel of the massive size of this model.
Working with the large and heavy wings proved to be troublesome. First, the contours of the butt joint on the fuselage side did not match very well to the wings. Also there was a noticeable gap towards the trailing edge of the wings. After the cyano glue dried and the wings set, I inserted styrene strips to fill the gaps and then covered the joints with putty. Once dry, I sanded the putty smooth and followed it with Mr Surfacer. I revived the scribed wing and fuselage panel lines and made sure the flap panel lines were scribed a little deeper.
I was glad that the tail gunner section was complete and after I masked the gunner windows, I sprayed first the green interior color and followed it with bright silver.
The tail wings went on next and were also worked on a bit to fix the gaps left at the joints.
As hard as the drafting of the tail gunner section was, the bombardier glass attachment was a very time consuming effort as well. I had to get it right as this area attracts a lot of attention. Endless trimming and dry fitting resulted in an acceptable fit. While I let the vacuformed clear part set, I worked on other minor assemblies such as the landing gear and the intakes and exhausts.
Working with white metal is not that hard. It cleans up well and polishes nicely. I was pleased with the end result for the tires. I spent lots of time trying to engrave the lost or damaged tire trend but the end result was worth it.
I finally puttied the clear bombardier's glass join to the fuselage and will let it dry for a day. Even in Arizona, winters are cold and putty takes longer to dry. Before painting the model, I realized that it would make much better sense to have the clear parts fitted and fixed in place first.
The vacuformed canopy was created using a portion of the upper fuselage as part of the mold. This means that it will have to be separated from the fuselage clear plastic portion. The separation line mastered between the fusleage and the clear part frame is very faint and almost invisible in areas. I trimmed very carefully all around and after ruining the first spare canopy I had something that fit reasonably well. The quality of the vacuformed part itself is abysmal. You can easily see debris from a dirty master, little hair and dust particle that have been vacuformed into the clear plastic. Another problem is that the plastic stock that was used was very thin and flexible. A little better quality work would have gone a long way. Dipping the clear parts in Future is mandatory. The end result is acceptable but defects can still be seen under daylight.
The cockpit was put back together and cleaned up prior to affixing the clear canopy part. The canopy was also masked and left to dry prior to gluing in place. I sprayed interior green first and after dry I carefully applied CY glue on the resin and slowly lowered the clear part in place. Spending hours trimming the clear part payed off in the end.
Similarly, I masked the bombardier's clear part and painted the same interior green.
A final coat of Mr Surfacer 1000 was sprayed. I was ready to start spraying the metallic paints but I avoided the temptation and sprayed more coat of Mr Surfacer 1200. I am glad I did. It makes a difference to have a nice and smooth surface before the NMF.
I started with Floquil Old Silver as a base. I continued with various Alclad II shades. I used a yellow zinc mix for the wheel wells. The antiglare panels were also Floquil green drab. I miss this company's paints.
Final touches on the Tornado included fabricating the missing exhaust cans from the kit. I used brass rod cut at 10mm length. Polished it and chamfered it with the Dremel tool and painted exhaust metallic.
The landing gear went on next. I knew I had enough lead weight to make the model a nose sitter but I was not certain if the metal gear would take the weight. I am happy to report that the gear is very robust (much like the Scale Aircraft Conversions designs) and it should be no problem.
The unmasking process was very tedious as the metal flakes were everywhere. I used the airbrush to blow them off the clear parts and the model itself. The model is now ready for the decals and final fiddly bits to be put on.
The decals went on last. They needed to soak for a long time before they would come off the carrier paper. They would rip easily otherwise because the protective film is very thin. By the same virtue they snuggled down well and the film all but disappeared. I glued the crew door open so the interior can be seen.
This is one of my lengthiest Collect-Aire builds. The kit is tough and needs real dedication on the modeler's part. It was a worthwhile build and a subject that I do not see coming out in 1/48th scale any time soon (I have made that prediction before!). For me it represents an interesting time in modeling, a time that I enjoyed by completing unique model subjects.
Building such subjects and kits brings back memories of a lost friend, Phil "Bondo" Brandt to whom I dedicate this build.


