Classic Airframes 1/48 TA-4J Skyhawk Build Review
By Fotios Rouch
| Date of Review | May 2008 | Manufacturer | Classic Airframes |
|---|---|---|---|
| Subject | TA-4J Skyhawk | Scale | 1/48 |
| Kit Number | 4147 | Primary Media | Styrene, Resin |
| Pros | Nice detailing, especially with the resin castings | Cons | See text |
| Skill Level | Intermediate | MSRP (USD) | Out of Production |
Build Review
The two seat TA-4J variant of the Skyhawk has been a very much anticipated model not only by the aficionados of the type but by most Navy jet modelers.
Everybody was expecting that Hasegawa would release it since they have already done most of the A-4 variants but it never happened.
Classic Airframes surprised the modeling community with the news of its eminent release. The in-box review can be seen here.
In preparation, I cut off the main kit parts, cleaned them up and proceeded to washing the plastic and resin in warm water and 409 cleaner.
My first concern was how well the fuselage would go together. I just taped the fuselage parts together and breathed a sigh of relief as they both lined up correctly with no big gaps and very good panel line alignment.
The next activity was to prepare the interior components staring from the cockpits.
The side walls in the kit are smooth and do not have the quilted look that you see in the real plane and the Hasegawa Skyhawk. I understand that the low pressure injection molding process does lot allow for much detail on the inside of parts. I decided to do a quick and dirty cross hatch scribing job on my side walls and get the look a bit closer to the Japanese kit.
Before working the cockpits I had to assemble the intakes. This is one of the toughest parts of the kit. Take it slow and do your trimming of the fuselage openings carefully. There is a need for precision here if you want the intakes to fit flush to the fuselage. The intake lips are also tough to get just right so take your time.
The cockpit resin parts were removed from their pouring stubs and test fitted together. The side wall instrumentation between front and rear cockpits is identical in this kit and I think it is ok since it is not going to be visible and most TA-4 skyhawks were different from aircraft to aircraft. The instrument panels are different and look ok for limited run plastic. However I feel that Classic had spoiled us with full resin interiors and that it would have been great to get more detailed resin instrument panels.
In limited run kits I prefer not to glue anything until I am totally sure that the fuselage will close securely. I tried a few times to get the two cockpits lined up just right by just securing them with a tinny bit of super glue. Once I was happy, I secured them to the starboard side with super glue.
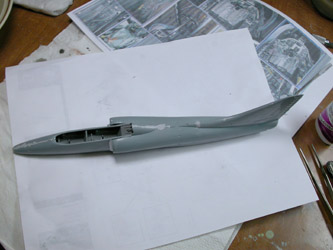
Closing up the fuselage was not tough and it came together pretty good. I let the glue dry overnight before cleaning up the fuselage seams.
One thing that some modelers do not like with some limited run companies is that they have to simplify the injection process by removing extreme curved surfaces like the bottom portion of the fuselage near the tail. The bottom part is provided separately and it adds complexity to the assembly process.
I tried to see the bright side of this approach. I found it easier to attach the small aux intake on the root of the tail. I also found it easier to only install the exhaust fan blade plate part and add the tail pipe and exhaust pipe later.
I did not glue the exhaust pipe to simplify the painting process. The pipe will be added in the end.
I needed putty on one spot on the top of the fuselage. I run Mr.Primer 500 all over the seems just in case and I will carefully polish it off when totally dry.
For a break I went on to the wing assembly. There are some ferocious injection stubs there as well as in many areas of the fuselage.
The funny part is that most of them will not interfere with the assembly of the wings. Taking the injection spigots as some modelers call them is not tough.
I liked how the resin wheel well insert went in. No adjustment or sanding necessary. I have had many limited run kits were I had to sand down the resin and plastic to paper thickness. Not here.
I opted to cut the flaps open to give a busier look to the wings.
I used the Hasegawa kit as a guide for extra confidence. Cutting off the flaps with a razor saw was very easy. To make my life easy I used the Hasegawa plastic for the flaps and actuator. It fits great and will serve the kit very well.
Here is the completed wing assembly.
Next step in the process was to test fit the wings to the fuselage. The fit of wing to fuselage was not bad on the top portion but a little work was required for the bottom portion. I ran some Mr Surfacer 500 on the fuselage joints and sanded it down once dry.
The whole model was sprayed with Mr Surfacer 1000 and sanded down with polishing cloths.
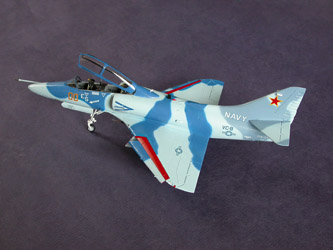
Painting the model was the biggest challenge. I could not find good matches for what I was seeing in the few photos available of this specific aircraft. In the end I thought that the idea was to represent the Flanker during dog fights so I went with the Testors colors for the Flanker. I was still not satisfied with the hues but I went for it anyway.
I used the ACMI probe from the Hasegawa weapons set so I would not have to clean up the plastic in the CA kit. I chose to put it under the center pylon as per the photos I have seen. The decals went down great and adhered to the painted model really well. Once done with the decals I sprayed the whole model with Testors semi gloss varnish.
It is of note that I did not use any lead weights at all for this kit. I had them ready to drop in inside the nose area through the pilot's foot well but the model stands on all three wheels just fine. I only added the black blade antenna and two smaller antennas on the tail. I regret not fixing up the aux air intake on the top of the fuselage and instead blanking it off. This appeared to me as a blemish on the mold and I chose to fill it in! Will not happen again!
The kit looks good to me and it is a good representation of the TA-4J. It is recommended to the all the Skyhawk collectors as it fills in this very important gap.


