Classic Airframes 1/48 Baltimore (Foreign Service) Build Review
By John Valo
| Date of Review | April 2008 | Manufacturer | Classic Airframes |
|---|---|---|---|
| Subject | Baltimore (Foreign Service) | Scale | 1/48 |
| Kit Number | 4140 | Primary Media | Styrene, Resin |
| Pros | Easily the best Baltimore kit produced in any scale | Cons | |
| Skill Level | Intermediate | MSRP (USD) | Out of Production |
Background
For a look at the history of the Baltimore and the kit straight out of the box, check out the review
published earlier on Cybermodeler.
Construction
Every modeler has a list of all-time favorite subjects, and as for me, when Classic Airframes announced the 1/48 scale Baltimore, it was like being united with a long lost love.
Consisting of the typical mix of low-pressure injected plastic and resin parts, detail is quite crisp and I found no warpage or fit problems during assembly. The clear parts are a rather soft plastic which initially looks cloudy, but after a bath in Future, they become crystal clear.
As I typically do with a mixed-media kit, I spent my initial modeling sessions removing the resin casting blocks and pin marks from the plastic parts. I then proceeded to pre-paint the various parts, which were then bagged for later assembly. I find this technique really helps me to maintain my enthusiasm for a project, as I get the boring stuff out of the way right off the bat.
The interior is quite simple, but very effective when assembled. The navigator's office-type chair is a beautifully delicate piece of resin - too bad you can't see it through the tiny side windows when the fuselage is closed up!
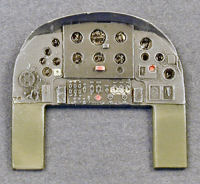
As is generally known, due to an error by the factory, the now sold-out Baltimores were shipped without instrument panels (Part R20). This situation has been corrected with a one-piece resin panel that is quite convincing when painted and drybrushed. I used spare generic decal seat belts for the pilot and bombardier seats for a bit of visual interest. The rest of the resin cockpit parts are very crisply detailed and benefit from careful painting and drybrushing. It is absolutely essential to dry-fit and sand the assembled interior width-wise to fit, as it is marginally too wide.
Assembly of the wings starts with the interesting folded wheel wells. These work quite well, but be sure to carefully align them during assembly.
The resin engines are quite well cast and are a lot less intimidating to assemble than what you may think at first glance. One warning though; the assembled engines' diameter is too great to fit in the cowlings, so you will have to carefully sand down the tops of the cylinders. I used a disc sander to assure the reduced areas remained perpendicular to the engines' mounting base. Only remove just enough resin to slide the cowlings over the engines, as this is essential for alignment.
If you are building a version which uses the larger upper cowling filters, wait until the wings and cowlings are attached to the fuselage and properly aligned to attach them to the cowlings. I had assembled mine as part of the completed wing/engine/cowling structure, only to find one was ever so slightly out of alignment, which necessitated its nerve-wracking removal and replacement. Because they are such an obvious visual feature, even being the merest bit off is exaggerated.
The wings mount to the fuselage on rather unassuming airfoil shaped 'pads'. While the fit and alignment is good, I would recommend adding a spar or strip stock to have more bonding area.
Through the course of conversation with other modelers building the Baltimore, the sweep of the horizontal tailplanes became an issue. After examining as many photos as I could, I became convinced that while there is a distinct aft sweep of the hinge line, the kit may have exaggerated it a bit. The modification is quite simple indeed. I used a razor saw to make a diagonal cut through the assembled tailplanes at the root, and then attached them to the fuselage.
My clear parts had a tad bit of flash that needed to be carefully trimmed, especially on the rear edge of the pilot's canopy. The cockpit opening and canopy will both need to be slightly trimmed and sanded, but you can achieve an excellent fit. The turret presents another challenge, as the vertical gun slots need to be opened. I drilled a small hole at either end, connected the holes with a razor saw, then used a small needle file to clean up the slots.
When mounting the landing gear struts, tack them in place with CyA for proper alignment, then reinforce the bond with epoxy. There is no real mechanical joint, just a vestigial bump on the bulkhead to position the struts. I replaced the kit tailwheel strut with brass wire for durability.
I finished the model with PollyScale acrylics, then a Future clear coat. The decals provide markings for four subjects: Italian, Turkish, Greek and Free French. Although the shade of Red looks quite deep on the sheet, once applied to the model, it looks just fine. The decals are printed by Cartograf and feature good saturation, opacity and registration. The decals snuggled down very well using Microset decal solution.
Conclusions
Overall, I give this kit high marks. It has a relatively low parts count, and the parts that are included are convincingly detailed and easy to work with. Better get one while you can!
My sincere thanks to Classic Airframes for this review sample!


