Classic Airframes 1/48 English Electric Canberra T.17 Build Review
By Fotios Rouch
| Date of Review | September 2006 | Manufacturer | Classic Airframes |
|---|---|---|---|
| Subject | English Electric Canberra T.17 | Scale | 1/48 |
| Kit Number | 4129 | Primary Media | Styrene, Resin |
| Pros | Nice detailing, especially with the resin castings | Cons | |
| Skill Level | Intermediate | MSRP (USD) | Out of Production |
Background
The T.17 in-box review is here
and the B.Mk.2 can be found here.
Getting Started
The model came to me immediately upon its arrival to the Classic Airframes warehouse. Bags were opened up and the inspection started. The plastic still looks good and no deterioration is visible on the plastic parts that are common to the previous variants.
A little flash is present in the expected areas. The resin is exquisite and plentiful. Very nicely done with zero defects in my sample and full of tiny detail. All the detail airframe bits that define this variant are done in resin and are very well cast.
Preparation consisted of cutting all the parts from the sprues. Once the parts were cut and cleaned up I proceeded to washing the plastic and resin in warm water and 409 cleaner.
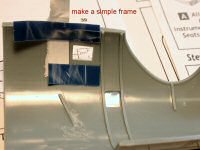
I noticed that this variant has two small windows on the top side of the fuselage and one window on the port side. The top windows will have to be created after drilling and opening up the plastic along the engraved panel lines were the windows are supposed to be. The kit includes four windows that will have to be very carefully glued in place for a good appearance. I decided to use clear resin for this job.
First step is to use clear tape to cover the outside of the fuselage were the window is. Use good quality packing tape like 3M. The adhesive is smoother on 3M tape and it will help us later once the tape is off and less polishing will be necessary on the clear resin.
Next step is to create a simple frame on the inside of the fuselage to contain the resin from flowing every where. Not much resin is needed so it is good to control its flow.
The resin is then mixed in equal parts and slowly poured straight in the window openings. Do not worry about the bubbles generated during the mixing process. Five minutes later you can pick each one of the bubbles with a toothpick and also you can wipe excess resin with some small lint free piece of clothing.
Let the parts rest for a couple of days. I like to take mine out to the warm sun to speed up the drying process. It does take a while so be patient.
Two days later the resin hard as a rock and can be polished with Micromesh polishing cloths. Polishing is recommended only because the resin will pick up all the tinny imperfections of the adhesive on the back side of the tape. The imperfections are small but the resin will not sparkle until it is polished. I will do the polishing after the fuselage is done as a last step before masking.
Next step was to work on the cockpit. Again as with the previous Canberra I built I felt sad that so much nice detail would be lost forever. I chose a dark gray mix as opposed to black for the floor and side walls and the used black for the seats and instrument details. The ejection seat will be painted and detailed and inserted before the canopy goes in.
I decided to follow a different approach with the front fuselage plug and the main fuselage parts. Although the instruction correctly advise to assemble the fuselage sides front and back and then later merge them together I decided to do the front plug first and attach it to one of the main sides afterwards. The front plug went together OK but it will need a little sanding and maybe a little putty here and there. The starboard side went on great.
After the glue dried I brought in the starboard fuselage part and carefully glued it in place starting from the front. Here is were all the attention needs to be paid because we will need a perfect and as smooth as possible seamless fit. I used cyanoacrylate glue just to make sure that nothing moves on me. Once that is in place you can slowly work your way around the fuselage and use liquid glue and vices to keep things together for the long cure.
Working the main wings was not a big problem but a few things need to be kept in mind. First, do sand the mating surfaces before gluing the wings together. It will help with the fit and it will thin down the trailing edges. The landing gear wheel wells fit great and little extra sanding is needed to sandwich them between the wings.
I noticed that I needed to include a little spacer in the intake area of the wing to accept the intakes with no step.
At this stage we are going to put the fuselage together and we are going to take our time doing it. This is a huge kit and the fuselage comes in four parts just like with the previous Classic Airframes Canberra releases. There are many ways to do the fuselage merging and the instructions suggest to do each side independently and then merge them.
In this build I decided to go about it a little differently and it worked fine in the end. I completed the two front parts and then attached one fuselage side to the front plug. Then I glued the other fuselage half to the assembly and slowly glued it starting from the front and slowly working my way to the back. The results were very good. One side was perfect and the other needed very little cleanup and a tinny bit of putty. Once the glue was dry I run the panel lines with a scribing tool and Dymo tape.
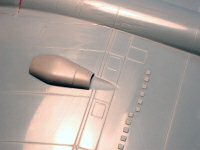
While the fuselage was set aside to dry I spent my time on the wings, especially the underside where the resin parts (are they generators?) get attached. Using the very useful walk around by Chris Hughes I realized that there is an exhaust path behind the generators.
To duplicate this depression I took the following steps. I first traced an outline around where the resin piece would go.
Then I used Dymo tape to trace an outline and protect the plastic from accidental gouging. I used a Dremel tool to dig up the area and sand paper to clean it up.
I then removed the Dymo tape and super glued the resin pieces to place.
Once the fuselage was dry I focused my attention on the tail cone area.
The kit provides a resin replacement tail cone that contains all the ECM gear. The modeler is supposed to remove the plastic tail cone in order to adapt the new part. The instructions do not specify exactly where the modeler is supposed to cut the tail cone off. Again I looked at the close-up in the Chris Hughes walk around. It was apparent that this part was not mastered based on the close up shots and therefore it is up to the modeler to adapt it and modify it a bit to get it close to the real thing as per the photos. I tried to get it to look close to the photo but the shapes did not help much.
The tail wings were attached to the fuselage with the help of brass locating pins. Their purpose is to add a little structural rigidity to the completed assembly. The next step was to mask the clear resin windows and cockpit opening.
Remember to look at your references and see what windows need to be deleted. (ca_canberrat17_masked.jpg) The last step for this weekend was to join the main wings and leave the model alone for 24 hours for everything to cure. So far little putty has been used and the model is almost ready for the first primer coat.
This is where the grand inspection will occur to see if there are mistakes and areas that need more attention.
Painting
After all the priming and surface checking was completed, it was time to apply the paint. I have to admit that I am never in a hurry when it is time to lay down the paint. I also have to admit that I do not care much for acrylic based paints. Just give me the strong stuff! Every once in a while I do British subjects and for paint I always use Xtracolor, mostly because they go through the pain of matching their paints with actual color chips.
What a great pleasure it was to use this product line again. Granted, they do take a while to dry, but boy what great coverage and smooth surface they do provide! Their BS389 Hemp and BS627 Light Aircraft Gray went down beautiful. The Xtracolor BS538 Post Office Red provided such great coverage that I just painted over the masked tail with no need for a primer coat of light gray or white to help the red come out. Enamels rule in that respect. The added advantage of course is that in the end there is no need to apply Future to prepare the surface for decaling. The decals will go down very snug and will not silver.
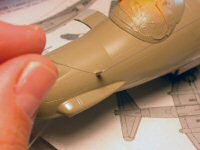
After the camo scheme paints were dry, I flipped the plane upside down and started working on creating the blade antennas. No antennas are provided in the kit but they are easy to make from plastic sheet. The only thing left is to paint the bottom and the leading edge of the antenna black. While you are at it you can add some rivet detail and a trace of smoke behind the under-wing generators.
One other small detail you might want to add is the long probe on the port wing. I made mine out of .025 and .020 evergreen plastic rod. I think it is worthwhile adding it and it does add to the look of the model.
I also added the antenna wire using fine Easyline. I see it more and more on models and find it very durable. The only problem might be that is not of circular cross section and under certain light conditions you can see it being flat. I secured mine using superglue and a dub of accelerator. I trimmed and it should stay tight for ever.
The decals went down fine and conformed well onto curvatures and followed the panel lines well. The only problem was the roundels as they did not work well with the speed brake fingers. I used MicroSet a few times and it helped a lot.
Some decals were not included in the kit and now I wish I had made my own. Not terribly important but I think the wingtip tank black and silver stencils could have been included. For the white line around the canopy I used decal stock cut into a very fine stripe.
Very light weathering was applied. This plane has been seen in photos varying from filthy to pristine. Also I noticed that sometimes it carried wingtip tanks and sometime it carried something that looked like wingtip tanks but was probably ECM gear housing.
Conclusions
I am satisfied with the completed model. It looks very different from the Orange Luftwaffe Canberra
and the black Collect-Aire B-57B. Know what is left is few more Classic Airframes B-57s to complete the collection and totally run out of room in that display case!


