Classic Airframes 1/48 Do 17Z Build Review
By Phil Hale
| Date of Review | June 2007 | Manufacturer | Classic Airframes |
|---|---|---|---|
| Subject | Do 17Z 'Finland' | Scale | 1/48 |
| Kit Number | 4114 | Primary Media | Styrene, Resin |
| Pros | Easily the best Do 17Z kit produced in any scale | Cons | |
| Skill Level | Intermediate | MSRP (USD) | Out of Production |
Background
For a look at the history of the Dornier Do 17Z and the kit straight out of the box, check out the review
published earlier on Cybermodeler.
Construction
Let me start off this article by saying to all the German aficionados that while I love German aircraft, the Do 17 has never been at the top of my modeling list. I don’t even own a Do 17 reference book so I may have put the pigs in the barn and horse in the hay loft. Please, don’t judge the kit by my lack of knowledge on the subject.
Well, on with the show. When you open that box, you’ll find medium gray and clear plastic in a big sip lock bag. There are no photo-etch parts in this kit, which means there are no seat belt parts. You’ll have to come up with these on your own. I used tape for seat belts in an attempt to keep the model ‘box stock’. This was not possible and this will become evident later. There is also quite a bit of resin in the box.
The engines are resin and a large part of the cockpit. I have no references so I don’t know if the cockpit is complete. The resin is nicely molded and fits fairly well. The rest of the cockpit is composed of injection molded parts and mine were somewhat mis-molded. This made clean up a bit of a chore. This carried over into the rest of the smaller parts and cleaning up the mold parting lines was time consuming. I hope that this was just my kit. I expect a certain amount of clean up in a limited run kit but this was more difficult than usual.
After all the clean up, I began the assembly process. I put the wings together and sanded them out. Then, I put the rear part of the fuselage together and cleaned up the seams. The fuselage is broken down into four main parts. The forward part is the cockpit area and is a top and bottom arrangement. The rear of the fuselage is the standard left right fuselage halves. The rear fuselage also includes the bomb bay. I closed my bomb bay. You’ll have to dry fit these parts and adjust the fit as needed.
You can get one side of the bomb bay doors to fit fairly well but the other will require more adjustment. I used super glue to fill in the seams and then re-scribed the panel lines. I then mated the bottom part of the forward fuselage (part #3) to the rear fuselage and cleaned those seams up. You’ll need to thin the inside of the mating surfaces of the rear fuselage and you’ll be able to eliminate most the step created by these parts. (Thin the mating surfaces of parts 3 and 1 and 2.) It was easier to do this part now as it would more difficult with the wing in the way.
Next, it was on to the engine nacelles. This was by far the worst part of the kit. I glued the corresponding nacelle parts together and cleaned them up before mating them to the wing. After clean up, I installed the forward and rear bulkheads in the nacelles. Take care when locating these parts as they will throw off the alignment of the landing gear. I was hoping that the bulkheads would spread the nacelles to where they would fit the wheel well opening in the wings. It spread them but not enough.
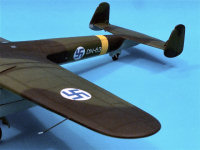
The wheel well openings are slightly bigger than the nacelles. There are locating lugs on the nacelles that correspond with locating holes around the nacelles. These lugs/pins are of little use and they should be cut off. You’ll have to fill in the rear locating holes and this might be easier done before mating the nacelles. You’ll need to test fit these nacelles and make sure that you have the correct one for each side. I had to fill small gaps on the left nacelle where it over laps the top of the wing but on the right nacelle I had on huge gap on the outboard side. It also created a larger opening on top between the top of the wing and the nacelle. You’ll notice this in the photos. I don’t have a clue what caused this as the nacelle fit flush underneath. I filled the gap at the leading edge with sheet plastic and super glue and then broke out the old sanding stick
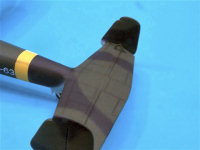
Oh, the joys of limited run kits. After this was done, I worked on the cowlings and for the most part they were OK. The cowl ring (part # 30) was a little too large for the cowling but a little sanding paper took care of that. The openings for resin parts 15 and 16 are seriously too small. You really should open them up before you mate the nacelles to the wings. Test fit often so you can get a tight fit. I’m assuming that these parts are intakes of some kind. The tail section fits ok but you’ll have some filling and sanding on all mating surfaces. The kit instructions would have you put the engines and the exhaust on and then mate the cowling upper and lower halves. I put mine together first and fit the cowl ring but by doing this I made it impossible to fit the exhausts the way the instructions recommend.
There are three mounting points on the nacelles for locating the exhaust ring. I cut off the upper parts of the exhaust stacks and glued the ring to the nacelle. Then after attaching the engines and the cowlings, I glued the upper parts of the exhausts back on through the openings in the top of the cowlings. I attached the wings to fuselage at this point and you’ll have some work here as well. I cut off the locating tabs on either side of the wing mating surfaces on the fuselage. This made the wing fit a little easier but you’ll still have some filling and sanding on all mating points. After painting and detailing the cockpit parts, it was time to attach part # 4 and fair it in. The fit was ok but where it meets the upper surface of the wing will need some filler. I had read one in box review and it indicated that the clear parts were a drop fit. This was definitely not the case with parts C5 and C7.
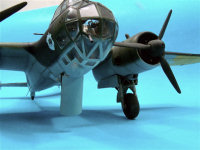
The upper green house canopy fit well but clear parts C5 and C7 need to be faired in. I trimmed some of the gray parts and then used super glue to fill the seams. It seems to me that this part of the model is overly complicated. There are two clear parts and part 58 that make up the underside of the nose. Part 58 has a blister molded onto it that may not be present on all Do 17s. Here is where my lack of information on this model comes into play. Seems to me that parts 58 and clear part C5 could have been combined and the fit in this area would have been much better.
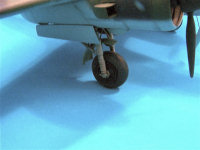
Take care when mounting the landing gear. Each side is made up of four parts. I glued the main gear legs into the mounting points and then attached the retraction struts. After all this was in place I mounted part 31. This fits well but if your bulkheads are off, your gear will be off and could be off set. You’ll have to scratch some of the smaller details such as the pitot tube and some of the antennas. The painting guide shows a loop antenna on the canopy but this is not addressed in the instructions so I did not make one. You would have to scratch or rob one out of another kit.
Well, I finished my Do 17 with Modelmaster Paints and used the kit decals. Here is another area of concern. The decals are not produced by Microscale as in the past. They are printed by Techmod and in my opinion are not as good as Microscale. Take care when placing the decals as they are easily scratched.
Conclusions
Well, I guess the bottom line is this. It is not the easiest kit that I’ve ever built and I’ve built dozens of Classic Airframes kits. I would put in a class with the CR 32 and CR 42 kits by CA. This kit will require some work on your part but if you love the Dornier Do 17 or you are a German aircraft fan, you’ll need this for your collection. It can be built and I’m sure that many of you out there in cyberland are chomping at the bit to get one. I’d love to see what a great modeler could do with this kit.
Maybe I could issue a challenge to my good friend John Valo to show what a great modeler could do with this kit. John’s work is first rate and he is not afraid of a challenge.
My sincere thanks to Classic Airframes for this review sample!


