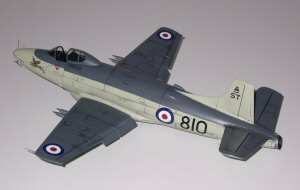
Classic Airframes 1/48 Supermarine Attacker Build Review
By Morris X. Fletcher
| Date of Review | February 2006 | Manufacturer | Classic Airframes |
|---|---|---|---|
| Subject | Supermarine Attacker | Scale | 1/48 |
| Kit Number | 4102 | Primary Media | Styrene, Resin, Vac |
| Pros | Nice detailing, especially with the resin castings | Cons | |
| Skill Level | Intermediate | MSRP (USD) | Out of Production |
Background
For a look at the history of the Supermarine Attacker and the kit straight out of the box, check out the review
published earlier on Cybermodeler.
Construction
I did not have any serious problems building this one, but as with any short run multimedia kit there is a number of items which I'd like to turn the modeler's attention on.
I started building the model by first cleaning both plastic and resin parts.
I also opened holes on the fuselage and wings, which are indicated in the instructions, but were not present on the actual parts.
Test-fitting the nose halves to fuselage showed an excellent joint between the parts without any additional adjustments.
What follows are my tips for the proper sequence on building the model:
1) Small portions of plastic must be removed as shown for the best fit of the internal fuselage parts.
2) The position of 27 & 38 parts is shown incorrectly in the instructions. The correct position of the intake plate parts should be as shown. Here are the completed fuselage halves after assembly.
3) The pins for fixing the cockpit tub inside the nose halves are incorrectly placed (figure 6). These pins must be removed and the corrected position for the cockpit tub is as shown.
4) In order to complete the cleanup of the fuselage halves I temporarily glued the fuselage halves just in a few spots and then cleaned up all the openings around the fuselage (cockpit, tail hook and rear wheel well, etc.). This is my standard method for cleaning up all the kits I build.
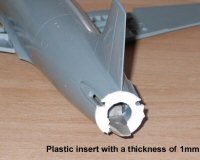
5) The most problematic area of the model I found to be the resin tail cone.
Resin shrinkage caused the diameter of this part to be smaller than the diameter of the fuselage.
The best solution I found to resolve this problem was to insert a plastic plate made out of 1mm thick styrene stock between the tail cone and the fuselage. Although the fuselage became 1mm longer (not a big problem in my view) no step appears between the plastic and the resin parts.
There are a couple more tips to help you avoid major problems during the rest of the build process.
6) After completing the fuselage I would recommend to first glue the lower halves of the wings to the completed fuselage and then after some small trimming adjustments to glue the upper halves of the wings. If you do this, very small amounts of putty will be required around the wings.
7) My first impression about the belly tank was that this part was not made very well. There is no need to be in a hurry and take a file to it. The best way to fit this part is to just press the tank from both sides and squeeze it to properly fit onto the fuselage. Fast cyanoacrylate glue and accelerator might help here. The corrected position and look of the belly tank can be seen in my pictures of the completed model.
8) Here is a hint on how you can enhance the definition of the scribed canopy frame lines. The frames are lightly scribed on this model to give a more "scale" effect. This makes them a bit tough to see when you try to mask them prior to painting. I used ink to outline the scribing and then lightly wiped it so as to leave just a hint of ink left behind.
One more note, although the instructions show two Pitot tubes (PE parts) for both wings, there is only one on the left wing tip.
Conclusions
Overall this was a pleasant build and I feel that any modeler with some experience in building limited run kits would have a great time completing this kit. I hope that my hints can help other modelers to save a lot of time and end up with a great looking model of this jet age pioneer.
My sincere thanks to Classic Airframes for this review sample!


