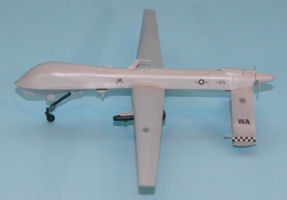
Bronco Models 1/48 MQ-1 Predator Build Review
By Michael Benolkin
| Date of Review | March 2010 | Manufacturer | Bronco Models |
|---|---|---|---|
| Subject | MQ-1 Predator | Scale | 1/48 |
| Kit Number | 4003 | Primary Media | Styrene |
| Pros | Nicely detailed kit | Cons | Slightly over-engineered, Italian roundels slightly out of register |
| Skill Level | Experienced | MSRP (USD) | OOP |
Build Review
For background on the Predator and a look at this kit out of the box, click here.
The kit provides a number of options for early and late block Predators and most notably the RQ-1 surveillance platform or the MQ-1 surveillance and strike variant. The instructions show two configurations, though they are not too clear on the differences. Your best bet is to make use of the nice selection of parts options and build one from a good reference photo or three.
I decided to put this project on the bench because as you can see in the in-box review, it should be a simple build.
I started with the upper fuselage half. I dropped some ballast into the cavity molded inside the radome for that purpose, then dropped cyano into the cavity to keep the ballast in place. I selected the lower fuselage half I intended to use as well as the FLIR turret. After assembling the FLIR turret and installing the wings onto the lower fuselage, I glued the fuselage halves together. You're supposed to assemble and install the propeller prior to putting the fuselage halves together, but I wanted the prop glued in place.
Next came the landing gear, and this is where I discovered the kit's biggest challenge. Where there should have been three struts and perhaps separately molded wheels, each strut was four parts apiece. In this scale and with the size of these parts, this is a bit of a challenge. First the main gear...
Each main gear strut is four pieces: strut, retraction mechanism, brake reservoir, and brake shield. I used liquid cement to bond each strut to its corresponding retraction mechanism as these two parts must be solid as the retraction mechanism serves as the strut mount to the fuselage. I clamped and set the struts aside to dry.
The nose gear stut at least mounts directly to the fuselage, but for some odd reason, the nose wheel forks and molded as separate halves which attach to the strut. I lost one of these fork halves in the carpet and never saw it again. Luckily I had a Scale Aircraft Conversion set for another project that had a tailwheel fork that was nearly perfect. I cut the white metal fork from its strut and cyanoed it onto the Predator nose gear strut. The fourth part of this subassembly is the nosewheel steering servo module.
All three struts dried nice and solid, so these were glued to the fuselage with liquid cement and set aside to dry. I checked a few times as the glue hardened to ensure the landing gear was properly aligned. The result is a sturdy set of gear that hasn't collapsed with all of the subsequent handling. I installed the wheels and moved on to the tail.
The ventral fin was next and it dropped right into place. The anhedral stabilators attach with a tiny styrene pin that doesn't provide a very solid join. I used liquid cement (again) to get the tail feathers all in place and looked at a few photos of the Predator online to set the proper angle of the anhedral as the instructions don't provide that information.
Construction wraps up with the various antennas, air scoops, weapons pylons and other tiny details around the airframe. Some of these parts are way too small to even bother with. I waited to install the Hellfire missiles until after painting.
I used Tamiya Sky Grey as the base coat for this build as it is a close match for the FS 36373 color called out in the instructions. When this base coat had dried, I painted the Hellfires and the landing gear Tamiya NATO Black.
The model was given an overall gloss coat using Alclad Klear and set aside to dry (which didn't take long).
I chose the markings for a Weapons School Predator out of Nellis AFB. The decals settled nicely and were assisted with Gunze Mr. Mark Setter. Another coat of Klear was applied over the details to blend them into the surface of the model.
I am pleased with the results and aside from the landing gear, the model goes together rather quickly. Patience is the key here as many of these parts are very small and will require a steady hand and magnified vision to install.
Recommended for experienced modelers.


