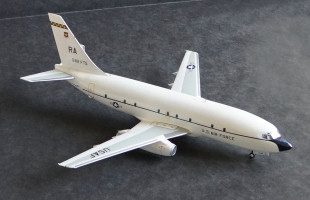
BPK Models 1/72 T-43A Build Review
By Fotios Rouch
| Date of Review | July 2015 | Manufacturer | BPK Models |
|---|---|---|---|
| Subject | T-43A | Scale | 1/72 |
| Kit Number | 7201 | Primary Media | Styrene, Photo-Etch, Resin |
| Pros | First new-tool 737 in this scale in decades | Cons | Nothing noted |
| Skill Level | Experienced | MSRP (USD) | $107.00 |
Background
This is the first injection molded kit of the 737-200/T-43 in 1/72nd scale (although there is a very credible vacuform kit of it from Welsh Models). BPK released first some airline versions of the Boeing 737 and then they released the T-43A USAF trainer model version. A kit first-look was posted here
a few years ago. The T-43A kit is completely identical to the airliner versions. Unfortunately this also means that we get the same clear inserts for the fuselage cabin windows from the airliner. This means that they will have to be deleted by sanding them down and keeping only the few relevant windows applicable to the USAF trainer.
The rest of the kit is the same as an airliner with the exception maybe of an extra antenna or two. Before I built the kit I purchased the excellent resin update/correction set from 72airliners in Germany. The set provides corrected stabilizers and tail, very nice intakes, very nice single piece exhausts with incorporated thrust reversers and exhaust tubes and a corrected radome. All the parts are perfectly cast. The radome is indeed corrected with a flatter profile on top , where the anti glare area is. The only problem is that the clear front fuselage plug will not match the contour of the resin replacement radome as it was designed for the more rounded nose piece.
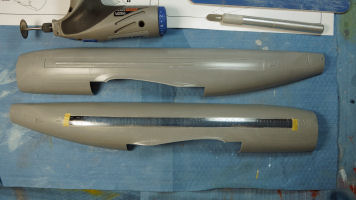
Work started by washing all the parts with detergent to remove the mold release agents. From the start of the project, the cabin window clear strips looked like they would be the greatest challenge. I used the Dremel tool to cut out the plastic and then sanding sticks to refine the area. As I expected, the clear plastic did not sit in the cut out area really flush and left gaps and peaks and valleys. I tried to correct this by inserting very fine and medium pieces of Evergreen styrene in order to provide some fine adjustments. The clear parts were glued with liberal applications of liquid glue and were taped down to ensure that the clear strips would be solidly secured as I knew that they would be abused in my efforts to get a mirror smooth integration.
While the clear parts were drying, I started building the cockpit. Enough detail is provided and I will be very happy if any of it is visible once the model is done and the clear parts are painted. The fit of the cockpit inside the clear forward fuselage plug is poor so you will need to file down the rear bulkhead and sidewalls so they fit completely inside the front plug. This will clear the way for the fit of the front plug to the main fuselage but also the front wheel well. More on that later.
Once the clear cabin window strips were secured in place I started lightly sanding them down to see how well they were matching the fuselage contours. It was obvious that putty would be required. I masked and protected the sensitive areas and applied 3M putty. I needed to putty over the clear cabin window seams but also cover up the scribed cargo hatch on the front but also one front and one rear boarding doors. The T-43 did not need all these entry/exit doors.
While the putty was drying, I spent time building the front and rear wheel wells. They are nicely done but the parts need lots of cleanup. The end result is pleasing but again, little will be really visible.
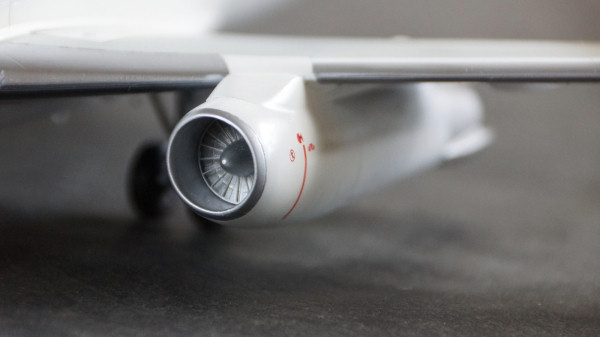
Next job was to cut up the plastic nacelles so they could accept the very nice German resin replacement parts. I used my trusty Tri-tools to make the cuts and everything fit really nice. The BPK kit provides very nice detail in plastic and photo-etch parts for the intakes. I like the inclusion of the photo-etched stator blades.
Next came the sanding down of the putty on the fuselage parts. It all looked good but I always know that application of Mr Primer always reveals flaws and it surely did. I applied more 3M putty to the areas that showed gaps and surface undulations.
I then cut out the scribed plastic around the front landing gear wheel well.
The instructions have you insert the front wheel well after the fuselage assembly is completed. After test fitting things, I am sure I will not wait until then as the front landing gear well will never fit the fuselage after assembly. It is tapered and it is meant to fit earlier, like when the front plug will meet the fuselage assembly.
Next, the wings were put together. No issues here. All fit was good. Just the same, I used a lot of clamps to make sure that there were gaps anywhere.
Work continued with the jet pods. My first approach was to cut out the plastic from each half prior to fitting the resin intake and exhaust. I found this approach difficult because there were too many parts to keep together and alignment was tougher. Taping things together gave me the first clue that the resin parts are a bit too large in diameter leaving behind a step that I would need to fill. The next pod was approached differently. I fist glued the two plastic halves together and then I cut off the intake and exhaust. This approach was better but the resin replacement parts are still a bit wider and the step left behind was not a product of my assembly approach. Lots of 3M putty was necessary to feather in and eliminate the step left from the oversize (or maybe undersize plastic) resin parts. The engine pods with the resin inserts were the most challenging part of the build. So much so that I wish I had left the engine pods alone.
I kept working the fuselage halves and kept finding little issues here and there. The clear side window inserts looked great as an idea when I first started the model but they are a huge headache in the end. They create little surface undulations that will really show under gloss paint.
One thing the modeler needs to pay attention to is a mistake in the instructions. Step 32 has the modeler finish the fuselage assembly and then insert the front wheel well. First of all the instructions fail to show that there is no opening in the plastic and that the modeler needs to cut one out both on the main fuselage parts and the clear front cockpit plug. Most importantly, the wheel well will not fit if you try to insert it in the cut out! The modeler needs to insert the wheel well prior to gluing the front clear fuselage part to the main fuselage.
Lots of trimming and adjusting will be necessary before actually gluing anything.
After the fuselage was together more 3M putty was used to eliminate the fuselage joint on top and bottom and between the clear cockpit plug and main fuselage.
The nose is an interesting story. The kit nose is a bit pointy and BPK includes a white resin replacement. The resin in my kit did not fit well. The German corrected resin looks nice with a better profile, better cross section and subdued strakes but it does not fit at all to the plastic. So in the end I was forced to use the plastic kit nose and I will work it to make it blunter on the nose tip.
Do not forget to add weight to balance the model, especially with the resin tail and resin elevators.
I attached the rear fuselage plug and the resin APU. Not a great fit.
Putty and sanding was required as there was a sizable step.
I used the German resin replacement tail which looks nicer than the kit tail but it does not fit very well to the fuselage because the tail bottom surface is perfectly flat and the top rear fuselage has a curvature on the top. I filled the gap with melted styrene strip and sanded it to shape.
The top of the fuselage seam left a gap that needed lots of putty. Same thing happened with the belly plug. I am expecting such things from a limited run kit but it does add a lot to the work required. 3M Red came to the rescue. After sanding everything down, I washed the model and applied primer to see what kind of progress I had made. It sure looks like more putty and primer will be required.
It was time for all the big sub-assemblies to get together and to see how the whole things looks. My main worry was the main wings and how I would dial in the correct dihedral. The wings clicked together and no dihedral adjustment were necessary. The fit on the top wing roots is OK but the bottom joints are not all that great. The tail wings went in OK. A little putty was necessary to blend in the resin tail. More primer was shot over the model and a final polish was completed together with light re-scribing of the panel lines.
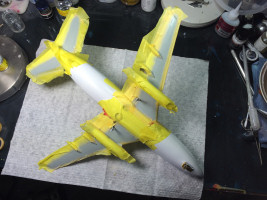
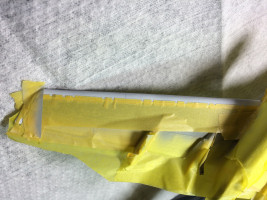
I first airbrushed the white paint in multiple light coats. White is tough color to get right. After a couple of days, I masked the white and sprayed the gray on the top and bottom of the wings. A couple of days later I masked prior to the NMF on the leading edges. This was a laborious act with all the intricate detail on the bottom of the wing. I used Alclad II Aluminum shade in multiple coats.
The reason I wait for days between painting the different gloss colors is because gloss paints take longer to dry well and it really is awful when you get permanent fingerprints or you move the paint!
All the masking was removed and the final result although pleasing, needs some corrections on some overspray here and there.
I decided not to use the black decal stripes provided in the kit and instead paint them in Insignia Blue, especially since the blue cheat line continues all the way to the front of the aircraft and wraps around the nose. Unfortunately I had only 35044 and not 15044. So after the paint dried I sprayed a coat of Future before removing the masking tape. The black anti glare and nose tip were painted black. The nose tip is semi gloss but the anti glare will be flat black in the end.
Once all the paint was dry I removed all the masking tape but saved it for later re-use. As uncle Murphy would have it I discovered some small areas that had blue over spray. I ignore it for now and will come back to it for later fixes. Another area that needs rework is wing root leading edge that will have to be repainted in a sharper fashion.
The next step was to mask the nacelles for the NMF intake and exhaust shades.
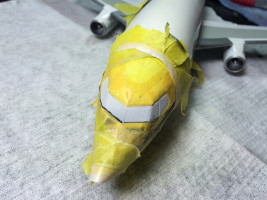
It was now time to mask the forward fuselage so I could spray on the silver windshield surrounding frame. I used Alclad II Aluminum and removed the mask almost immediately after I sprayed it and before the Alclad II could form a skin that would be prominent to peal. Still as the masking came off from the delicate frame some Alclad II was almost ready to lift together with the masking tape. With some care, the end result was pleasing.
Next I started working on the decals. The BPK included decals are quite thin and care needs to be taken not to damage them. They also like to fold under themselves. If they do, remove them gently and put them back in water and try to park them on top of their carrier decal paper again and go at it one more time. In the end and with the help of some Micro Set they snuggled down really well. They are on the thin side however and translucent. I realized it when I put the wing-walks over the wings. I could see the colors underneath peeking through. I had to remove them, paint the right shape in white and use the decal wing-walks included in the Draw Decal set that I bought for my Piedmont 737 which will also become a USAF bird. Draw Decals provides two wing-walk sets.
I think I like the BPK wing-walks shape-wise but I had to go with my only choice left.
Next I worked the wheels and landing gear. The rubber wheels and inserts work really well.
The main landing gear has issues. It will not fit as designed so some parts will have to be adjusted. Use photos for the proper angles for the landing gear doors. The instructions are very vague.
The model is practically done. I just need to add the photo-etch details and, lights and antennae.
And here it is...


