Avis 1/72 Bf 109C-1 Build Review
By Llarry Amrose
| Date of Review | March 2011 | Manufacturer | Avis |
|---|---|---|---|
| Subject | Bf 109C-1 | Scale | 1/72 |
| Kit Number | 72012 | Primary Media | Styrene |
| Pros | Unusual subject | Cons | Short-run kit, thick canopy |
| Skill Level | Intermediate | MSRP (USD) | $25.95 |
Background
The Bf 109 fighter was designed by Willi Messerschmitt and built by his company, Bayerische Flugzeug Werke (later renamed for Messerschmitt). It first flew in 1935 and beat out a competing Heinkel design to become the main fighter of the young and growing Luftwaffe.
The first mark to see service was the –B, and a number of them were sent to serve with the Legion Kondor in the Spanish Civil War. The –C model followed, with two additional guns in the wings and the more powerful fuel injected Jumo 210g engine. Problems with the engine resulted in only 58 being built before the carbureted Jumo 210d was reinstated in the –D model. Only 5 of these 58 were sent to Spain.
The 109 would see continuous improvements through to the end of the Second World War, being the most produced Nazi fighter, even after being surpassed in performance by the Focke-Wulf 190.
The Kit
In 1/72, most of the attention has been paid to the later variants, the –E and later. For years the only readily available early 109 was Heller’s kit, which would build into either a –B or –C. It was a very good kit for its day, but had raised panel lines and other characteristics of the age, and was in and out of production many times. Eventually, MPM produced a kit of the V-1 prototype and Sword followed with a –D. Both are typical short-run kits.
Now Avis, a newer Ukrainian maker (which undoubtedly has roots in other departed companies) has jumped in with a series of early 109s. The sprues are definitely what we call ‘short-run’, with soft plastic, good detail and uneven fit. It’s better quality than early MPM, though not yet up to the standard MPM has grown to. To me, this is a good sign for Avis, as they have learned the lessons of earlier manufacturers and hopefully will stick around long enough to develop.
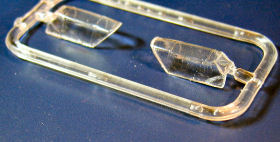
There are three sprues of pale grey plastic, plus a clear one with two canopies which appear to be identical. The clear parts are pretty thick and appeared cloudy, the weakest part of the kit, though in the end a dip in Future helped immensely. The decal sheet is by Decalograph, while I had not previously heard of them, they do nice work. The instructions consist of 8 pages made from 2 sheets folded in half, and the construction steps are nice and clear. The parts diagram clearly notes the parts that are not used, an upper and lower cowling, two seats, and the wing cannons (from the C-3 version).
Construction
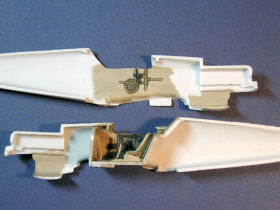
Like most aircraft, construction begins in the cockpit. There’s no photo-etched brass, but it doesn’t really need it. The instrument panel, floor and sidewall have nice detail, which responded nicely to washes and dry-brushing. The seat could use seatbelts, though I wasn’t sure if it would matter through the thick canopy. The directions correctly identify the interior as being in RLM 02, though describe it as “Slate Grey”, which are not the words I’d use for it.
As a short-run kit, there are no locating pins in the fuselage halves, so assembly is a matter of test-fit, test-fit, and test-fit some more. Even so, I generally find some spot that doesn’t quite go together as anticipated due to the parts shifting ever so slightly during test-fitting. For me that was the lower nose and radiator, yet I didn’t end up needing very much filler. I ended up with the outflow from the radiator (piece 7) closed, as the fit wasn’t conducive to placing it in the open position. When it came time to mount the canopy, the fit was rough. I tried to fair it in as best I could, but a vacuform replacement might not be a bad idea. After a dip in Future, the canopy was far clearer than I had expected, but it was still thick and inflexible.
I had to do some extra sanding to the inside of the upper cowl and the part of the fuselage it fits over. The joint is along the actual panel lines, so you want to get a fit tight enough that you don’t end up using extra filler and losing the proper seam. I also found that I needed to reverse the part numbers on the struts supporting the horizontal stabilizers (parts 9 and 11). The wings went on with better fit and less filler than some mainstream kits, much less short-run ones.
Painting
There are two schemes. The first is from JG2, based in Norway in 1940. It is in RLM71 Dark Green and RLM02 Gray over RLM65 Hellblau with the demarcation high on the fuselage sides and no mottling.
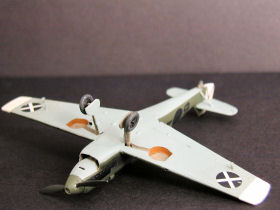
The second is 6o47, one of the five C-1s sent to Spain in 1938, and the one I built, though some corrections were in order. First, the instructions would have you mount the wooden Schwarz propeller as seen on early –Bs, while the –C always used the metal VDM “Hamilton Standard”-type prop which is noted for use with the other paint scheme. Secondly, pictures from Spain show that Legion Kondor 109s did not have the radio mast behind the cockpit or the antenna wires, so they should be omitted.
The colors used on Kondor Legion planes are a source of considerable debate. Conventional wisdom says that they were a light grey, usually quoted as RLM02 or RLM63, which is actually a bit darker. These instructions quote RLM71 Dark Green, which is almost certainly wrong. The earliest planes were delivered in the standard 70/71 splinter, but quickly repainted. Ken Merrick argues for RLM62 Green and Eric Mombeek’s JagdWaffe book follows along, while Lynn Ritger counters that argument with a call for RLM63. Both are colors that would have been available and both were used in some of the other paint schemes of the time. I find Lynn’s arguments slightly more compelling, but decided to try the RLM62 anyway for the sake of novelty. The underside is the standard RLM65 Hellblau, without controversy.
The landing gear was the last tricky bit. The 109 has a characteristic way of sitting that is not always easy to capture. Some kits have used square pins on the struts for a positive fit and alignment. Avis did, but it didn't work out as well as might be hoped. First, one of the sprue attachments is on the pin, so the square peg ends up being what you trim and sand rather than what the designer intended. Then the square holes in the wheel well are too shallow, and since I don't have a square drill bit, I had to make do and sand the pegs on the struts a little further.
The decals were fairly matte and handled well, snuggling down with minimal use of a setting solution. Photos from the time period, including the two in the JagdWaffe book, which are described as being the only two known pictures of the five C-1s in Spain, show the planes to be in generally good shape and well maintained, at least at first, so all I added for weathering was some exhaust staining, as shown in the photos.
Conclusions
It’s definitely a short-run kit, so it won’t be as easy a build as the old Heller kit. Take your time and it will build up just as nicely, and with a more modern level and style of detail. If you have experience with these kinds of kits, there should be no hesitation in picking one up. With no resin or photoetch, this might be a good first short-run kit to try.
My sincere thanks to HobbyTerra.com for this review sample!
References:
- Modellers Datafile #9, The Messerschmitt Bf 109 part 1, Lynn Ritger, SAM Publications
- Luftwaffe Camouflage and Markings 1933-1945, Volume One, Ken Merrick, Classic Publications
- JagdWaffe Volume One Section 2 – The Spanish Civil War, Mombeek, Smith and Creek, Classic Publications
- Messerschmitt Me 109 Volume 1, Elbied and Jouineau, Histoire & Collections


