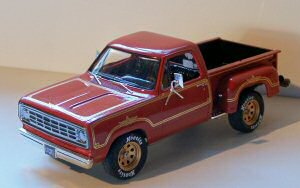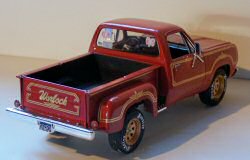
AMT 1/25 Dodge Warlock Build Review
By Phil Cooley, Front Range Auto Modelers (FRAM)
| Date of Review | December 2006 | Manufacturer | AMT/ERTL |
|---|---|---|---|
| Subject | Dodge Warlock (sold as Lil Red Express Truck) | Scale | 1/25 |
| Kit Number | 38248 | Primary Media | Styrene |
| Pros | Fairly easy to assemble | Cons | Had to use aftermarket grille and decals |
| Skill Level | Basic | MSRP (USD) | $11.00 |
The 1:1
As the 1970's progressed, the U.S. Government was choking the performance out of the American Automakers and Dodge was no exception. In order to change this perception, Dodge decided to spice up life a bit by putting something interesting out for public consumption with their Adult Toy Program. Beginning in 1976, Dodge put out the Warlock. They offered four color choices, Black, Red, Orange, or Green. Black was the most common choice. The Warlock had gold pinstripe scrolling that outlined the wheel wells and body lines, along with the inside of the doors, the dash and around the instrument cluster.
Most engine choices were available, from the Leaning Tower of Power (225 cid Slant Six), the 318 cid 2bbl or 4 bbl, the 360 cid 4 bbl, and the 400 cid (the replacement for the aging 383 cid). There has been much discussion and cussing about whether or not the 440 cid fire breather was an option. It was available in a 220hp version. Most likely a 2bbl and detuned from the factory. You could have the A833 four speed manual or the A727 automatic transmission. Also, you had the choice of two or four wheel drive.
The Dodge Warlock was produced from 1976 to 1979, even though the 1979 said Warlock II on the tailgate. The Warlock was not nearly as popular as the Lil Red Express Truck (which was produced in 78 and 79) and has been relegated to an almost mythical status. It was one of the most misunderstood vehicles to come along in quite some time. (Adapted from the Dodge Warlock history here.)
My 1:25 scale Warlock is a fairly faithful copy of a friend’s truck. Ken bought his Warlock new in ’76 and is the original owner. Sometime along the way, he pulled the original V-8 and installed a Hemi from a 53 Imperial. He has had the truck ‘smogged’ and says the Hemi passed with flying colors while giving better performance and economy than the original! He also has had his truck repainted. He went with a red from the Viper color pallet and had the gold pin striping painted on (less the Warlock figure on the hood).
The Kit
Engine: The engine in the kit is a Chrysler small block engine with a 4 bbl carburetor. My engine is a parts box early Hemi with valve covers I got from a friend in a swap (thanks Jeff)! I had to modify the oil pan to provide clearance for the kit’s metal axle. I did use the front cover, fan belt and fan from the kit. I drilled out the distributor and wired the engine, plus added heater lines and a custom radiator hose made from a piece of insulated wire. I used the stock manifolds from the Hemi and modified the kit’s exhaust pipe/muffler assemblies to resemble the ones on the 1:1.
Interior: The interior is a tub type, so the side details are very light. I cut the side panels loose so I could better detail paint them. I also detailed the dash by painting the needles on the gauges and then painting the gauge faces, themselves. Most of the interior is black, with some red accents – the same color as the exterior.
Chassis: The chassis is molded in one piece and includes separate front and rear suspensions. The front suspension is not very detailed while the rear suspension includes separate leaf springs and shock absorbers. I gave the chassis an authentic look by painting it grey and then fogging the edges with red to simulate overspray. I did have to modify the driveshaft as the Hemi engine and transmission was a slightly different length (than the kit engine/transmission).
Wheels/tires: The wheels and tires in the kit are fine, but Ken’s truck has wagon wheels, so I had to go scrounging again. The closest approximation I could find were the wheels from an unidentified Jeep CJ. However, the tires from the CJ were wholly inappropriate, as they were “mudder type” tires. I searched and searched but could not find another tire that fit the wagon wheels. So, I ended up sanding off the CJ’s tire’s sidewall details to approximate a street tire. With thanks again to Jeff, I had access to a set of Hoosier tire rub-ons. I first painted the tire sidewalls with Testor’s liquid Glosscoat, applied the tire lettering, then repainted the sidewalls with Testor’s liquid Dullcoat. One other modification I made was to the kit’s tire backs – these were too small for the CJ’s tires. I increased their size by gluing small strips of plastic to the edge of the tire backs until they were large enough to fit the tires.
Body: The body appears to be well molded, though it doesn’t include all of the 1:1’s insignias. Also, the Lil Red Express is a ’78 and has a different grill than Ken’s truck, so I had to use a resin grill. The one I bought was done by Matt Conte of Lookout Design. I painted it with Testor’s gloss black, followed by two coats of Alclad chrome. It was the first time I had used Alclad and I am pleased with the result. This resin grill was slightly less wide than the kit grille, so once it was installed, I had to sand the sides of the hood slightly to get it to fit.
Paint: As stated earlier, Ken’s truck is painted a Viper color. I didn’t know exactly what it was, so I made an approximation. I used a stock Duplicolor truck paint, as it was available in a large spray can. It went on nicely – the only polishing I did was the roof, hood and rear fenders. I sprayed it over Duplicoolr grey primer.
Decals: The kit includes a set of decals for the Lil Red Express; they appear to be fairly accurate. However, I needed Warlock decals -- after a little searching, I found Billy Gooch decals and bought a set. They are reproductions of the original MPC Dodge Warlock decal sheet and do a good job of depicting the 1:1’s graphics, though some, like the Warlock name, are a little oversize. I tried to apply the hood and front fender decals in one piece -- this proved to be very difficult, if not impossible. Every one of the large decals came apart when I applied them. Fortunately the breaks were clean and the decal seams were easily hidden. If I was going to do it again, I would spray them with clear decal film before applying. I did use some Microset where the decals curved around the rear fenders and to nestle them down in the cracks around the doors. I also made a few decals of my own – the license plates and the decals in the rear window.
Summary
I enjoyed building this kit and tried to make it as accurate as I could, within reason (for instance, Ken’s Warlock was the optional oak side racks and the model doesn’t). I plan to give it to my friend as a gift.
Ed Note: Phil is a member of Front Range Auto Modelers.


