Amodel 1/72 Petlyakov Pe-8 Strategic Bomber Build Review
By Michael Neradkov
| Date of Review | December 2008 | Manufacturer | Amodel |
|---|---|---|---|
| Subject | Petlyakov Pe-8 Strategic Bomber | Scale | 1/72 |
| Kit Number | 72142 | Primary Media | Styrene, fiberglass |
| Pros | Nice detailing | Cons | Many gaps to fill |
| Skill Level | Intermediate | MSRP (USD) | $119.95 |
The Project
The big planes have a kind a mystical charm – just imagine how these giants could rise up to the air and not need to say anything more.
Some time ago, Amodel released a short-run kit of the ‘Russian Lancaster,’ the Pe-8 strategic bomber in 1/72 scale. It is a very interested kit that could not lose its attraction even when the new Zvevda kit was released. The Amodel kit has very lovely overlapped panel lines which should give very nice and realistic results, but will be much harder to assemble than the Zvezda kit.
The plastic of kit is rather soft and could be nice machined – sanded and scribed, but some imperfections could be found. Note the thick edges of wings and control surfaces - these should be sanded for a more ‘cutting’ look.
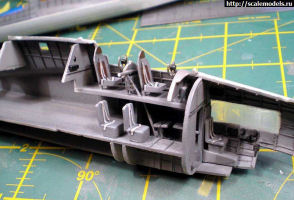
Unfortunately the kit has no decal for pilot’s instrument panels – I created these with white circles on black panel scribed by a needle. Except this and the pilot’s sea belts (made from foil) the cockpit was simply assembled out of box and painted with XF-53 Tamiya acrylic, which is an approximate equivalent of A-14 VVS interior color but has a little unwanted bluish shadow.
Based on this build, I offer some tricks about fuselage assembling.
In the assembly instructions, they have you assemble the fuselage halves and then the nose halves first, but a more preferred and comfortable way is a gluing nose and main fuselage halves for each side (left & right) together, install cockpit parts and glue halves together. Note that nice overlapped panel will need much more work to correct any damage by sanding after gluing, and so we must be very carefully and adjust details very exactly. Also cockpit parts do not fit fuselage – it is wider by about 1.5 mm – you’ll need to lower the size of it or follow my way – insert a plastic strip between fuselage halves.
While fuselage halved dry, start working on the wings. I added a metal gauze washed by black in radiators – it gave nice looking effect. The hardest part of the work is a fitting the engines to the wing – additional upholders are needed as well as sanding and rescribing.
By the way re-scribing an overlapped panel lines is a rather interesting process. I use a combination of needle, self-made scriber and a jewelry engraver for this. The rear of fuselage does not need any additional work except inserting metal pin for landing gear.
Note that main landing gear looks like a rather fragile structure at first look, but after fully assembling and gluing it is a very durable detail. When the wings were attached to fuselage, they needed some putty and plastic wedges to close the seams.
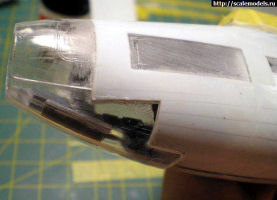
The canopy above the pilot’s shifted part of canopy of has a dome shape that should be sanded flat and polished to restore transparency.
The model was primed with Mr. Surfacer 1000, polished and painted with AKAN (local brand) and Mr. Color paints. For upper surface I used AMT-1/AMT-4/AMT-6 standard camouflage scheme for Pe-8 & Il-4 after middle 1943 , lower surface was painted in AMT-6 overall as standard for night bomber . AMT-1 and AMT-4 is a ready color by AKAN, but AMT-6 could be easily mixed by 50% black and 50% brown paint.
After some layers of Future were sprayed, the decals were applied and dried. This was followed by another coat of Future. Next, it was time to wash the model with artistic oil paints on white-spirit. Weathering of overall black surfaces is rather interesting task – I use mix of white, black and light-brown paints for getting very-light-brown washing mix. When applied, the coat of oil should be dry (but not fully), and I started to remove it gently by soft cloth from nose to tail (it is very important detail). This kind of motion should leave small irregular strips by the plane motion direction and finally a nice weathering effect. Final thin coat of Testors Dull Coat for semi-matt surface looking like real plane and small numbers of striped paint areas.
I could not say that this was a very easy kit, but I am more than satisfied by result.


