Accurate Miniatures 1/48 0251 SBD-1 Dauntless Build Review
By Joe McCaslin
| Date of Review | November 2017 | Manufacturer | Accurate Miniatures |
|---|---|---|---|
| Subject | SBD-1 Dauntless | Scale | 1/48 |
| Kit Number | 0251 | Primary Media | Styrene |
| Pros | Nice fit, easy build | Cons | See text |
| Skill Level | Experienced | MSRP (USD) | Out of Production |
Build Review
December of 1941, Marine squadron VMB-232 – had been divided. A portion of the squadron had been sent to the island of Wake to support the defenses there against a possible Japanese threat. The remaining aircraft in Hawaii consisted of SB2U Vindicators as well as SBD-1’s. Both aircraft were seriously outmatched and outdated at the time. New aircraft were being assigned but had not arrived yet. Before 8 a.m. of December the 7th, the Japanese attack began. Two hours later, no aircraft of the Marine unit were left in Hawaii. None were able to get airborne.
This kit, Marines at Pearl Harbor, from Accurate Miniatures allows the builder several options for aircraft of the squadrons at Ewa. Specific aircraft are specified in a color pamphlet that also gives some detail of the attack. There is also a set of nonspecific numbers that allow the builder to build on their own.
A bit of a description of this kit is in order. The sprue trees are crisp with little flash. Beautiful details are etched into the injected parts. Initial fit of the fuselage halves leaves me anxious to dig in. The detail provided looks very good.
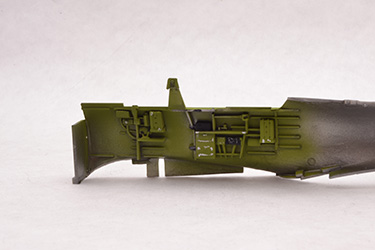
The build begins with the cockpit. The only issue that arises is the lack of detail on the instrument panel. For a kit such as this and the amount of detail out of box the instrument panel is a bit of a let-down. Very faint raised areas represent the dials. Not nearly what I had expected with this kit. The cockpit itself was very straight forward and went together very easily. Painting brought up a rather interesting bit of research. Navy aircraft went through rapid changes from the late 1930’s through 1945. The interior colours themselves changed several times. Depending on the period interiors were painted an Aluminium Dope, a shade of Interior Green, a mixture of the two, or even Zinc Chromate Green. The exterior and markings suffered through a similar rapid change. For this particular aircraft I wanted to show an aircraft from December 7, 1941 so I researched and requested help from some others. Of the many things that were shared the one that seemed logical and the one that I could find solid backing on was that in 1941 land based aircraft were painted in a Neutrality scheme, Neutral Grey all over. With this scheme there were two interior schemes used, the first was Aluminium in the forward cockpit and Interior Green aft the rear bulkhead. The second was Interior Green throughout. As the Neutral scheme changed late in December 1941 or early February 1942 I went with something logical, Interior Green throughout.
Once the cockpit forward was done I moved into the rear part, the gunner position. Again all construction proceeded easily. For those with this kit be aware that some of the finishing touches for the gunner position are not actually addressed until late in the instructions. I did not notice this and proceeded to attach, remove, and then reattach the canopy. In the end all was ok and I was able to attach the canopy with little trouble. Another issue to be aware of is that the supplied canopy masks are not all correct. Some just plain do not fit. I needed to use my standby, washable School Glue, to get all the clear masked and ready for paint.
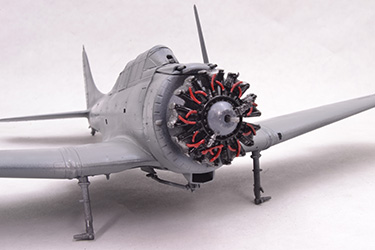
The work on the engine itself was another very easy assembly. I painted the parts prior to attaching them together and then attached the engine following painting the fuselage. Be aware the call outs for the paint colours for the engine are wrong, at least for the wiring. After research and consulting with one who has more knowledge that I of the subject I changed from the Red called for to Gunmetal as a base and then dry-brushed Copper to give it some life.
Just a brief word on the propeller, the instructions call for the builder to paint bands on the blades, from the tip, Red, Yellow, and then Blue. They do not offer anything to indicate the width of the bands nor do they offer a decal option. Be aware you will need to be careful when doing this step.
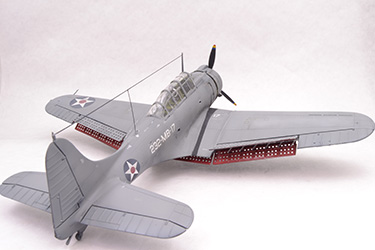
As indicated the scheme for this aircraft is a Neutrality Scheme used prior to hostilities in 1941. It was used for all Navy land based aircraft. Painting began with an overall base coat of Flat Black. Once dry Model Master Aluminium plate to break up the overall Black appearance. I then sprayed Neutral Grey in a very random pattern. This was to break up the panel lines a bit. To give it a more random paint difference in the final coat. The next step involved spraying Neutral Grey concentrating on the panels. A touch of Flat White was added to the Grey and then sprayed at different areas on the top side of the aircraft to simulate a bit of sun bleaching.
The next step in the process to try to bring this aircraft to life is to give it a bit of weathering. These aircraft although used were well maintained. Taking that into consideration weathering consisted of different Oils near the cowl. These were to represent oil, grime, smoke, and general stuff that would have been picked up by the paint and the panels during the course of the aircrafts use. The port side picked up a bit more weathering with the idea that the aircraft may have had a bit of an oil leak or something similar. This breaks up the uniformity of the weathering. Some chipping was added using silver paint and a very small brush. This was kept to a random pattern on random panels, generally where use or airflow would have caused chipping. Some minor staining was added to the wings to break up the all Grey of the large parts.
The final touches, wheels, landing gear, antenna wire, etc, were added to finish off the build. Once all was allowed to dry a final coat of Matte was applied to seal everything in.
This is a wonderful kit and a subject that is near and dear to me. The overall impression of this kit is positive. There are a few things that had me scratching my head a bit but on the overall this was a pleasant build. The details are crisp and clean. The fit is very good. I hope at some point to find this set again and build it as another of this squadron. As with each of my tribute builds the research taught me things and allowed me the opportunity to pay tribute to those that died, allowed me to pay homage to those that survived, and allows me the opportunity to show that they will never be forgotten.


