Airfix 1/72 Spitfire Mk.Vc Build Review
By Michael J. Gething
| Date of Review | February 2022 | Manufacturer | Airfix |
|---|---|---|---|
| Subject | Spitfire Mk.Vc | Scale | 1/72 |
| Kit Number | A55001 | Primary Media | Styrene |
| Pros | Good basic detail | Cons | Nothing obvious |
| Skill Level | Basic | MSRP (GBP) | £11.99 |
Build Review
Let me begin this review with a warning: Do not confuse this kit of the Spitfire Mk.Vc (A55001) with the Spitfire Mk.Vc (A02108) released late in 2020 and reviewed last year. They are two different mouldings but, presumably, derived from the same source data. This kit has been designed for the novice modeller, with less parts configured for a much simpler construction process. It is packaged as a Starter Set, complete with a small tube of cement, four small pots of acrylic paint and a paint brush. Opening the box and looking at the parts, it took me back to the early days of Airfix (early 1960s) but with current standards of accuracy and surface detail and simplified decal sheet for one aircraft only. It even includes a display stand (but in a totally different style to the stands of yore).
Under normal circumstances I might not have acquired this Mk.Vc kit (after all, I’ve built the 2020 new tool version) but, having been asked to conduct a talk and demonstration for my local Cub Scout pack on ‘How To Build A Plastic Kit’, I chose this kit for the subject. After all, you can never have too many Spitfire models!
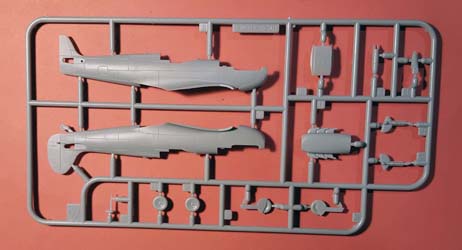
The accompany pictures show the breakdown of the parts which, as a Starter Set, do not feature the detail of the “adult” model. The cockpit, for example, while having interior detail engraved onto the inside of the fuselage, does not have the fuselage bulkheads, control column or instrument panel decal; just the pilot’s seat mounted on the lower wing interior (and a pilot figure). A neat trick is that the canopy is of a ‘snap fit’ configuration, thus preventing the problem, often encountered by younger modellers, of too much cement causing ‘fogging’ of the transparency.
The undercarriage can be fitted with wheels up or down, with appropriate parts for each option, with a sturdy fit into the fuselage for the wheels down option, a weak point for the earliest iterations of Spitfire from Airfix. The tailwheel is moulded integrally into the port fuselage half.
Another simplification is the integral mouldings of the cannon with the lower wing, while the exhaust stacks are integrally moulded on an upper nose panel part (thus reducing the joint line from the windscreen to propeller). The propeller assembly comprises spinner and blades as one moulding but it attaches to the back plate with the shaft that drops into the locating hole in the fuselage, being held in place by the aforementioned upper nose panel. A small word of warning here – do ensure the shaft (part C22) is pushed into the locating plug (C21) to leave sufficient space to allow for rotation of the propeller, once attached. I have always left this process until the model is painted, as it reduces the chance of accidents with the propeller blades. This procedure is now advised in the official instructions (although I’ve always applied the decals after painting as well).
The colour scheme is RAF European – dark green and ocean grey upper surfaces and medium sea grey on the underside. (I used my own Lifecolor acrylic paints, applied in the old-fashioned bay with a brush, rather than the little pots supplied.)
To my delight, the final design tweak to make life simpler for the tyro modeller is the attachment of the radio antenna behind the cockpit – this now comes with a small base that fits snugly into a recess on the fuselage top, so no more wonky antennas!
New to the kit is the re-introduction of a display stand, in the form of a ‘shadow’ plan of the Spitfire as the base, with the vertical element fitting into a recess located where the belly centre light would normally be located.
The decal sheet, providing the markings for the Spitfire Mk Vc of 303 (Polish) Sqn RAF, based at Northolt, West London in 1942, as flown by Plt Off Antoni Glowacki, is up to current standards. It also includes the rear-fuselage sky band which, while eliminating the need for masking at the painting stage, does require careful application to line up on the underside. However, it misses out the myriad of stencilling and warning notices that appear on current generation decal sheets.
Altogether an excellent starter kit for a youngster and (according to feedback from the Group Scout Leader) was very well received by the Cubs.
As a postscript, I’ll note some small additions I added myself. I drilled out the oil filler cap recess on the upper forward fuselage ahead of the cockpit. At the painting stage, I added the yellow leading-edge strip outboard of the cannon, and the red machine gun aperture covers; while on the wings, I applied the wing walkway markings with a black 0.05 liner pen. The final tweak was suggested by The Young Master. As I was going to mount the model on its stand in airborne mode, he suggested I use an acetate depiction of the spinning propeller; directing me to Tom’s Props. Once acquired and fitted, even The Domestic Authority was impressed … and that’s saying something!


